This revision contains only editorial changes and no technical updates.
25.06.01
Partner Getting Started
Revised the Partner Getting Started section.
25.03.01
This revision contains only editorial changes and no technical updates.
25.02.01
This revision contains only editorial changes and no technical updates.
25.01.01
This revision contains only editorial changes and no technical updates.
VISA Platform Connect: Specifications and Conditions for
Resellers/Partners
The following are specifications and conditions that apply to a Reseller/Partner enabling
its merchants through
Visa Acceptance platform
. Failure to meet any of the specifications and conditions below is
subject to the liability provisions and indemnification obligations under
Reseller/Partner’s contract with Visa/Cybersource.
Before boarding merchants for payment processing on a VPC acquirer’s connection,
Reseller/Partner and the VPC acquirer must have a contract or other legal agreement
that permits Reseller/Partner to enable its merchants to process payments with the
acquirer through the dedicated VPC connection and/or traditional connection with
such VPC acquirer.
Reseller/Partner is responsible for boarding and enabling its merchants in
accordance with the terms of the contract or other legal agreement with the relevant
VPC acquirer.
Reseller/Partner acknowledges and agrees that all considerations and fees associated
with chargebacks, interchange downgrades, settlement issues, funding delays, and
other processing related activities are strictly between Reseller and the relevant
VPC acquirer.
Reseller/Partner acknowledges and agrees that the relevant VPC acquirer is
responsible for payment processing issues, including but not limited to, transaction
declines by network/issuer, decline rates, and interchange qualification, as may be
agreed to or outlined in the contract or other legal agreement between
Reseller/Partner and such VPC acquirer.
DISCLAIMER: NEITHER VISA NOR CYBERSOURCE WILL BE RESPONSIBLE OR LIABLE FOR ANY ERRORS OR
OMISSIONS BY THE
Visa Platform Connect
ACQUIRER IN PROCESSING TRANSACTIONS. NEITHER VISA
NOR CYBERSOURCE WILL BE RESPONSIBLE OR LIABLE FOR RESELLER/PARTNER BOARDING MERCHANTS OR
ENABLING MERCHANT PROCESSING IN VIOLATION OF THE TERMS AND CONDITIONS IMPOSED BY THE
RELEVANT
Visa Platform Connect
ACQUIRER.
About the Integrated Solutions
offers integrated solutions to enhance payment acceptance,
fraud management, recurring billing, reconciliation, and reporting processes. Our
integrated solutions provide significant and vast use cases for product managers to
developers and business professionals. Reduce your operational costs through streamlined
payment integrations and improve customer satisfaction through flexible and secure
payment options. Our solutions can easily scale to your growing business needs, help
increase sales and conversion rates, and provide a clear value proposition to
distinguish your business from competitors.
, for you. These solutions offer potential use cases that improve
operational efficiency, enhance security, and provide comprehensive reporting and
invoicing. Reduce the risk of errors, protect against fraudulent transactions, and
ensure accurate financial records through streamlined reconciliation processes. Our
solutions are ideal for various industries including financial services, healthcare,
manufacturing, and distribution. For example, in healthcare, our solutions can manage
payment operations efficiently, ensuring secure and accurate processing of payments for
services rendered, and support timely invoicing actions.
platform to process payments using Magento checkout. The
Adobe Commerce
extension supports popular payment methods, safeguards
payment data, minimizes fraud, and mitigates risks. This section describes the payment
management capabilities offered by
Visa Acceptance Solutions
through the
Adobe Commerce
integration.
This guide also applies to installing this extension in a Magento Open Source
environment.
Fraud Management
Fraud Management prevents fraud losses and gives you the flexibility to control
business practices and policies in real time. Fraud Management can help you
accurately identify and review potentially risky transactions while minimizing the
rejection of valid orders. Fraud Management comprises these capabilities:
Real-time fraud screening performed only during authorization
Device fingerprinting
On-demand Conversion Detail Report for changes in order status
Account Takeover Protection
Account Takeover Protection defends customers and merchants from fraudulent use of
online accounts. It monitors suspicious account changes and helps identify high risk
users at account creation and login. These capabilities comprise Account Takeover
Protection:
Real-time event screening of account creation, login, and changes
Device fingerprinting
Payer Authentication
Payer Authentication enables you to add support to your web store for card
authentication services offered by Visa
, Mastercard,
and other card brands. These
programs verify the cardholder’s identity directly with the card-issuing bank in
real time to increase payment security and reduce the risk of fraud. However, Payer
Authentication is not a fraud management service, and
Visa Acceptance Solutions
recommends that you configure a comprehensive fraud management program
such as
Decision Manager
in addition to Payer Authentication services. These services
comprise Payer Authentication:
Verified by Visa
Mastercard Identity Check
American Express SafeKey
Discover ProtectBuy
JCB
Diners
Maestro International
To comply with the recent mandates for French local processors that support Payer
Authentication, CMCIC, Atos and BNP processors no longer support these
combinations.
PayPal
The
Adobe Commerce Cloud
integration includes the PayPal payment
method. Processing your PayPal transactions through
Visa Acceptance Solutions
enables you to consolidate all payment types under a single gateway account,
simplify integration efforts, screen PayPal transactions for fraud with Decision
Manager, and streamline reporting. These services comprise PayPal:
Sessions
Check Status
Order
Authorization
Authorization Reversal
Capture
Sale
Refund
PayPal Credit
Billing Agreements
PayPal Credit
PayPal Credit is a payment method that allows merchants to accept a PayPal
transaction when the customer chooses to finance their purchase through PayPal.
Electronic Check (
eCheck
Service)
The
eCheck
Service a form of digital payment that serves the same
function as a physical check. When a merchant accepts an electronic check payment,
the funds are pulled directly from the customer’s checking or savings account. These
are the
eCheck
s include both debit and credit services.
eCheck
Service process refunds with the credit payment
service.
Online Bank Transfers
Online banking services enable customers to pay for goods by sending money from their
bank account to the merchant.
The
Adobe Commerce Cloud
extension supports the following payment
methods and corresponding online bank transfer services:
Bancontact
Sale
Check Status
Refund
Country: Belgium
iDEAL
Options
Sale
Check Status
Refund
Country: Netherlands
Tax Calculation
The Tax Calculation service provides real-time tax calculation during order checkout
for orders placed worldwide with your business.
Delivery Address Verification
The Delivery Address Verification service verifies the entered address and suggests
the recommended address for city, state, and zip code combinations in real time.
If this feature is enabled in the
Adobe Commerce Cloud
console, the
Adobe Commerce Cloud
extension verifies the delivery address on
shipping information updated by the user.
Klarna
Klarna credit provides a seamless user experience for online customer financing to
merchants of all sizes, which helps in increasing customer choice, loyalty and
growth in sales.
Google Pay
Google Pay is a digital wallet that allows customers to pay with any payment method
saved to their Google account.
Release Notes
This section provides information about functionality, bug fixes, and enhancements for
the
Implemented Direct Connection API Payer Authentication.
Removed dependency on
sales_order_grid
table for Google Pay and Secure Acceptance.
Apple Pay order cancel fixes.
PayPal billing address line 2 issue fixes.
Removed parenthesis for http signature request-target in core
and
eCheck
module
.
Upgraded version for the lcobucci/jwt from 3.4.2 to 3.4.6.
May 2023
Adobe Commerce Cloud
Visa Acceptance Solutions
3.5.5 is compatible with
Adobe Commerce Cloud
: 2.4.6, 2.4.5 p2, 2.4.5p1, 2.4.4 and PHP
8.2, 8.1
PHP support added for v 8.2.
Compatibility with
Adobe Commerce Cloud
v2.4.6 – Changed few components of zend framework to laminas as per the latest
Adobe Commerce Cloud
changes.
Fixed bugs related to supported card types and sandbox/production
issue in Apple Pay.
Fixed jQuery deprecated functions.
February 2023
Adobe Commerce Cloud
Visa Acceptance Solutions
3.5.4 is compatible with
Adobe Commerce Cloud
: 2.4.5 p2, 2.4.5 p1, 2.4.x, 2.3.x
New implementation for
eCheck
cron –
EventStatus
.
Fixed bug related to Strong Customer Authentication.
Removed required validation from reCAPTCHA fields.
Updated Klarna library from credit to payments.
Added
PaymentFlowMode
as inline and
PaymentMethodName
as
pay_now
in Klarna app session request.
Updated WSDL version to latest V1.206.
Add new payment reject status as
AUTHORIZED_RISK_DECLINED
for Decision Manager
reject.
Updating the
Adobe Commerce
You need a
Visa Acceptance Solutions
Business Center
account to update
Adobe Commerce
.
If you do not have an account, go to the website to create an account. Follow the
email instructions that you received to activate your merchant account, and then log
in to the
Business Center
to complete the registration process.
Follow these steps to update the
Visa Acceptance Solutions
bundle to the latest
version:
In your directory, navigate to
Adobe Commerce
root directory
/
composer.json
file
.
In the
composer.json
file, under
require field
,
change the version to the plugin with the latest version.
After you change the version in require field of
composer.json
, run the
composer update command.
Configuring the
Adobe Commerce
Customer payments can be managed through the
Adobe Commerce
or
the
Visa Acceptance Solutions
Business Center
. This section describes the settings you must
configure in the
Business Center
as well as some general use cases that are
typical in the day-to-day management of your
Adobe Commerce
store.
Contact
Visa Acceptance Solutions
for information about product availability and enablement.
You must complete all of the configuration tasks in order to use the features offered in
the
Adobe Commerce
Visa Acceptance Solutions
integration.
Configuring Security Credentials
The module uses connection methods to access services that require their own security
credentials for authentication.
You must create and configure the SOAP toolkit key and REST API key for the
Adobe Commerce
to function properly.
If you do not have a
Business Center
account, go to the website to create an account. Follow the email instructions that you received to
activate your merchant account, and then log in to the
Business Center
to
complete the registration process. Be sure to store your merchant key ID for later
use.
Creating a SOAP Toolkit Key
The
Adobe Commerce
integration uses the SOAP Toolkit API to
access several services.
Generate the SOAP toolkit key from your
Business Center
account. For information on how
to create a SOAP toolkit key, see Creating a SOAP Toolkit Key . Be sure to
store your SOAP toolkit key for later use.
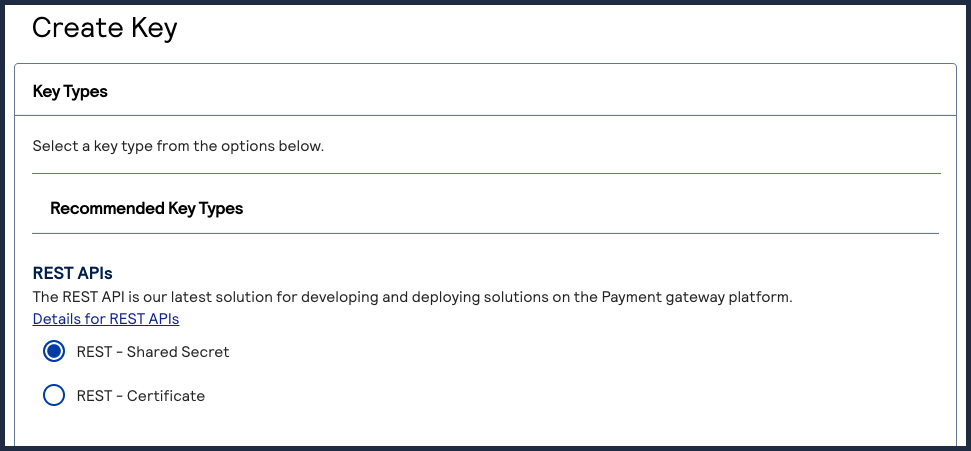
Creating a REST API Key
The
Adobe Commerce
integration requires REST API key
creation to use some services like Flex Microform and the Fraud Management
report.
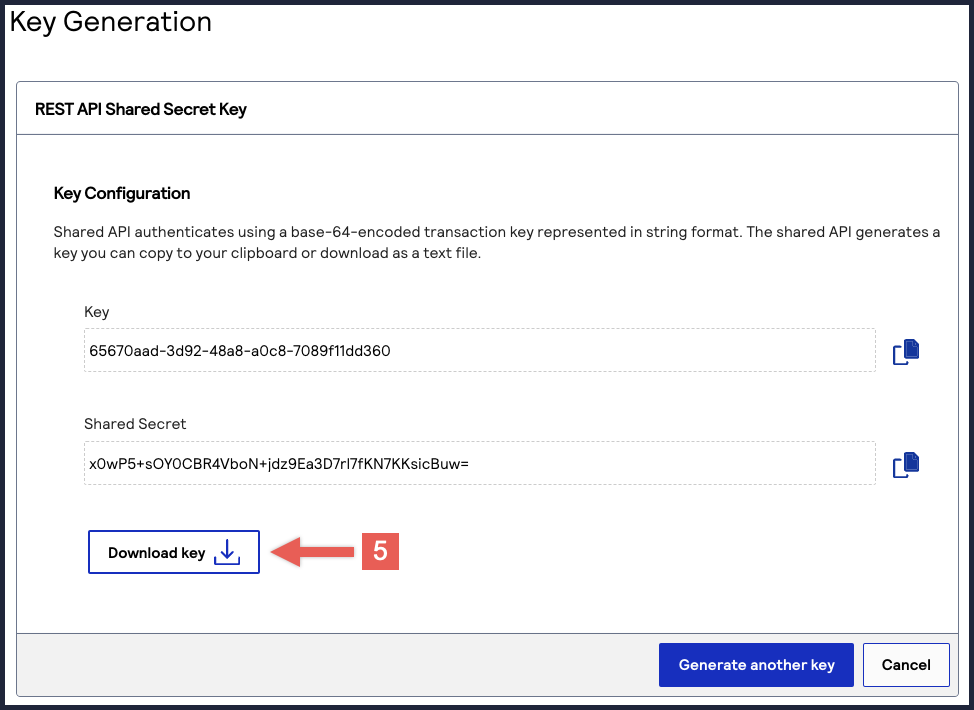
From your
Business Center
account, you also need your merchant key ID
and shared secret key to enable the integration with
Adobe Commerce
. For information on how to generate a shared secret
key, see . Be sure
to store your key ID and shared secret key for later use.
Configuring Additional Backend Settings
Some services supported on
Adobe Commerce
require additional backend
setup on your
Business Center
account. Contact your
Visa Acceptance Solutions
account representative
to enable any of these services:
Payment Tokenization: required by the module for credit card processing
Decision Manager
Payer Authentication
PayPal Express Checkout
eCheck
Service
Online Bank Transfers
Tax Calculation
Klarna
Click to Pay
: Enabled in the
Business Center
Apple Pay: Enabled in the
Business Center
Configuring Backend Settings
Follow these steps to access the configuration settings in the administration section
of your
Adobe Commerce
console:
Go to the
Adobe Commerce
administration console.
On the left navigation, click
Stores
.
Under Settings, click
Configuration
.
On the Configuration page, click
Sales
to expand the menu.
Click
Payment Methods
.
Choose
OTHER PAYMENT METHODS >
Visa Acceptance Solutions
.
ADDITIONAL INFORMATION
Complete all of the required fields in the sections and subsections of the settings to
configure the
Visa Acceptance Solutions
payment module and other payment methods. Expand
each section to complete the fields.
Configuring General Settings
The settings under the General section apply to all payment methods. Follow these steps to complete this section:
From the
Visa Acceptance Solutions
setting, click the arrow to expand the General
section.
From the
Debug Mode
drop-down list,
choose
Yes
to troubleshoot using the
Adobe Commerce
logs (
cybs.log
). Diagnostic information
is stored in log files on the
Adobe Commerce
web server.
From the
Sort Order
drop-down list, change the default
module sort order.
In the
Show Exact Rejection or Error Message to Users
option set to:
No
to display general error messages according to
Adobe Commerce Cloud
in all rejection and error cases.
Yes
to display general error message according to the
responses from
Visa Acceptance Solutions
in all rejection and error
cases.
In the
Override Payment Error Route Path
field, enter
the error page route path. When you leave the default
Use system
value
box checked, the checkout or cart route is used if no path
is
entered.
Configuring WebService
The WebService configuration includes the default
Adobe Commerce
merchant ID (applies to all the payment methods), the REST shared key, and the
SOAP key detail. Follow these steps to complete the configuration:
Click
WebService Configuration
to expand the
section.
In the
Merchant ID
field, enter your
Visa Acceptance Solutions
merchant ID.
From the
Test Mode
drop-down list, choose:
Yes
when you are using the
Business Center
testing environment.
No
when you are using the production
Business Center
. Optionally, in the
Developer ID
field, you can enter the developer ID. The ID cannot be longer than eight
characters. You can also request
Visa Acceptance Solutions
to assign you
a developer ID.
In the
SOAP Key Detail
field, enter the key you
generated from the SOAP toolkit API. If you did not generate a key, see Creating a SOAP Toolkit Key for
instructions.
Proper configuration of the SOAP WebService is required for the functioning
of other services including
Tax
Calculation, Secure Acceptance, PayPal, Account Takeover Protection,
and
Apple Pay. If you experience issues with these modules, ensure
that the SOAP WebService options are configured correctly. The SOAP API Key
Detail must have the correct value and the Test Mode option should match the
correct environment for the
Visa Acceptance Solutions
Business Center
(test).
In the
REST API Shared Secret Key
field, enter the
Shared Secret key you generated from the
Proper configuration of the REST Web Service is required for other services
including Flex Microform,
Decision Manager
,
and the Account
Updater. If you experience issues with these modules, ensure that the REST
Web Service options are configured properly. The API Key Detail and API
Shared Secret Key should have the correct value, and the Test Mode option
should match the environment for the
Visa Acceptance Solutions
Business Center
.
Configuring Device Fingerprinting
Device Fingerprinting is used with
Decision Manager
for all relevant payment
methods. If you are not using
Decision Manager
, you must disable this
module. Follow these steps to configure device fingerprinting:
Click
Device Fingerprint
to expand the section.
In the
Active
field, choose
Yes
to activate it or
No
to deactivate it if you are not
using
Decision Manager
.
In the
Org ID
field, enter the value provided to you. To
obtain this value either for test or production, contact your
Visa Acceptance Solutions
representative.
Configuring the Delivery Address Verification Service
The Delivery Address Verification Service acts as an additional layer of address
verification and normalization on the shipping page. Follow these steps to configure
this section:
Click
Delivery Address Verification Service
to expand the
section.
From the
Address verification
drop-down list, choose
Yes
to enable this service or
No
to disable this service.
From the
Address Force Normalization
drop-down list, choose
Yes
to require the use of suggested address alternatives
or
No
to make suggested address alternatives optional.
Configuring Credit Card Payments
Follow these steps to configure
Visa Acceptance Solutions
credit card
payments:
From the
Enabled
drop-down list, choose
Yes
to activate or
No
to
deactivate the credit card payment method.
In the
Title
field, enter the text you want to display
as the name for credit card payment method. This name will be used for Web
Mobile, Flex Microform, and Silent Order Post.
In the
Payment API
drop-down list, choose
Payment API
to have an authorization performed and
post card data to
Visa Acceptance Solutions
. Choose
SOAP Toolkit
API
to have the card information tokenized. The SOAP service
separately requests authorizations.
In the
Checkout Flow Type
drop-down list, choose a
desired checkout type.
ADDITIONAL INFORMATION
Visa Acceptance Solutions
recommends that you choose
Flex
Microform
. Flex Microform is a REST-based Microform
Integration to access new enhancements, easier configuration, and updated
technology.
You will use all of the benefits from the Hosted Checkout
and Checkout API.
The customer never leaves your checkout page and
is a potential SAQ A qualification. For more information about Microform
Integration, see Microform Integration.
In the
CSRF Token Expiration Time (Seconds)
field, enter
the expiration time in seconds. This is the lifetime of the SOP security token
used to prevent card testing attacks. For the default of 600 seconds, leave this
field blank.
Configuring Strong Customer Authentication
When payer authentication is enabled and a transaction is declined with reason code
478
(Strong Customer Authentication required), another request is sent
from the
Adobe Commerce
module for the same order. The customer must
complete a
3-D Secure
challenge.
To configure this setting, click
Strong Customer Authentication
to
expand the section. In the
Enforce Strong Customer Authentication when saving a
card
drop-down list, choose
Yes
to have the cardholder
complete a
3-D Secure
challenge while saving a card.
Configuring Credit Card Settings
Follow these steps to complete the Credit Card Settings section:
Click
Credit Card Settings
to expand the
section.
From the
Payment Action
drop-down list,
choose
Authorize Only
or
Authorize and Capture
.
Authorize Only reserves funds during checkout and captures
when making an invoice. The Authorize and Capture payment
action authorizes and captures funds during the customer
checkout.
From the
Auth Indicator
drop-down list,
choose the purpose of the authorization.
From the
New Order Status
field
drop-down list, choose the order status assigned to the
order when successfully paid, or leave the default
Use system value
box checked
for
Processing
order status.
From the
Ignore AVS
drop-down list,
choose
Yes
to have the results of AVS
verification ignored.
In the
Ignore CVN
field, choose
Yes
to have the results of
CVN verification ignored.
In the
Skip Fraud Management for
Tokenization
field, choose
No
to
have
Skip Decision Manager
field set
to
false
for Secure Acceptance tokenization
requests and set to
true
otherwise.
In the
Skip Pre-Authorization Check for
Tokenization
field, choose to
No
to have the
skip preauthorization
field
set to
false
for Secure Acceptance
tokenization requests and set to
true
otherwise.
In the
Pass expiration date for tokenized card via
SOAP
field, specify the card expiration
date with SOAP Toolkit Authorization Calls for card
tokenization.
In the
Credit Card Types
box, choose
which card types you want to accept. This only applies to
Checkout API and
Flex Microform
configuration.
This option is not used for Hosted
Checkout.
In the
Payment from Applicable Countries
field, leave the default
Use system
value
box checked to accept credit card
payments from the countries choose, or clear the
Use system value
box to
specify countries in the next field.
To specify the countries from which to accept credit card
payments, in
Payment from Specific
Countries
box choose the
countries.
From the
Override secure acceptance
locale
drop-down list, leave the default
Use system value
box checked
to use the store locale language.
Configuring Payer Authentication
The Payer Authentication (
3-D Secure
) protocol reduces fraud and security to online
payments.
3-D Secure
adds frictionless authentication and improves the user
experience. You must have the SOAP Toolkit configured to use this service.
Follow these steps to configure the Payer Authentication section:
Click
Payer Authentication
to expand the section.
From the
Enabled
drop-down list, choose
Yes
to activate the Payer Authentication Module or
No
to deactivate it.
From the
Credit Card Types
field box, choose the card
types to be enabled for Payer Authentication.
Configuring Save Card for Later Service
Follow these steps to configure Save Card for Later Service settings:
Click
Save Card for Later Service
to expand the section.
From the
Enabled
drop-down list, choose
Yes
to enable the customer to save their credit card information
securely for later use.
In the
Saved Card Section Title
field, enter the name of the
saved cards payment method.
From the
Save Card for Later for Admin orders
drop-down list,
choose
Yes
to enable storing card details for orders placed in the
admin area.
From the
Use CVV for Saved Credit Cards
drop-down list, choose
Yes
to enable the customer to enter the Card Security Code when
paying with a stored card.
From the
Use CVV for Saved Credit Cards in Admin
drop-down list,
choose
Yes
to allow the merchant to enter the customer’s Card
Security Code when the customer is paying with a stored card.
Click
Save Config
.
Configuring reCAPTCHA
The
Adobe Commerce
SOAP Toolkit API provides an option to use
reCAPTCHA. This feature is essential in protecting the merchant's store from brute force
attacks. Most of the time, the reCAPTCHA is invisible to normal users, but it will
provide a visible challenge when necessary. The module providing reCAPTCHA is an
optional package.
Installing reCAPTCHA
To install reCAPTCHA, run the
following command for composer installation:
composer require
Visa Acceptance Solutions
/module-recaptcha
Creating reCAPTCHA
Follow these steps to
generate Google reCAPTCHA Site Key and Secret Key:
Visit the Google reCAPTCHA website: .
Log in to the reCAPTCHA Admin Console.
Click the
Create
icon.
Fill in the required details.
After you submit the details, the reCAPTCHA site key and secret key are generated.
Use these keys to configure the module in Back Store.
Configuring reCAPTCHA in
Adobe Commerce
Go the
Adobe Commerce
console.
On the Payment Methods page, under the
Visa Acceptance Solutions
settings, click
reCaptcha
to expand the section.
From the
Enabled
drop-down list, choose
Yes
to activate, or
No
to
deactivate reCAPTCHA.
In the
Website API Key
field, enter your site key
obtained from reCAPTCHA Admin Console.
In the
Secret API Key
field, enter your secret key
obtained from reCAPTCHA Admin Console.
From the
reCAPTCHA type
drop-down list, choose the
reCAPTCHA type that you choose for your API keys.
In the
Badge position
field, choose the reCAPTCHA badge
position.
In the
reCAPTCHA language
field, choose a language code
for reCAPTCHA or leave the
Auto
option selected.
Click
Save Config
.
Clear the
Adobe Commerce
cache.
Configuring the
eCheck
Payment Module
The
Visa Acceptance Solutions
eCheck
module enables customers to make purchases using a routing
number and an account number. During checkout, an
eCheck
transaction
request is sent to
Visa Acceptance Solutions
. If successful, the transaction is sent
to the Automated Clearing House (ACH).
The
Adobe Commerce
queries
Visa Acceptance Solutions
periodically
to check on the status of each pending
eCheck
transaction. In
response,
Visa Acceptance Solutions
provides an updated transaction status, known as a
Payment Event Type
. Various outcomes can occur during ACH processing. For
each pending transaction included in the
Visa Acceptance Solutions
response, the
Adobe Commerce
determines whether a transaction remains
pending, settles, or is rejected.
You can configure these
eCheck
payment event types :
Pending Event Type: No change is made to the transaction or order status. The order
remains in Payment Pending state.
Reject Event Type: The order is cancelled.
Accept Event Type: An invoice is prepared for that order, and the order status
changes to processing.
Testing
eCheck
Payment Settings
You can test the
eCheck
Payment Event Types using two
Adobe Commerce
settings that simulate possible event types during
the processing of the requested report. While the status request goes to
Visa Acceptance Solutions
, the
Adobe Commerce
ignores the
returned Payment Event Type in the response and uses the Test Event Type
instead.
Follow these steps to test the
eCheck
Payment Event
Types:
Click
eCheck
to expand the
section.
From the
Enabled
drop-down list, choose
Yes
to enable the
eCheck
payment
method.
In the
Title
field, enter the text that is displayed to
customers as the name of this payment method.
Configure the payment statuses for these event types:
ADDITIONAL INFORMATION
In the
Accept Event Type
box, choose which
payment statuses to accept, which signify the receipt of funds and the
order status moved to processing.
In the
Pending Event Type
box, choose which
payment statuses to consider for pending.
In the
Reject Event Type
box, choose which
payment statuses to reject which were initially accepted during
checkout, but rejected after processed by ACH.
Configure how to accept the
eCheck
payment method:
ADDITIONAL INFORMATION
To accept the default country configuration, in the
Payment
From Applicable Countries
field, leave the
Use system value
box checked.
To specify which other countries you will accept the
eCheck
payment method from, clear the
Use
system value
box and in the
Payment From
Specific Countries
box, choose the countries.
To require customers to enter a drivers license number, from the
Enabled Drivers License Number
drop-down list, choose
Yes
. For
TeleCheck
, contact a
representative to see if this field is required.
To require the customer to enter the check number, from the
Enabled
Check Number
drop-down list, choose
Yes
.
These processors have specified whether it is required or optional:
ADDITIONAL INFORMATION
Chase Paymentech Solutions
: Optional
Cybersource ACH Service
: Not used
RBS WorldPay Atlanta
: Optional on debits, and required on
credits
TeleCheck
: Strongly recommended on debit requests,
and optional on credits
To require an agreement at the checkout page, from the
Agreement
Required
drop-down list, choose
Yes
.
From the
SEC code
drop-down list, choose a code that
specifies the authorization method for the transaction.
In the
Sort Order
field, enter the number of entries to
be sorted on a page.
Click
Save Config
.
Configuring Fraud Management
You must configure the
Adobe Commerce
to work with Fraud Management
to use all of the features.
Follow these steps to configure Fraud Management in
Adobe Commerce
:
Click
Fraud Management
to expand the section.
From the
Enable Fraud Management CRON Job
drop-down list,
choose
Yes
.
In the
Fraud Management fail email sender
option, leave the
Use system value
box checked.
In the
Fraud Management fail email template
option, leave the
Use system value
box checked.
From the
Settle Fraud Management accepted order automatically
drop-down list, choose
Yes
.
Expand the
On-Demand Job
section to see the
Report
Date
field.
Enter a date to download an accepted or rejected transactions report, and click
Run
.
Click
Save Config
.
Fraud Management Orders
The
Decision Manager
rule setting and the response received for
authorizations and sales service determine whether the
Adobe Commerce Cloud
marks the orders as Pending Review.
On the
Decision Manager
Case Management page, when you change an order from
REVIEW
to
REJECT
or
ACCEPT
, the
Adobe Commerce Cloud
updates
payment transaction states periodically (by cron every two minutes) by contacting
Cybersource and querying for changes.
In the settings, find the
Adobe Commerce Cloud
Cron settings and
configure them to trigger an
Adobe Commerce Cloud
task. The task
looks for
Decision Manager
changes in the
Business Center
and
updates the
Adobe Commerce Cloud
Orders accordingly.
If the module detects a change in state, it updates the order status in the
Adobe Commerce Cloud
from Pending Review to one of these states:
Processing
Pending
Closed
If an order is Pending Review in
Decision Manager
, you
cannot prepare an invoice in the
Adobe Commerce Cloud
until
Decision Manager
accepts it.
Fraud Management Refunds
Decision Manager
must either accept or reject an order before issuing a
refund. If you reject an order in
Decision Manager
, an Authorization
Reversal for the order automatically occurs as part of the Cron process that queries
for updates in
Decision Manager
.
Configuring Custom Fields
Decision Manager
supports custom fields known as merchant-defined data
fields. You must configure the fields inside
Decision Manager
in the
Business Center
to use them. The Module for the
Adobe Commerce Cloud
sends 10 of these fields.
Follow these steps to add
custom fields provided by the
Adobe Commerce Cloud
:
Log in to the
Business Center
and go to
Decision Manager
> Shared Configuration > Custom Fields.
Choose
Merchant Custom Fields
.
To add a field, click
ADD CUSTOM FIELD
, enter a
name, and choose an
order element
. Use the list below
to map the correct names and elements for each field:
Logged-in customer:
Merchant_defined_data1
Account creation date:
Merchant_defined_data2
Purchase History Count:
Merchant_defined_data3
Last Order Date:
Merchant_defined_data4
Member account age:
Merchant_defined_data5
Repeat customer:
Merchant_defined_data6
Coupon Code Used:
Merchant_defined_data20
Discount Amount:
Merchant_defined_data21
Gift Message:
Merchant_defined_data22
Order Source:
Merchant_defined_data23
Shipping Method Code:
Merchant_defined_data31
Shipping Method Description:
Merchant_defined_data32
Click
Save
.
For detailed instructions on how to add custom fields, see the
Decision Manager
Guide. In the
Business Center
, go to
the left navigation panel, and choose
Decision
Manager > Documentation
> Guides
.
Configuring Apple Pay
To use Apple Pay, you must meet these prerequisites:
Have a valid Apple Developer Account.
All pages that incorporate Apple Pay must be served over HTTPS.
Follow these steps to configure Klarna payments.You can use the default merchant ID
or you can manually configure a new merchant ID:
Click
Klarna
to expand the section.
From the
Enable
drop-down list, choose
Yes
or
No
to activate or
deactivate Klarna.
From
Title
box, enter the text to display to customers
on the checkout page.
From the
Use Default Merchant ID
drop-down list, leave
Yes
selected to use the Merchant ID given in Web
Service Configuration under General Settings. Choose
No
to enter another merchant ID and transaction key in the next two fields.
If you choose not to use the default merchant ID, in the
Merchant
ID
field, enter a different merchant ID.
In the
Transaction Key
field, enter the transaction key
for the merchant ID you entered.
From the
New Order Status
drop-down list, choose the
order status assigned to the order successfully paid with
Visa Acceptance Solutions
.
Configure which countries you will accept Klarna from:
ADDITIONAL INFORMATION
To accept payment from the default countries, in the
Payment
From Applicable Countries
field, leave the
Use system value
box checked.
To specify other countries, clear the
Use system
value
box and in the
Payment From Specific
Countries
box, choose the countries from where you want
to accept Google Pay.
Configuring PayPal
Follow these steps to configure the PayPal Express Checkout, PayPal Credit, and
PayPal Billing Agreement:
Click
PayPal
to expand the section.
From the
Enable
drop-down list, choose
Yes
or
No
to activate or
deactivate PayPal.
In
Title
box, enter the text to display to customers on
the checkout page.
From the
New Order Status
drop-down list, choose the
order status assigned to the order successfully paid with Cybersource.
In the
Merchant ID
field, enter your
Adobe Commerce Cloud
merchant ID.
From the
PayPal Redirection Type
drop-down list, choose
Traditional Express Checkout
to redirect the customer
PayPal Payment Page, or choose
In-Context Express Checkout for a
PayPal
pop-up to appear for customers to complete payment.
From the
Payment Action
drop-down list, choose
Authorize Only
to check the account for validity, but
not charge until the order is approved and invoiced. Choose
Authorize
and Capture
to charge the PayPal account at the time the order
is submitted.
Configure which countries you will accept PayPal from:
ADDITIONAL INFORMATION
To accept payment from the default countries, in the
Payment
From Applicable Countries
field, leave the
Use system value
box checked.
To specify other countries, clear the
Use system
value
box and in the
Payment From Specific
Countries
box, choose the countries from where you want
to accept PayPa.
From the
Enable PayPal Credit
drop-down list, choose
Yes
to enable financing through PayPal Credit.
In the
PayPal Credit Title
box, enter the text customers
will see as the title of PayPal Credit payment option.
From the
Enable PayPal Billing Agreements
drop-down
list, choose
Yes
to allow registered customers to create
a billing agreement for faster purchases.
In the
Sort Order
box, enter a numeric value to place
this payment method amongst all the other
Adobe Commerce
payment methods.
Configuring Bank Transfers
Online banking services enable customers to pay for goods using direct online bank
transfers from their bank account to your
Adobe Commerce
merchant
account.
Click
Bank Transfer
to expand the section. In the
Store Name
field, enter the name you want customers to
see on their bank transfer invoices.
Configuring iDEAL
Follow these steps to configure an iDEAL payment:
Click
iDEAL
to expand the section.
In the
Enable
drop-down list, choose
Yes
to activate the iDEAL bank transfer (or
No
to deactivate iDEAL bank transfer.)
In
Title
box, enter the text to display to customers
on the checkout page.
In the
Use Default Merchant ID
field, leave
Yes
selected to use the merchant ID given in the
Web Service Configuration under General Settings page. Choose
No
to enter another merchant ID and transaction
key in the next two fields.
If you choose not to use the default merchant ID, enter your
Visa Acceptance Solutions
Merchant ID
in the
Merchant ID
field.
In the
Transaction Key
field, enter the transaction
key for the merchant ID you entered.
In the
Allowed Currencies
box, choose which
currencies you will accept payment.
In the
Sort Order
box, change the default module
sort order.
Configure which countries you will accept Klarna from:
ADDITIONAL INFORMATION
To accept payment from the default countries, in the
Payment From Applicable Countries
field,
leave the
Use system value
box checked.
To specify other countries, clear the
Use system
value
box and in the
Payment From
Specific Countries
box, choose the countries from
where you want to accept iDEAL.
Configuring Bancontact
Follow these steps to configure Bancontact bank transfer payments:
Click
Bancontact
to expand the section.
In the
Enable
drop-down list, choose
Yes
or
No
to activate or
deactivate Bancontact Bank Transfer.
In
Title
box, enter the text to display to customers
on the checkout page.
In the
Use Default Merchant ID
field, leave
Yes
selected to use the Merchant ID given in Web
Service Configuration under General Settings. Select
No
to enter another merchant ID and transaction
key in the next two fields.
If you choose not to use the default merchant ID, enter your
Visa Acceptance Solutions
merchant ID in the
Merchant ID
field.
In the
Transaction Key
field, enter the transaction
key for the merchant ID you entered.
In the
Allowed Currencies
box, choose the currencies
with which to accept payment.
In the
Sort Order
box, change the default module
sort order.
Configure which countries you will accept Klarna from:
ADDITIONAL INFORMATION
To accept payment from the default countries, in the
Payment From Applicable Countries
field,
leave the
Use system value
box checked.
To specify other countries, clear the
Use system
value
box and in the
Payment From
Specific Countries
box, choose the countries from
where you want to accept Bancontact.
Configuring WeChat Pay
WeChat Pay is a digital wallet that enable customers to make mobile payments and
online transactions. Customers who have provided bank account information can use
the app to pay bills, order goods and services, transfer money to other users, and
pay in stores if the stores have a WeChat payment option.
Follow these steps to configure WeChat Pay:
Click
WeChat Pay
to expand the section.
From the
Enable
drop-down list, choose
Yes
to activate or deactivate WeChat Pay (or
No
to deactivate WeChat Pay.)
In the
Sort Order
box, change the default module sort
order.
In
Title
box, enter the text to display to customers on
the checkout page.
In the
Use Default Merchant ID
field, leave
Yes
selected to use the merchant ID from the Web
Service Configuration section under General Settings. Choose
No
to enter another merchant ID and transaction key
in the next two fields.
If you choose not to use the default merchant ID, enter your
Visa Acceptance Solutions
merchant ID in the
Merchant ID
field.
In the
Transaction Key
field, enter the transaction key
for the merchant ID you entered.
In the
QR Code Expiration Time
field, enter an
expiration time in seconds for the WeChat pay QR code.
In the
Check Status Frequency
field, enter an interval
in seconds between transaction status checks.
In the
Max Status Requests
field, enter a limit for
transaction status checks.
Configure which countries you will accept WeChat Pay from:
ADDITIONAL INFORMATION
To accept payment from the default countries, in the
Payment
From Applicable Countries
field, leave the
Use system value
box checked.
To specify other countries, clear the
Use system
value
box and in the
Payment From Specific
Countries
box, choose the countries from where you want
to accept WeChat Pay.
In the
Success/Failure Message Delay
field, enter a
delay in seconds between the transaction check and redirection to the result
page.
In the
Check Status query Simulated Response
field,
choose a simulated status check response code for testing.
Click
Save Config
.
Configuring Taxes
Visa Acceptance Solutions
offers a service that calculates taxes to be charged on
orders. You must configure your settings in order to receive accurate results
Contact your
Visa Acceptance Solutions
representative to have this feature enabled.
This feature includes activation of sandbox capabilities as well.
Before configuring the Tax Calculation service, you must have the SOAP Web Service
configured. For more information, see Configuring Security Credentials.
To use the Tax Calculation Service, you must have the Product Tax Class codes and
has a setting for Tax Class.
This setting defines the product and how it should be taxed. Contact your
Visa Acceptance Solutions
representative for a list of available product tax class IDs
and your tax consultant for advice on which IDs you should use for products you
sell.
Follow these steps to set the product tax class IDs in
Adobe Commerce
:
Go the
Adobe Commerce
Admin console.
On the left panel, click
Stores
, and then click
Tax Classes
.
On the Tax Classes page, click
Add New
to create a new
tax class entry for each tax class ID that your representative provides.
In the
Tax Class Code
field, enter the code provided to
you.
From the
Tax Class Type
drop-down list, choose
Product
.
Click
Save
.
Complete these steps for each tax class ID.
Configuring
Visa Acceptance Solutions
Tax Services Settings
Follow these steps to configure
Visa Acceptance Solutions
Tax Services in the
Adobe Commerce Cloud
:
Go to the
Adobe Commerce Cloud
admin console, and in the left
panel, click
Stores
, and then click
Configuration
.
On the Configuration page, go to
Sales > Tax > Cybersource Tax
Services
.
From the
Tax Calculation
drop-down list, choose
Yes
to activate the
Visa Acceptance Solutions
Tax
Services per your business requirements.
In the
Nexus regions
box, select the regions where your
business has a physical presence in the U.S. or Canada.
In the
Customer countries to calculate Tax for
box,
choose the countries for which you will calculate tax.
In the
Customer Tax classes to exclude from Tax
calculation
box, choose the customer tax classes to exclude from
tax calculation.
In the
Ship From
fields, enter the city, postcode,
country, and region from which the orders are shipped.
In the
Acceptance
fields, enter the city, postcode,
country, and region in which you will accept or approve customers' orders.
In the
Origin
fields, enter the city, postcode, country,
and region of the point of origin from which the order is picked up.
In the
Merchant VAT
fields, enter the merchant VAT
seller registration number.
Click
Save Config
.
Calculating Taxes for Shipping Rates
You might have taxes calculated for shipping rates if your site offers dynamic
shipping rates from a carrier that is presented to the customer at checkout.
However, if you offer a flat-rate shipping charge, you might want to add taxes
to that flat rate.
Follow these steps to add taxes to flat shipping rates:
On the Configuration page, go to
Sales > Tax > Tax
Classes
.
From the
Tax Class for Shipping
drop-down list,
select the product tax code that references the taxes applied to shipping
services.
Click
Calculation Settings
.
In the
Shipping Prices
field, choose
Excluding Tax
when the shipping rates need to be
taxed. Select
Including Tax
when the shipping rates
already include taxes , and no taxes are applied through the
Visa Acceptance Solutions
tax service.
Click
Save Config
.
Configuring Transactional Emails
When an order is flagged for
Decision Manager
review, the customer is not
informed that their transaction was not fully accepted. If a manual review leads to
a rejection of the transaction, the customer is then informed that their order is no
longer active. You can configure the email sent to the customer.
Follow these steps to configure the transactional emails sent to the customers:
Go to the
Adobe Commerce
console.
On the left panel, choose
Marketing
.
Click
Email Templates
.
In the table, find the Template column, and click the
DM Fail
Transaction
template row. The Template Information page
opens.
On the Template Information page, complete the required information in the
template name, subject, and content text boxes.
Click
Save Template
.
Configuring Cron Settings
Follow these steps to configure Cron settings for
Decision Manager
:
In the
Adobe Commerce
console.
On the left panel, click
Stores
.
Go to
Configuration > Advanced
> System > Cron (Scheduled Tasks
).
Scroll down and click
Cron configuration options for
group:dm
.
Complete the required fields.
Click
Save Config
. For further instructions on how to configure
Cron settings, see Cron (scheduled tasks).
Configuring Tokens
When a customer is logged in and is checking out, their card data can be stored in a
secured
Visa Acceptance Solutions
data center. After the card data is saved, a token
is provided to you through this module. This token represents the customer record. When
a returning customer uses your checkout, they can opt to use a previously stored card so
they don't have to enter their card data again.
When a token is used, the customer is still redirected to the
Visa Acceptance Solutions
Hosted Payment page for payment confirmation. If a customer chooses to checkout as a
guest, the token system is not used.
Saving a Card for Later Use
To save the card, log in or register a new customer account. During the checkout
process, check the
Save for later use
box. After the order is
placed, the card information is securely saved with
Visa Acceptance Solutions
.
Managing the
Adobe Commerce
Tokens
Customers who are logged in can delete their tokens at any time. To do so, they must
visit the My Account section of the
Adobe Commerce
and choose
the
Stored Payment Methods
menu item. Customers can use the
delete links beside any stored tokens to remove a stored token.
Paying with Tokens
To pay the order with a stored card, the customer chooses it from the list at the top
of the Billing and review checkout page.
Multi-Shipping Feature
The plugin supports the multi-shipping feature only for the
Adobe Commerce
registered users when they place orders with stored credit
cards.
Node Implementation
The plugin does not support multiple-node implementation.
Support
If you require support with this software, contact [email protected] and provide this information:
Summary of the issue
Steps to reproduce the issue
Magento platform version
Visa Acceptance Solutions
plug-in version
Visa Acceptance Solutions
merchant ID
Configuration screenshots
All the themes/additional extensions installed
These log files:
system.log
,
debug.log
,
cybs.log
and
exception.log
. To generate logs, navigate to this path
in the root directory of Magneto:
Magento Folder
Name\var\log
OpenCart
The plugin for OpenCart provides a payment solution for
merchants using OpenCart to manage their orders. This section describes the payment
methods and services the Plugin provides.
Supported payment methods
These are the supported payment methods for OpenCart:
Credit and debit cards
eCheck
Click to Pay
Supported payment services
These are the supported payment services available for OpenCart:
Payment acceptance services
Authorization only
Sale (bundled authorization and capture)
Electronic check debit (sale) for
eCheck
payment
method
Order management services
Capture an authorization
(not for
eCheck
)
Multiple partial captures (not for
eCheck
)
Standard and partial refunds
Standard and partial void captures
(not for
eCheck
)
Standard and partial void refunds
Full authorization reversal
(not for
eCheck
)
Token Management Service
(
TMS
) for credit and debit
cards payments
:
Create payment token along with authorization
Update an existing token along with authorization
Update an existing token from My Account section
Delete an existing token from My Account section
Create payment token for new payment methods during checkout
Make a payment with a stored token during checkout
Reporting services that allow you to import theses
Business Center
reports into OpenCart
:
Transaction Request Report
Payment Batch Detail Report
Conversion Detail Report
Release Information
This section provides information about the releases for the plugin.
Release Version
Release Date
Support End Date
Version 22.1.0
October 25, 2022
October 14, 2025
Version 23.1.0
December 8, 2023
December 7, 2026
Version 23.1.0 includes the following enhancements:
Updated authentication signature
Added DAV enable/disable button for admin configuration
Updated reCAPTCHA key generation tooltip URL
Fix for target origin issue for different domain in the flex form capture
context
Compatible with OpenCart versions 3.0.3.7 and 3.0.3.8
Version 22.1.0
Initial release.
Installation
Before you install the plugin, make sure that these requirements are met:
and browse to the file you downloaded to your local system.
The pane displays the status of the installation. After the Plugin is
installed, the pane indicates that the module is installed. You can close it or
click
Configure
to configure the Plugin.
Configuration Overview
This section describes how to set up the plugin.
The following table shows where to access the plugin configuration settings.
From the left navigation panel in
OpenCart
Back Office, select
Extensions
and follow the path indicated in the table for the configuration
settings you want to configure.
Configuration Settings
Settings
Path
General Configuration
Report Configuration
Order Status Configuration
Extensions > Extensions > Modules >
Visa Acceptance Solutions
Configuration
Unified Checkout
Payment Action
Payer Authentication
Status
Sort Order
Tokenization
Limit Saved Card Rate
Enforce SCA for Saving Card
Extensions > Extensions > Payments >
Visa Acceptance Solutions
Unified Checkout
eCheck
Status
Sort Order
Extensions > Extensions > Payments >
Visa Acceptance Solutions
eCheck
Enable Basic Configuration
This section describes the required and optional basic configuration settings for the
plugin.
To enable Basic Configuration, follow these steps:
In
OpenCart
Back office, navigate to
Extensions
>
Extensions
>
Modules
>
Visa Acceptance Solutions
Configuration
.
Click the
Edit
icon.
In the General Configuration tab of the Edit
Visa Acceptance Solutions
Configuration Module pane, from the drop down list or text box, select or enter
a setting.
Click the
Save
icon.
Repeat for each required setting and each optional setting you want to enable.
Required Settings
These settings are required for using the plugin:
Sandbox Mode
Set to
Enable
to operate in Sandbox (T) mode. You can
test new changes in this mode and no funds are affected.
Set to
Disable
to operate in Production (Live)
mode.
Merchant ID
Enter the
Business Center
Merchant ID or Organization ID, which is a
unique identifier for the merchant.
Merchant Key ID
Enter your REST Shared Secret Key generated from within the
Business Center
. This specific key authenticates and authorizes the
merchant's integration with the gateway.
Merchant Secret Key
Enter the complimentary Secret key that is generated at the same time as the
Merchant Key ID. It is used for secure communication between the merchant's
online store and a payment gateway.
reCAPTCHA Site key
For each request, this key returns a score based on the user interactions
with your site. Based on these scores, you can take appropriate actions for
your site, such as allowing or blocking users.
reCAPTCHA Secret key
This key authorizes communication between the plugin's backend and the
reCAPTCHA server to verify the user's response. The secret key should be
kept safe for security purposes.
Optional Settings
These settings are optional for using the plugin.
Fraud Management
Click
Enable
to enable merchants to identify and prevent fraudulent
activities.
Delivery Address Verification
Click
Enable
to enable merchants to verify the delivery address.
Device Fingerprint
Click
Enable
to enable merchants to identify and track devices accessing
an online store.
Developer ID
Identifier for the developer that helps integrate a partner solution with
Visa Acceptance Solutions
. This settings is only required for
Visa Acceptance Solutions
System Integrators.
Status
Click
Enable
for the
Visa Acceptance Solutions
integration to be active
and visible at checkout.
Payment Action
Click
Enable
to enable card payments for Authorize Only or Sale
(Authorization and Capture) for front office transactions.
Enhanced Logs
Click
Enable
to generate logs that can be accessed by selecting
Configure
>
Advanced
Parameters
>
Logs
.
Visa Acceptance Solutions
strongly recommends that you map your Order Status
responses to your preferred order status under the Order Status Configuration
section.
Enable
Unified Checkout
This section describes the required and optional configuration settings for
Unified Checkout
for the plugin.
To enable Card Payment follow these steps:
In
OpenCart
Back office, navigate to
Extensions >
Extensions > Payments >
Visa Acceptance Solutions
Unified Checkout
.
Click the
Edit
icon.
In the Edit
Visa Acceptance Solutions
Unified Checkout
pane, from the drop down list or text box, select
or enter the setting you want.
Click the
Save
icon.
Repeat for each required setting and each optional setting you want to set.
Follow these steps to enable Enforce Strong Customer Authentication:
Open
OpenCart
Back Office and select
Extensions
>
Extensions
>
Payments
>
Visa Acceptance Solutions
Unified Checkout
.
Select the
Edit
icon.
From the drop down menu next to Enforce SCA for Saving Card, select
Enable
.
Click the
Save
icon.
Scheduling Report Generation
Schedulers on a Linux, Mac, or Windows system are used to set up how often a specified
report is generated. Schedulers for Linux and Mac systems are set up using a Cron Tab.
The scheduler for a Windows system is set up using the Windows Task Scheduler app.
When setting up a schedule for generating a specific report, use this format:
When setting up the reporting schedule on a Linux or Mac system, you use
crontab
commands that determine how often and when the report
is generated.
The syntax is:
* * * * * [command]
The asterisk (*) represents each of these timing parameters:
Minute (0-59)
Hour (0-23)
Day of Month (1-31)
Month (1-12)
Day of week (0-6), (0-Sunday)
For example, these timing parameters indicate how often a specified report is
generated:
* * * * * [command]
: Runs every minute of every day of
every week of every month.
0 * * * * [command]
: Runs every hour of every day of every
week of every month.
30 2 * * * [command]
: Runs at 2:30 a.m. every day of every
week of every month.
0 0 2 * * [command]
: Runs once a month every month on the
second day of the month.
0 * * * 1 [command]
: Runs every Monday at every hour.
0,10,20 * * * * [command]
: Runs on 0, 10, 20 minute of
every hour of every day of every week of every month.
0 5-10 * * * *[command]
: Runs every hour between 5 a.m. and
10 a.m.
@reboot [command]
: Runs every time after the server
reboots.
*/5 * * * * [command]
: Runs every five minutes of every
day.
Setting Up Cron Scheduler for Linux
Open a Linux terminal.
Enter
crontab-e
to enter editor mode. For example:
root@OpencartQA4:/etc# crontab -e
Enter the command to set the timing for the cron job. For example, this command
sets the cron job to run every 15th minute of every hour, every day, every week,
and every month:
Enter the command to set the timing for the cron job. For example, this command
sets the cron job to run every 45th minute of every hour, every day, every week,
and every month:
Order status is triggered and updated when transactions are processed. The plugin supports custom and default status states for
orders.
Custom order status states:
Cancel error
Canceled
Canceled Reversal
Chargeback
Complete
Denied
Expired
Failed
Order cancelled by merchant
Partial Refunded
Partial Voided
Payment error
Payment pending for review
Pending
Processed
Processing
Refund Error
Refunded
Reversal
Shipped
Void Error
Voided
Default order status states:
Processed
Canceled
Shipped
Delivered
Refunded
Only the shipped and delivered status states can be manually updated.
Order Management Workflows
This section describes the order of events that the merchant completes after a customer
submits an order.
After-Authorization Workflow
This workflow comprises the sequence of events that occur after a customer places a new
order using
OpenCart
Front Office. The workflow shows how the order
status is updated when the authorized transaction is captured or reversed (full
authorization reversal).
The new order displays in
OpenCart
Back Office and the order
status is
Pending
.
The merchant chooses one of these actions:
Standard capture
.
Partial capture
.
Cancel products
. For a full authorization
reversal, the merchant must also cancel the order, which requires that
they select all the quantities and all the items included in the
order.
A partial authorization reversal is not
supported.
When the merchant initiates a full authorization reversal, the authorization is
cancelled and the order status is set to
Order cancelled by
merchant
.
When the merchant initiates a multiple partial capture, they choose how many
quantities to capture and whether to include the shipping costs.
After multiple partial captures are processed, the order status is set to
Processing
.
When the merchant initiates a full capture, the entire authorization amount is
captured and the order status is set to
Processed
.
After-Capture Workflow
This workflow comprises the sequence of events that occur after an authorization is
captured. The workflow shows how the order status is updated when the captured
transaction is refunded or voided.
The merchant selects one of these actions:
Standard refund
Partial refund
Void capture
If the merchant voids the capture, the captured transactions are voided.
When
all quantities of the transaction are captured, the entire order is voided
and the order status is set to
Payment cancelled
.
If
only a few quantities are captured, only the captured quantities are voided
and the order status is set to
Partial payment accepted
.
If the merchant initiates a standard refund
before
updating the order
status to
shipped
, the order status is set to
Partial refunded
(before shipped)
until the refunded amount becomes equal to the
captured amount. When the refunded amount becomes equal to the captured
amount, the order status is set to
Refunded
.
When the merchant selects a refund
after
updating the order status to
shipped
, the order status is set to
Partial refunded (after
shipped)
until the refunded amount becomes equal to the captured
amount. When the refunded amount becomes equal to the captured amount, the
order status is set to
Refunded
.
To refund the amount of an order, merchants can either generate a voucher or
a credit slip for the refund. Depending on the type of refund they select
and whether they issue a voucher or a credit slip, one of these actions
occurs:
When the merchant chooses
Generate a voucher
for a partial refund, the sum of the items is not refunded. Instead,
a voucher is generated that can be used for future
transactions.
When the merchant chooses
Generate a voucher
and enters the amount in the shipping costs field for a partial
refund, then a voucher equal to the sum of the items and the
shipping amount is generated.
When the merchant chooses
Generate a credit
slip
for a standard refund, the sum of the items is
refunded.
When the merchant chooses both
Generate a credit
slip
and
Repay shipping costs
for a standard refund, the sum of the items and the shipping amount
are both refunded.
When the merchant chooses both
Generate a
voucher
and
Repay shipping
costs
for a standard refund, a voucher equal to the
sum of the items and shipping amount is generated.
When the merchant chooses both
Generate a
voucher
and
Generate credit
slip
for a standard refund, a voucher is generated
and a refund for the sum of the items is not generated.
After-Refund Workflow
This workflow comprises the sequence of events that occur when the merchant voids a
refund under specific conditions:
When the refund is processed
before
the order is shipped, the refund is
cancelled and the order status is set to
Voided
or
Partially Voided
.
When the refund is processed
after
the order is shipped, the refund is
cancelled and the order status is set to
Voided
or
Partially Voided
.
When the voided refund amount is equal to the refund amount, the refund is
cancelled and the order status is set to
Voided
or
Partially Voided
.
OpenCart
does not provide an option to return
Gift Certificates. For orders associated with Gift Certificates, the services mentioned
below are not available:
Front Office Cancel
Back Office Cancel
Void a Capture
Customer Tasks
Customers can use the
My Account
option on the merchant's
OpenCart
website to manage orders and their payment information. The
following sections contain the steps to complete these tasks.
Saving Credit/Debit Card Information
Saving card information enables customers to use that information for future transactions. Using
OpenCart
Front Office, customers can save their card
information during the checkout process, or they can add their card's information to
their registered
OpenCart
accounts using the
Visa Acceptance Solutions
My Cards feature.
If a customer wants to save their card information during the checkout process, they can select
the
Save my card for future payment
option when entering
their credit/debit card payment during checkout.
The card information can also be saved using the
Visa Acceptance Solutions
My Cards page in
OpenCart
:
Open
OpenCart
Front Office.
Click
My Account > Managed Stored Credit Cards >
Visa Acceptance Solutions
My Cards > Add New Card
.
If no current address is associated with the customer account, the customer
is prompted to add an address. The customer can enter the required address
information and click
Save
.
If an address is already associated with the customer account, the customer
can select and use the address or add a new address.
When the address information is complete and selected, the customer can
update the card expiration information, if needed, or delete the existing
card from the account.
To update the expiration information (expiration month/year) for the card,
under
Saved Cards
the customer clicks the blue arrow
beneath
More
, then clicks either
Update
, or
Delete
to remove
the card from the account.
ADDITIONAL INFORMATION
Customers can only add the number of cards that the merchant specified in
the account configuration. The updated card information is tokenized and
securely saved. The customer can use the saved card information for future
transactions without having to enter that card information during the checkout
process.
Selecting a Default Credit/Debit Card
When a customer has multiple cards associated with their account, they can designate the default
card. By default, the first card added to the account will be set as the default
card. In the
Visa Acceptance Solutions
My Cards page, the default card is
identified using an asterisk (*) that appears to the right of the card number.
To change the default card, the
customer follows these steps:
Open
OpenCart
Front Office.
Open the
Visa Acceptance Solutions
My Cards page. The page displays the saved
cards associated with the account.
Choose the card to set as the default card and select
More > SET AS
DEFAULT
. The card is set as the default card.
ADDITIONAL INFORMATION
The default card cannot be deleted unless all other saved cards from the
Visa Acceptance Solutions
My Cards section are deleted.
Cancelling an Order
This task describes the steps a customer takes to cancel an order. They cannot cancel
an order if the order is in review with the merchant. The Cancel option is also not
available in direct Settlement for Captured
and
eCheck
orders.
Open
OpenCart
Front Office.
Select
My Account > Order History
. The Order history
page displays the customer's orders.
Select the View icon for the order. The
Order details page
appears.
Click the
Cancel Order
icon to cancel the order. A
Cancel Order confirmation notice appears.
Click
Yes
on the Cancel Order confirmation notice to
cancel the order.
ADDITIONAL INFORMATION
Above the Order History, a notification appears stating
Success: Entire
order was successfully cancelled.
The order is cancelled and the order
status is set to
Canceled
.
If the order was a sales transaction or was captured, the cancellation is sent
to the merchant and the status is set to
Canceled
.
After the customer cancels an order, the merchant can accept or reject the
order cancellation (as instructed in Processing a Cancelled Order).
If the merchant accepts
the cancellation request, a refund for the order amount is initiated and the
order status is set to
Refunded
. If the merchant rejects the
cancellation request, the order status is set to
Denied
.
Merchant Tasks
Merchants use
OpenCart
Back Office to manage orders. This section
describes the steps to complete these tasks.
Processing a Cancelled Order
When a customer cancels an order, a request is sent to the merchant and the order
status is set to
Cancelled
. Merchants can accept or reject an order that a
customer cancels.
Open
OpenCart
Back Office and select
Orders
from the Dashboard.
Click the box beside the order the customer cancelled.
Click the View icon. Under Order Details, the information for that order
displays.
Under
Add Order Status
, choose the order status that describes your processing of the cancellation.
Processing a Merchandise Return
When a customer requests to return merchandise, the information appears on the
Merchandise Returns page in
OpenCart
Back Office. Follow these
steps to process the return.
Open
OpenCart
Back Office and select
Sales >
Returns
. The Product Returns page displays and identifies the
order or orders for which customers have requested a return.
Click the box beside the order that you want to process the return and then
click the Edit icon. The Edit Product Return page displays.
In the Product Information and Reason for Return pane, choose one of these
options from the
Return Action
drop-down menu:
Credit issued
Refunded
Replacement Sent
The status is updated for the order on the Merchandise Returns page. Next,
you can proceed with selecting a return or refund option for the order.
Select
Orders
from the Dashboard.
Select the order for which you want to process a return, and select one of
these options:
Return products
Partial refund
Fraud Management
The plugin provides fraud management functionality
for merchants who also use the
Business Center
. You can apply fraud management functionality to transactions
when:
Fraud management is enabled in the plugin.
You have a fraud management profile in the
Business Center
.
Fraud screening includes these features:
Fraud Management Essentials (FME):
used to enforce the rules created by
Visa Acceptance Solutions
Machine Learning System (MLS). Fraud management is used
to define the merchant’s rules.
Fraud Management Rules:
When the decision status from the
Business Center
is
AUTHORIZED_PENDING_REVIEW or PENDING_REVIEW, the order is in review and the
order status is set to
Payment pending for review
.
When the decision status from the
Business Center
is
AUTHORIZED_RISK_DECLINED, the order is rejected and the order status is set
to
Order cancelled by merchant
.
The table below describes the possible decisions, outcomes, and timing Decision Manager
uses when an order is triggered for review.
When these transactions are in a Decision Manager review state,
certain settlement considerations apply:
For authorizations:
while accepting this transaction it is not
recommended to settle it in the
Business Center
. When the transaction is
settled in the
Business Center
, the follow-on services initiated from
OpenCart Back Office are impacted.
For sales:
The entire authorized amount should be settled in the
Business Center
when accepting the transaction. When the settlement
is not performed in the
Business Center
, the follow-on services
initiated from OpenCart Back Office fail.
A follow-on void capture does not trigger from OpenCart Back Office.
While accepting review transactions, merchants should not select the
settle option.
Decision Manager Decisions, Execution Timings, and Outcomes for Orders
Decision
Execution Timing
Outcome of Decision
Monitor
Before authorization
Authorization will be successful and no
action from the Decision Manager is required. Use this decision to
understand the outcome of a rule.
Accept
Before authorization
The order is processed normally and is
placed successfully.
Review
Before authorization
The authorization is successful, and
follow-on services are put on hold until the merchant accepts or rejects
it. The order status will be set to
Payment pending for review
.
Reject
Before authorization
The order is rejected and the authorization
is not processed. The merchant is not able to view the order in OpenCart
Back Office.
Monitor
After authorization
The authorization is successful and no
action from Decision Manager is required. Use this decision to
understand the outcome of a rule.
Accept
After authorization
The order is processed normally and placed
successfully.
Review
After authorization
The authorization is successful, and
follow-on services are put on hold until the merchant accepts or rejects
it. The order status is set to
Payment pending for
review
.
Reject
After authorization
The original authorization is successful
and then is automatically reversed and the order status is set to
Order cancelled by merchant
.
Reporting
The plugin provides reporting functionality for merchants who also use the
Business Center
. You can import these reports from the
Business Center
into OpenCart:
Transaction Request Report:
includes details for individual
transactions that are processed each day.
Payment Batch Detail Report:
includes transactions that are processed
with the applications. This report is available shortly after captured
transactions are batched.
Conversion Detail Report:
includes Case Management changes recorded
in the
Business Center
to ensure that updated orders are also
included in
OpenCart
. This report is generated at
regular intervals and includes the results of the converted orders for each
reviewer. This information provides an overview of all orders that were not
immediately accepted.
Scheduling
The Plugin reporting functionality works with a system scheduler to generate and
update reports for
OpenCart
. There are some Cron Job modules
available for
OpenCart
, such as the Cron Tab, that support
reporting. Merchants can use any Cron Job module that
OpenCart
supports, or any other online Cron service provider to generate reports.
The reports are processed and orders are updated in
OpenCart
using this workflow:
Orders with an
AUTHORIZED_PENDING_REVIEW
or
AUTHORIZED_RISK_DECLINED
status are included in the
ps_cybersourceofficial_order
table in the OpenCart database.
If a review is trigged for an order based on the profile rule in Decision
Manager, a
Payment pending for review
order status displays for that
order on the
OpenCart
Back Office Orders page.
The merchant uses the
Business Center
to accept the order that is in
review, and, if not already enabled, enables the reports using the Report
Settings on the Plugin Configuration page.
The scheduler runs the report at regular intervals according to the
intervals the merchant configured. The order is accepted or rejected by the
merchant in the
Business Center
, is retrieved, and the new status is
updated as
AUTHORIZED
or
DECLINED
. The updated order status
displays in the
op_cybersourceofficial_order
table in the
OpenCart
database.
The original decision and the new decision are updated and displayed in the
op_cybersourceofficial_conversion_detail_report
table in the
OpenCart
database.
The order is updated as
Awaiting payment
status for the authorization
and displayed on the
OpenCart
Back Office Orders page.
The payment is accepted for the sale and any associated follow-on
transactions (capture, void capture, refund, void refund, and full
authorization reversal).
Testing
If you have not done so already, configure these settings using OpenCart Back
Office:
After configuring the Plugin, complete this task to test the configuration using
OpenCart Front Office to place an order and OpenCart Back Office to manage the
order.
Open OpenCart Front Office to place an order.
At Checkout, enter any required personal information and select the payment
method you want to use to place the order.
Enter the card information you want to use to place the order and click
Confirm Order
. If the order is successful, an order
confirmation message displays.
Open OpenCart Back Office to manage the order.
Select
Orders
from the Dashboard. The Orders page
displays and lists all active orders.
Select the checkbox next to the order you processed in Step 1. Then click the
View icon. The order status for the order should display
Pending
.
Click
Capture
to capture the authorized amount, then
Yes
. The order status changes to
Processed
.
Click
Partial capture
to capture part of the authorized
amount. The order status changes to
Processing
.
Click
Cancel
to cancel the order. The order status
changes to
Order Cancelled by Merchant
.
ADDITIONAL INFORMATION
For more information about testing, including test cards, see
Upgrading
You can install a newer version of the plugin using
OpenCart
Back
Office.
To uninstall
Visa Acceptance Solutions
Payment, navigate to
Extensions > Extension Types > Payments
and then
uninstall all of the
Visa Acceptance Solutions
payment modules.
To uninstall
Visa Acceptance Solutions
Tax, under the same Extension
dropdown, select
Order Totals
and uninstall
Visa Acceptance Solutions
Tax.
To uninstall the
Visa Acceptance Solutions
Payment extension, under the
Extension dropdown, select
Modules
, and uninstall the
Visa Acceptance Solutions
Payment extension.
Navigate to the Extensions tab and click
Installer
, then
click
Delete
to remove the
Visa Acceptance Solutions
extension.
Navigate back to the Extensions tab and click
Modification
, then click
Refresh
.
To install the new
Visa Acceptance Solutions
Payment extension, follow the
steps mentioned in Installation.
Log file and any other data or screenshots related to the issue
Oracle NetSuite
Visa Acceptance Solutions
services can be integrated with
Oracle NetSuite
to
simplify your payment management platform. This section describes the payment
methods and services that the
Visa Acceptance Solutions
SuiteApp for
Oracle NetSuite
bundle provides.
Payment Acceptance Services
The bundle supports payment acceptance
services that the customer initiates (authorization and sale), and order management
services that the merchant handles for credit and debit cards (capture, credit,
authorization reversal).
The bundle includes these credit and debit card
services:
Authentication
Authorization only
Authorization reversal
Capture
Credit
eCheck
Refund
Sale (authorization and capture)
Tokenization (
TMS
and network tokenization)
For the
Visa Acceptance Solutions
Automatic Clearing House (ACH) service,
the bundle supports payment acceptance services that the customer initiates
(authorization and sale), and order management services the merchant
handles(refund). The bundle also supports the tokenization service for
ACH.
Order Management Services
The bundle supports order management services for Apple Pay, Google Pay,
PayPal,
and
Click to Pay
. Order management services
support these operations for the payment methods of Apple Pay, Google Pay,
PayPal,
and
Click to Pay
:
Authorization reversal
Capture
Credit
Sale (supported for
Click to Pay
and for PayPal
as
a workaround for multi-capture functionality)
You must import authorizations that
are processed
outside of
Oracle NetSuite
to see details of those authorizations using
live integrations or CSV imports. For
Click to Pay
, the PNRef
number field of the sales order should hold the details of the authorization ID and
Visa order ID in the format of
AuthorizationID_VisaOrderID
.
For
PayPal, the PNRef number field of the sales order should hold the details of the
authorization ID and order ID in the format of
AuthorizationID_OrderID
.
Reporting Services
You can import these reports from
Visa Acceptance Solutions
into
Oracle NetSuite
:
Transaction Request Report
Payment Batch Detail Report
Conversion Detail Report
Invoicing Services
These invoicing actions can be generated in
Oracle NetSuite
and
imported from
Visa Acceptance Solutions
:
Creating a draft invoice
Create an invoice without sending it
Create and sending an invoice immediately
Processor Support
The
Visa Acceptance Solutions
SuiteApp for the
Oracle NetSuite
bundle
supports all processors that are available through
Visa Acceptance Solutions
.
Additional features are available for these processors:
Chase Paymentech Solutions
: Level II and Level III supported for all card
brands.
FDC Nashville Global
: Level II and Level III supported for all card
brands.
Global Payments: Level III supported for all card brands, and Level II supported
only for American Express, Diners Club, Discover, JCB, and Maestro.
OmniPay Direct
: Level III supported only for all card brands, and
Level II supported for American Express, Diners Club, Discover, JCB, and
Maestro.
TSYS Acquiring Solutions
: Level II and Level III supported for all card brands.
Credit Mutuel-CIC
: Level II and Level III supported for all card
brands.
Elavon Americas
: Level III supported for all card brands, and
Level II supported only for American Express, Diners Club, Discover, JCB, and
Maestro.
Barclays
: Level III supported only for all card brands using
REST, and Level II is not supported.
Release Notes
This section provides information about functionality, bug fixes, and enhancements for
the
Visa Acceptance Solutions
SuiteApp for
Oracle NetSuite
integration.
January 2024
Visa Acceptance Solutions
Version 23.5.0 is compatible with
Oracle NetSuite
2023.2 or earlier
Stripping of unsupported characters in
billTo
and
shipTo
Web sec code support for ACH transactions
Line item support for basic transactions
Barclaycard processor L3 support
Deprecation of delete scenario for network tokens
3-D Secure
enhancements – device
information
Decoupling of bundled Payer Authentication requests
Bug fix for ACH quantity field in REST
Bug fix for delay shipment with partial capture
Bug fix for PayPal multi-capture
Bug fix for delay shipment without multi-currency feature
Notice of SOAP and Secure Acceptance deprecation in August
2024
Partner Solution IDs update
Configuration Guide update
September 2023
Visa Acceptance Solutions
Version 23.4.0 is compatible with
Oracle NetSuite
2023.2 or earlier
SCA enhancements
Source based PS ID
Map NS ID on reporting records
Payment facilitator support
Network tokenization
Bug fix for delay shipment handling with foreign currency
Bug fix for declined sale operations accepted in
Oracle NetSuite
when using SOAP
Company name support in payment acceptance and order management
Update to
Visa Acceptance Solutions
authentication
signature
Partner solution IDs update
August 2023
Visa Acceptance Solutions
Version 23.3.1 is compatible with
Oracle NetSuite
2023.2 or earlier
BFN certification for
Oracle NetSuite
2023.2 release
Bug fix for Mastercard level III sale for TSYS
Bug fix for special character support for REST
Company name support for
Pay by Link
Support for hold transaction reason codes multi-select
field
Registration website to create an
account. Follow the email instructions that you received to activate your merchant
account, and then log in to the
Business Center
to complete the registration
process.
From your
Business Center
account, you also need your merchant
key ID and shared secret key to enable the integration with
Oracle NetSuite
. For steps on how to generate a shared secret key, see Getting Started with the REST API guide. Store your merchant key ID and shared
secret key for later use.
Installing SuiteApp
Follow these steps if you are installing
Visa Acceptance Solutions
SuiteApp for
Oracle NetSuite
integration for the first time:
In your
Oracle NetSuite
account, click
Customization
.
On the left panel, click
SuiteBundler
, and then click
Search &
Install Bundles
.
In the
KEYWORDS
field, enter
Visa Acceptance Solutions
for
Oracle NetSuite
.
Click the bundle ID
316818
.
Click
Install
.
Installing the SuiteApp Update
Follow these steps if you already installed the SuiteApp integration.
In your
Oracle NetSuite
account, click
Customization
.
On the left panel, click
SuiteBundler
, and then click
Search &
Install Bundles
.
In the
KEYWORDS
field, enter
Visa Acceptance Solutions
for
Oracle NetSuite
.
Click the bundle ID
316818
.
From the list, ensure that the
Replace Data
option is selected for the
following contents:
ADDITIONAL INFORMATION
API response code/message
Processor Name
Sec Code
Click
Update Bundle
to start the update.
To verify progress, follow Steps 1-4 to go to the list of bundles.
Installing SuiteApp from Legacy Profile
Follow these steps to migrate from the
Oracle NetSuite
legacy profile to
the SuiteApp profile:
Install the SuiteApp integration. For more information, see Installing SuiteApp.
After you configure the new processing profile following the steps from the
linked section in the previous step, enable the new profile for the existing
payment method and websites in the Payment Processing Profile form. Test the new
profile integration in test mode.
When the configuration is working properly, uncheck the
Test mode
box
in the Payment Processing Profile form to use the integration in live
mode.
Search for any default Payment Processing Profile assigned on the customer
master record. If necessary, remove the legacy profile and update it to the new
SuiteApp profile. This ensures you have updated the reference to the new
profile.
Remove the reference to the legacy profile from the website setup, and assign
the new SuiteApp profile to the same website.
Clear the
Authorization
and
Sale request type
from the legacy
profile to partially disable the legacy profile. This ensures that new
authorizations or sales do not process with the legacy profile.
Verify that the open sales orders and cash sales were authorized by the legacy
profile. Configure a related transaction (cash, sale, or refund) with the legacy
profile itself so that related payment events are shown on the
transaction.
ADDITIONAL INFORMATION
If a sales order (authorization) is executed with a legacy
Visa Acceptance Solutions
profile, and a cash sale is executed with a new
SuiteApp profile, the capture happens successfully until the merchant ID and
the gateway in the legacy profile and in the new SuiteApp profile match.
However, during a Sales Order Payment event, the reference is shown only for
the Authorization. It might not show the capture payment. The capture
payment event is visible in the cash sale record only.
When all sales orders authorized by the legacy profile are processed, clear the
Capture
box, and
Inactivate
the legacy profile to fully disable the legacy profile.
Configuring SuiteApp
The SuiteApp integration supports the payment acceptance and order management services
for credit and debit cards, and the order management service supports alternative
payment methods: Apple Pay, Google Pay,
PayPal,
and
Click to Pay
.
The below sections provide details for configuring the payment acceptance and order
management services. You must go through each section in order for detailed instructions
on how to configure each feature.
Enabling the Plug-in
You must first enable the plug-in before you begin configuring the SuiteApp features.
In your
Oracle NetSuite
account, click
Customization
.
On the left panel, click
Plugins
, and click
Manage
Plug-ins
.
Ensure that the
Visa Acceptance Solutions
FOR
NETSUITE
box is checked, and then click
Save
.
Completing the SuiteApp Configurations
You must complete the following configuration to use all of the features offered in
the
Visa Acceptance Solutions
Oracle NetSuite
integration. Each feature requires detailed actions,
which are explained further in the linked sections below:
Follow these steps to configure all supported payment methods automatically:
In your
Oracle NetSuite
account, on the top navigation, hover over
Visa Acceptance Solutions
Integration
>
SuiteApp Configuration
. Click
SuiteApp
Configuration
.
On the top navigation, hover over
Configuration > SuiteApp > Step 1:
Payment Method
. Click
Create Supported Payment
Methods (Automatic)
.
Payment Method Mapping is automatically processed for credit and debit cards,
ACH, and tokens. For Order Management and
Secure Acceptance
Payment Methods
(such as Google Pay, Apple Pay, and
Secure Acceptance
credit and debit
card), mapping is automatically processed if the payment method name matches the
supported plug-in payment methods. Otherwise, select the respective Payment
Method Mapping.
View the created payment methods, click the
Payment Method
Record
column link and make any desired changes.
Select the
Display in Website
field to enable the automatic payment
method.
Under the
Payment Visuals
tab, in the
Flags
field, type
web/standard
.
For the
URL
field, type the logo image URL.
For the local payment card payment method, you must upload and copy the logo
image URL. For more information, see Uploading a Payment Method Logo.
Click
Add
and then click
Save
.
ADDITIONAL INFORMATION
The following payment methods are automatically configured:
Apple Pay
ACH
ACH Token
American Express
Click to Pay
Discover
Google Pay
Mastercard
Payment Card Token
PayPal Credit
PayPal Express Checkout
Secure Acceptance
credit and debit card
Secure Acceptance
eCheck
Visa
To use the ACH or token management
functionality, you must enable payment instruments. For more information,
see Enabling Payment Instrument Support.
Klarna is currently not supported in the
SuiteApp.
Configuring Credit and Debit Payment Methods
Follow these steps to configure credit and debit card payment methods:
In your
Oracle NetSuite
account, on the top navigation, hover over
Visa Acceptance Solutions
Integration > SuiteApp
Configuration
. Click
SuiteApp
Configuration
.
On the top navigation, hover over
Configuration > Suite > Step 1:
Payment Method
. Click
Create Payment Method
(Manual)
.
Enter the name of the card (such as American Express).
From the
Type
drop-down list, choose
Payment
Card
.
Click the
REQUIRES LINE-LEVEL DATA
box.
Click the
Display in Website
box to enable this payment
method.
Under the Payment Visuals tab, in the
Flags
field, type
web/standard
.
For the
URL
field, enter the logo image URL. For more
information, see Uploading a Payment Method Logo. For the local
payment card payment method, you must upload and copy the logo image URL.
Click
Add
and then click
Save
.
ADDITIONAL INFORMATION
The following payment methods are automatically configured:
Apple Pay
ACH
ACH Token
American Express
Click to Pay
Discover
Google Pay
Mastercard
Payment Card Token
PayPal Credit
PayPal Express Checkout
Secure Acceptance
credit and debit
card
Secure Acceptance
eCheck
"/>
Visa
To use the ACH or token management
functionality, you must enable payment instruments. For more information,
see Enabling Payment Instrument Support.
Klarna is currently not supported in the
SuiteApp.
Configuring Order Management Payment Methods
Follow these steps to configure the order management payment methods like
PayPal,
Apple Pay, and Google Pay:
In your account, on the top navigation, hover over
Visa Acceptance Solutions
Integration > SuiteApp Configuration
.
Click
SuiteApp Configuration
.
On the top navigation, hover over
Configuration > SuiteApp > Step 1:
Payment Method
. Click
Create Payment Method
(Manual)
.
Enter the name of this payment method (such as Google Pay, Apple Pay).
Select the type as
External Checkout
, and then click the corresponding account.
Click the
Requires Line-Level Data
box.
Click
Add
and then click
Save
.
Configuring Payment Card Token Payment Method
Follow these steps to configure a Payment Card Token payment method on the Payment
Processing Profile:
In your
Oracle NetSuite
account, on the top navigation, hover over
Visa Acceptance Solutions
Integration > SuiteApp
Configuration
. Click
SuiteApp
Configuration
.
On the top navigation, hover over
Configuration > SuiteApp> Step 1:
Payment Method
. Click
Create Payment Method
(Manual)
.
In the
Name
field, type
Token
.
Click the
Requires Line-Level Data
box.
In the
Type
field, choose
Payment Card
Token
.
Click the
Display in Website
box to enable this payment
method.
Under the
Payment Visuals
tab, in the
Flags
field, type
web/standard
.
For the
URL
field, enter the logo image URL. For more
information, see Uploading a Payment Method Logo. For the local
payment card payment method, you must upload and copy the logo image URL.
Click
Add
and then click
Save
.
ADDITIONAL INFORMATION
To use the ACH or token management functionality, you must enable payment
instruments. For more information, see Enabling Payment Instrument Support.
Configuring the ACH Payment Method
Follow these steps to configure an ACH payment method on the Payment Processing
Profile:
In your
Oracle NetSuite
account, on the top navigation, hover over
Visa Acceptance Solutions
Integration > SuiteApp
Configuration
. Click
SuiteApp
Configuration
.
On the top navigation, hover over
Configuration > SuiteApp > Step 1:
Payment Method
. Click
Create Payment Method
(Manual)
.
In the
Name
field, type
ACH
.
Click the
Requires Line-Level Data
box.
Select the type as
ACH
.
Click the
Display in Website
box to enable this payment method.
Under the Payment Visuals tab, in the
Flags
field, type
web/standard
.
For the
URL
field, enter the logo image URL. For more
information, see Uploading a Payment Method Logo. For the local
payment card payment method, you must upload and copy the logo image URL.
Click
Add
and then click
Save
.
ADDITIONAL INFORMATION
To use the ACH or token management functionality, you must enable payment
instruments. For more information, see Enabling Payment Instrument Support
Configuring the ACH Token Payment Method
Follow these steps to configure an ACH token payment method on the Payment Processing
Profile:
In your
Oracle NetSuite
account, on the top navigation, hover over
Visa Acceptance Solutions
Integration > SuiteApp
Configuration
. Click
SuiteApp
Configuration
.
On the top navigation, hover over
Configuration > SuiteApp > Step 1:
Payment Method
. Click
Create Payment Method
(Manual)
.
In the
Name
field, type
ACH
Token
.
Click the
Requires Line-Level Data
box.
From the
Type
drop-down list, choose
General
Token
Choose
Display in Website
field to enable this payment method.
Under the Payment Visuals tab, in the
Flags
field, type
web/standard
.
For the
URL
field, enter the logo image URL. For more
information, see Uploading a Payment Method Logo. For the local
payment card payment method, you must upload and copy the logo image URL.
Click
Add
and then click
Save
.
Uploading a Payment Method Logo
Follow these steps to upload the logo of the payment method to the payment
visual:
On the top navigation, go to
Documents > Files > File
Cabinet
.
Click the name of the folder to which you will add the new logo.
tab on the payment method screen with the value obtained
in Step 5.
Mapping Payment Methods
Payment method mapping is automatically completed for credit and debit cards, ACH,
and tokens and for order management and
Secure
Acceptance
payment methods (such as, Google Pay, Apple Pay,
Secure Acceptance
credit and debit card) if
the payment name matches the supported plug-in payment methods. If the payment
method name does not match the payment name, follow these steps to map the payment
methods:
In the PAYMENT NAME row, choose the corresponding payment name from the
drop-down list for that payment method.
Mapping Check for Card Types
Sometimes the same credit and debit card can be referred with different names in
Oracle NetSuite
and
Visa Acceptance Solutions
. For example,
credit and debit card American Express can be referred to as Amex in
Oracle NetSuite
and as American Express in
Visa Acceptance Solutions
. To
cross reference the credit and debit card names between two systems, mapping is
required.
Follow these steps to map credit and debit card names between the
Visa Acceptance Solutions
and
Oracle NetSuite
applications with a unique
number:
Go to Customization, choose
Lists > Records > Fields > Record
Types
.
From the results, select the custom record
Card Type Mapping
, and click
the
List
link.
Verify that the mapping of the credit and debit card name between
Oracle NetSuite
and
Visa Acceptance Solutions
is correct.
If the mapping does not exist on the list page, click
New Card Type
Mapping
to add a new mapping.
Enter the
Oracle NetSuite
payment method name in the
Name
field.
Enter the card type value in the
Card Type ID
field (this is a unique
numeric value).
Enter the payment method name in
Card Type Name
field.
Clear the
Inactive
box.
Click
Save
.
Click the
Edit
link to update the credit and debit card name on any
existing mappings.
Configuring Payment Processing Profiles
Configure a new payment processing profile to support credit and debit cards and other
payment methods. Follow these steps to navigate to the Payment Processing Profile:
From the Payment Processing Profile, follow these steps to complete the Primary
section of the Payment Processing Profile:
In the Primary section, in the
WEB SITE
box, choose
the website for which this profile must be applied.
In the
Name
field, enter a name for the payment
processing profile (such as
Payment Integration
).
From the
Subsidiary
drop-down list, choose the
subsidiary to which the profile should be mapped.
From the
Charge Currencies
box, choose a
currency.
From the
Settlement Currency
drop-down list, choose
which currency you want to accept.
From the
Settlement Bank Account
drop-down list,
choose the bank account for receiving payments.
Click the
Support Line Level Data
box to support line
data for the integration.
Click the
Test Mode
box to integrate with the Payment
Gateway Test account for processing the payment transactions. Clear the
Test Mode
box to run the integration with the
Payment Gateway Production account.
Payment Acceptance and Order Management
Follow these steps to complete the Payment Acceptance and Order Management section of
the Payment Processing Profile:
In the Payment Acceptance and Order Management section, in the
Merchant ID
field, enter the
Visa Acceptance Solutions
merchant ID.
In the Payment Processing Profile, choose one of the level types:
Level II
to pass Level II data.
Level III
to pass Level III data.
Basic
to pass the default data to the gateway.
Choose the processor name. Click
Blank
to pass the
request to the gateway with the default structure, which is processor
agnostic.
Payment Facilitator
From the
Payment Facilitator
drop-down list, choose the
desired payment facilitator for the subsidiary corresponding to this Payment
Processing Profile. This field can be left blank if a payment facilitator is not
used. For more information, see Enabling a Payment Facilitator.
Payer Authentication Configuration
Select the desired Strong Consumer Authentication (SCA) settings for certain
scenarios. You can select one or more of these settings:
To enable SCA for all transactions, click the
Enforce Strong
Consumer Authentication for All Transactions
box.
To enable SCA when the card is being saved for the first time, click the
Enforce Strong Consumer Authentication When Saving
Cards
box.
To proceed with the authorization when the Electronic Commerce Indicator
values are
00
or
07
, click the
Proceed To Authorization when ECI Values are
00/07
box. This means the cardholder was unable to
authenticate for various reasons.
REST Keys Configuration
You must enter the required REST information you obtained from the
Business Center
:
In the
REST Key ID
field, enter the REST Key
Identifier value from the
Business Center
.
In the
REST Secret Key
field, enter the REST Secret
Key value from the
Business Center
.
For information on how to generate a key ID and a secret key, see .
Transaction Hold Reason
Select the reason codes when a payment must be put on hold (such as 101 -
MISSING_FIELD, 102 - INVALID_DATA). For more information about reason codes, see
Reason Codes for Oracle NetSuite.
Merchant Reference Number Customization
Choose one of these options in the
For Capture
field and
choose an option for the
For Refund
field:
Sales Order #
to set the merchant reference code to the sales order
number
Cash Sale #
to set the merchant reference code to the cash sale
number
Cash Refund #
to set the merchant reference code to the cash refund
number
Fraud Management
Click the
Enable Fraud Management
box to use
Decision Manager
rules or
the rules enforced by the
Visa Acceptance Solutions
machine learning system. Clear this option to ignore the
Visa Acceptance Solutions
Fraud Management Services.
In the
Decision Manager
Reject
field, choose
External Fraud Reject Hold
to keep the payment on hold
when the
Visa Acceptance Solutions
Fraud Management services rejects the payment.
To cancel the order when the
Visa Acceptance Solutions
Fraud Management services
reject the payment, choose
External Fraud Reject Hold and Cancel
Order
.
AVS/CVN Rules
By default, only the Address Verification Service (AVS) code
N
results in an AVS decline. Use the
Decline AVS Flags
field to
specify a list of AVS codes that should result in an AVS decline. You must include
the value
N
in the list if you want to receive declines for AVS
code N. These codes are available
1, 2, 3, 4, 5, A, B, C, D, E, F, G, H, I,
J, K, L, M, N, O, P, Q, R, S, T, U, V, W, X, Y, Z
.
To disable AVS functionality, choose the
Ignore AVS Response
box. If this box is checked, the plugin ignores the results from the
Visa Acceptance Solutions
AVS, even when you use Decline AVS flags. The plugin
processes the payment transaction when a customer's address information does not
match the billing address of the credit or debit card account.
The
No AVS Match
,
AVS Service Not Available
, and the
Partial AVS
Match
settings indicate how SuiteApp handles AVS results returned during an
authorization and sale operation. For each AVS setting, in their respective field,
choose one of these actions:
Accept
Cancel Order
Verification Review
Credit Card Verification (CSC) Rules
To disable CSC functionality, click the
Ignore CSC Response
box. If this box is checked, the plugin ignores the results from the
Visa Acceptance Solutions
CVN service. The plugin processes the payment transaction
even when the CSC code entered does not match the security code of the credit and
debit card account.
These settings indicate how SuiteApp handles CVN results returned during an
authorization and sale operation:
CSC Not Submitted
CSC Not Supported by Cardholder Bank
CSC Service Not Available
CSC Check Failed
No CSC Match
For each CSC setting that is listed above, choose one of these actions:
Accept
Cancel Order
Verification Review
Override Options
To use a dummy email address on requests with an empty email address, click the
Use Dummy Billing Email Address
box.
Secure Acceptance
Profile Configuration
Follow these steps to configure
Secure Acceptance
as a payment method, if
you use it:
In the
Profile ID
field, enter your
Business Center
Secure Acceptance
profile ID.
In the
Access Key
field, enter your
Business Center
Secure Acceptance
access key.
In the
Key Secret
field, enter your
Business Center
Secure Acceptance
key secret.
In the
Web Store URL
field, enter the Web Store URL
link. Make sure that you replace the relevant account ID on the following
URL
https://accountid.secure.
Oracle NetSuite
.com/app/site/backend/returnfromplacedorder.nl
. You can
find the account ID in
Setup/Company/Company Information/Account
ID
. After logging in to
Oracle NetSuite
, the
account ID is visible on the URL as well (such as:
field if you want the field
value from the transaction to sync to the
Business Center
. Due to
limitations, this service is not supported when Payer Authentication (
3-D Secure
) is enabled.
Under the
Decision Manager
section, Payer Authentication (DMPA) is not
currently supported. You must disable the DMPA rules set in the
Business Center
.
Default Custom Messages and Developer ID
Enter the customer messages that you want displayed for each of these scenarios:
External Reject Message
: Enter the custom message to be displayed
when transactions are rejected.
External Hold Message
: Enter the custom message to be displayed when
transactions are kept on hold.
Developer ID
: Enter the developer ID (for example, 20083856). This ID
is populated by the solution partner or solution integrator who performs the
implementation on your behalf.
ACH Configuration
Choose the
Default SEC Code
for all ACH transactions through
Oracle NetSuite
. You can change the SEC (Standard Entry Class)
Codes at the transaction level. These are the SEC code options:
PPD
: Pre-arranged payment or deposit
CCD
: Corporate credit or debit
TEL
: Telephone initiated entries
Oracle NetSuite
SuiteCommerce automatically sets the SEC code for
transactions to WEB (internet initiated/mobile entry).
Webhook Configuration for Network Tokenization
To enable creating a webhook subscription, click the
field, select all of the payment methods that
you require. In the
Gateway Request Types
field, select all of the gateway
request types that you require (authentication, authorizations, capture
authorization, credits, refunds, sales, void authorizations).
Tokenization
Tokenization is supported through Strong Customer Authentication (SCA) and not
Oracle NetSuite
.
To support tokenization, click the
Replace Payment Card by
Token
box.
In the
Payment Card Token Payment Method
field,
select the payment method.
For ACH, in the
General Token Payment Method
field, select the payment card token payment method.
Configuring Reports
The
Visa Acceptance Solutions
SuiteApp for
Oracle NetSuite
bundle provides
these reporting services, which you can import from
Visa Acceptance Solutions
into
Oracle NetSuite
:
Transaction Request Report
Payment Batch Detail Report
Conversion Detail Report
Configuring Reports
Follow these steps to configure the reports that you want to use:
In your
Oracle NetSuite
account, on the top navigation, hover over
Visa Acceptance Solutions
Integration > SuiteApp
Configuration
. Click
SuiteApp
Configuration
.
On the top navigation, hover over
Configuration >
Reporting
. Click
Create Reporting
Setup
.
Enter your
Business Center
merchant ID, key ID, and the secret key that
you generated from the
Business Center
.
To move details of the Conversion Detail Report from the
Business Center
to
Oracle NetSuite
, click the
Conversion Detail
Report
box. To run the integration in test mode, click the
Test Mode
box. To run the integration in live mode,
clear the
Test Mode
box.
Click the
Reporting File Details
tab. The configuration for standard
Payment Batch Detail Report and Transaction Request Report appear by default.
They cannot be removed.
Choose a report (Payment Batch Detail Report or Transaction Request
Report).
Enter the name of the custom report under
Name
and click
OK
.
For a custom one-time report, enter an end date like these examples. For
subscription reports, keep the field blank.
Example 1: If your report start date is 2024-03-06 and the end date is 2024-03-09,
the Report End Date passed in the query is 2024-03-09.
Example 2: If your report runs from midnight to midnight on 2024-03-09, the Report
End Date passed in the query is 2024-03-10.
Configuring the Schedule for the Transaction Request Report
The reporting scripts pull the information from the payment application to
Oracle NetSuite
based on schedules defined in
Oracle NetSuite
.
To ensure timely generation of reports, set up the same timezone on your
Oracle NetSuite
account and on the
Business Center
.
Follow these steps to configure a schedule for the Transaction Request Report:
In your
Oracle NetSuite
account, on the top navigation, hover over
Visa Acceptance Solutions
Integration > Reporting
Scripts
. Click
Transaction Request
Report
.
On the script deployments page, click
View
to view the
scheduler details. On the
Schedule
tab of the Script
Deployment page, you can view the frequency of the event, the start date and
start time, and the end date and end time. By default, the schedule is set as a
daily event with a start time of 12:00 a.m.
To change the schedule options, click
Edit
on the script
deployments page to update the scheduler options.
On the
Schedule
tab, choose the appropriate frequency of
the event (daily/weekly/monthly), start date and start time, the end date and
end time of the event.
Configuring the Schedule for Payment Batch Detail Report
The reporting scripts pull the information from the payment application to
Oracle NetSuite
based on schedules defined in
Oracle NetSuite
.
To ensure timely generation of reports, set up the same timezone on your
Oracle NetSuite
account and on the
Business Center
.
To configure a schedule for the Payment Batch Detail Report, follow these steps:
In your
Oracle NetSuite
account, on the top navigation, hover over
Visa Acceptance Solutions
Integration > Reporting
Scripts
. Click
Payment Batch Detail
Report
.
On the script deployments page, click
View
to view the
scheduler details. On the Schedule tab of the Script Deployment page, you can
view the frequency of the event, the start date and start time, and the end date
and end time. By default, the schedule is set as a daily event with a start time
of 12:00 a.m.
To change the schedule options, click
Edit
on the script
deployments page to update the scheduler options.
On the Schedule tab, choose the appropriate frequency of the event
(daily/weekly/monthly), start date and start time, the end date and end time of
the event.
Configuring the Schedule for Conversion Detail Report
The reporting scripts pull the information from the payment application to
Oracle NetSuite
based on schedules defined in
Oracle NetSuite
.
To ensure timely generation of reports, set up the same timezone on your
Oracle NetSuite
account and on the
Business Center
.
To configure a schedule for the Conversion Detail Report, follow these steps:
In your
Oracle NetSuite
account, on the top navigation, hover over
Visa Acceptance Solutions
Integration > Reporting
Scripts
. Click
Conversion Detail
Report
.
On the script deployments page, click
View
to view the
scheduler details. On the
Schedule
tab of the Script
Deployment page, you can view the frequency of the event, the start date and
start time, and the end date and end time. By default, the schedule is set as a
daily event with a start time of 12:00 a.m.
To change the schedule options, click
Edit
on the script
deployments page to update the scheduler options.
On the
Schedule
tab, choose the appropriate frequency of
the event (daily/weekly/monthly), start date and start time, the end date and
end time of the event.
The script
Update SO status by Conversion Detail Report
updates the sales order status according to the information from the conversion
detail report. To view the scheduler option of this script, hover over
Visa Acceptance Solutions
Integration > Reporting
Script
. Click
Update SO status by Conversion Detail
Report
. You can view and change the schedule options from the
Script Deployment page.
Creating a Reporting Script
If any of the imported reporting records are missing from the mapping to the
transaction in
Oracle NetSuite
, you can initiate a script on demand to
map the existing reporting records to the transaction IDs. Follow these steps to
initiate this script:
In your
Oracle NetSuite
account, on the top navigation, hover over
Visa Acceptance Solutions
Integration > Reporting
Script
. Click
Map NS ID on Reporting
Records
.
On the Script Deployments page, click
Edit
next to
customdeploy_cs_pymt_map_reporting_ns_id
for the status Not
Scheduled.
Click the drop-down button beside
Save
, and then click
Save and Execute
. The script now updates the
reporting records in the background.
Configuring Invoicing
The
Visa Acceptance Solutions
invoicing feature enables you to create invoices and
share them with your customers. You can manage invoices and import existing invoices
within
Oracle NetSuite
.
If an invoice is created in
Oracle NetSuite
,
Visa Acceptance Solutions
recommends that you make all of the updates to that transaction on
Oracle NetSuite
and have the feature update the corresponding invoice in
Business Center
. If an invoice is created in the
Business Center
and
imported into
Oracle NetSuite
,
Visa Acceptance Solutions
recommends that
all updates to that transaction should be done on the
Business Center
and have
the feature update the corresponding invoice in
Oracle NetSuite
.
Enabling the Custom Transaction Feature for Invoicing
You must enable the Custom Transaction feature to use the upgraded invoicing
features.
In the top navigation, hover on
Setup > Company
. Click
Enable Features
.
Click the
SuiteCloud
tab.
Scroll down to the SuiteGL section, and click the
Custom
Transactions
box.
Setting Up an Invoicing for the
Pay by Link
Feature
Follow these steps to set up the
Visa Acceptance Solutions
Pay by Link
Invoicing feature:
In your
Oracle NetSuite
account, on the top navigation, hover over
Visa Acceptance Solutions
Integration > SuiteApp
Configuration
. Click
SuiteApp
Configuration
.
On the top navigation, hover over
Configuration >
Invoicing
. Click
Create Invoicing
Setup
.
Under Merchant Details, enter the required fields. Enter a name in the
corresponding field for your invoicing configuration.
If you are working with a
Business Center
Test Account, check the
Test Mode
box.
For the
Merchant ID
field, enter the
Business Center
account
merchant ID (MID).
For the
Secret Key
field, enter the
Business Center
account
secret key (key ID). For steps on how to generate a shared secret key, see .
For the
Key
field, enter the
Business Center
account merchant
key (secret key). For steps on how to generate a shared secret key, see .
Under
Oracle NetSuite
Invoice Default Values, check the
Set as
Default MID
box to add the MID you entered earlier as the
Pay by Link
account on new invoices.
Check
Use Invoice Number as
Pay by Link
Invoice ID
box
to automatically set the
Oracle NetSuite
generated invoice ID on
the
Pay by Link
Invoice ID
field (if left blank).
Select a Default Invoice Action that you want set on the invoice record. This
selection must be the same value as the
Pay by Link
Create Invoice
field when you create a new invoice. These are
the options:
ADDITIONAL INFORMATION
Create a draft invoice.
Create and send the invoice immediately. This creates the invoice and
the customer receives the
Pay by Link
invoice.
Create an invoice without sending it. This creates an invoice and
generates the
Pay by Link
invoice, but does not send
it to the customer.
Select the
Default MID Config
field, which displays the current default
invoicing setup.
ADDITIONAL INFORMATION
The default MID cannot be inactivated or deleted. Assign another invoicing
setup as the default before inactivating or deleting the default invoicing
setup. If an item has auto sourcing values, which are mandatory on an
invoice line level, then these values must be set on the default items
present on the invoicing configuration record.
Under
Business Center
Import Invoice Default Values, check the
Import EBC Invoices
box to import invoices created in
Business Center
into
Oracle NetSuite
.
Select the
On Demand Scheduler
to run the invoices script on
demand.
Choose the
Default Customer
in case of any error while creating or
updating existing customer in an invoice. Choose the same customer as the
subsidiary.
Choose the
Subsidiary
you want recorded on the invoices.
Choose the
Location
you want recorded on the invoice.
Choose the
Item
that defaults on the invoice when an item is not matched.
Choose the
Shipping Item
that defaults on an invoice for shipping cost.
Choose the
Tax Item
that defaults on an invoice for tax amount.
Choose the
Discount Item
to add a default item on an invoice for discount amount.
Choose a
Tax Code
to use on an invoice. The default is Not Taxable.
Choose a
Deposit Account
to deposit paid invoices.
Check the
Default Header Only
box to set the default header as the only
option for all the invoicing transactions.
Click
Save
.
Creating a New Invoice
You must enter all of the details in the Invoice page and then fill out the
Visa Acceptance Solutions
tab to create an invoice in
Oracle NetSuite
and
send it to
Visa Acceptance Solutions
.
In your
Oracle NetSuite
account, hover over
Transactions > Sales > Create Invoices
. For detailed
instructions on completing the Invoice page, see Creating an Invoice. Then, continue
following the steps in this section to complete the
Visa Acceptance Solutions
portion.
From the Invoice page, scroll down and click the
Visa Acceptance Solutions
tab.
In the
Pay by Link
MID Account
field,
select the same MID account as the
Default MID Config
field contains from the Configuring an Invoicing Setup section. This field
contains all the active set up records, so carefully select the correct
account.
In the
Pay by Link
Create Invoice
field, select the same invoice action that you selected for the
Default Invoice Action
field in the
Configuring an
Invoicing Setup
section.
ADDITIONAL INFORMATION
To create an invoice using a specific number, enter that number in the
Pay by Link
Invoice ID
field. If you leave it blank,
Visa Acceptance Solutions
auto-generates
the invoice number and saves it. The invoice ID allows only letters,
numbers, and special characters like the underscore (
_
)and hypen: (
-
).
To allow partial payments for the invoice, enter the amount in the
Pay by Link
Partial Allowed
Amount
field. The partial amount you enter should not be
greater than the total invoice amount.
Enter the email address to be used when sending the
Pay by Link
Invoice Link
field at the transaction
level. If you leave this field blank, the system sources the email address from
the
Pay by Link
Email
field on the
customer record. If that field is also blank, the system sources the email
address from the standard
Email
field on the customer
record.
Check the
Pay by Link
Header Only
box
if you do not want to send line-level data in the request to the
Business Center
. Line level data cannot exceed the maximum limit of 30 lines,
and you must leave the box clear.
Click
Save
. If you exceed the line-level data limit and
did not check the
Pay by Link
Header
Only
box, a warning message appears when you try to save it.
Reduce the number of lines or check the
Pay by Link
Header Only
box to send the header only.
ADDITIONAL INFORMATION
When you save the record, a new invoice is created in the
Business Center
with these details. The system saves the invoice number from
the
Business Center
in the
Pay by Link
Invoice ID
field and the status in the
Pay by Link
Invoice Status
field.
If an issue
occurs while you are creating the invoice, the error message appears in the
Pay by Link
Error Message
field. After you resolve the error, save the record again to create the
invoice. For more information about the reason codes, see Reason Codes for Oracle NetSuite.
Updating an Existing Invoice
Follow these steps to update an existing invoice from
Oracle NetSuite
to
the
Business Center
:
On the top navigation, hover over
Transactions > Sales > Create
Invoices
. Click
List
.
On the Invoices page, click
Edit
on the invoice that you want to
update.
Make the appropriate changes in the invoice.
Scroll down and click the
Visa Acceptance Solutions
tab.
In the
Pay by Link
Invoice Action
field, select
Update
.
Click
Save
. The invoice is now updated in the
Business Center
in
the
Pay by Link
Invoice Status
field.
Sending an Invoice
Follow these steps to send or resend an invoice from
Oracle NetSuite
:
On the top navigation, hover over
Transactions> Sales > Create
Invoices
. Click
List
.
On the Invoices page, click
Edit
on the invoice that you want to
update.
Scroll down and click the
Visa Acceptance Solutions
tab.
In the
Pay by Link
Invoice Action
field, choose
SEND
.
Click
Save
. The invoice link is sent from the
Business Center
to the customer email address.
Voiding an Invoice
Follow these steps to void an invoice in
Oracle NetSuite
and cancel it
in the
Business Center
:
On the top navigation, go to
Setup > Accounting > Accounting
Preferences
.
If checked, clear the
Void Transactions Using Reversing
Journals
box.
Click
Save
.
On the top navigation, hover over
Transactions > Sales > Create
Invoices
. Click
List
.
On the Invoices page, click
Edit
on the invoice that you want to
update.
Scroll down and click the
Visa Acceptance Solutions
tab.
In the
Pay by Link
Invoice Action
field, select
Cancel
.
Click
Save
. The invoice is now voided from
Oracle NetSuite
and canceled in the
Business Center
.
Searching for an Invoice
You can search for invoices created and imported in
Oracle NetSuite
from these four lists:
Invoices Created and Send: list of invoices.
Paid Invoices: list of paid invoices.
Errored Invoices When Exporting: list of invoices errored out when an
invoice had an error message.
Errored Invoices When Importing: list of invoices that errored out when
importing or updating an invoice with an error message.
To search for an invoice, on the top navigation, hover over
Visa Acceptance Solutions
Integration > Invoicing
. Select the list for the
invoice you want to find.
Invoicing using the Webstore
Enabling the Payment Link Feature
You must enable the Payment Link feature in
Oracle NetSuite
to use
invoicing with the webstore. Follow these steps to enable Payment Link:
On the top navigation, hover over
Setup > Company
.
Click
Enable Features
.
Click the Transactions tab, and then scroll down to Payment Processing.
Check the
Payment Link
box.
Click
Save
.
Setting Up Invoicing for Suite Payment
Follow these steps to setup the invoicing for Suite Payment:
On the top navigation, go to
Commerce
, and click
Payment
Link
.
Enter a name in the
Domain Prefix
field to be part of the
domain.
In the
Payment Methods
field, select the payment
methods that you want to make available.
Check the
Accept Partial Payments
box to enable
customers to select the amount to be paid on an invoice.
In the
Company Logo
field, upload and select a
company logo to display in the header of the Payment Link page.
In the
Company Name
field, enter a name that you want
to display in the header of the Payment Link page.
In the
Company Info
field, enter additional company
information to display in the header of the Payment Link page.
In the
Payment Accepted
field, set the system email
template that you want to send to customers when payment is confirmed.
In the
Payment Rejected
field, set the system email
template that you want to send to customers when payment is rejected.
Click
Save
.
Creating an Invoice and Generating a Payment Link
To create an invoice and generate a payment link in
Oracle NetSuite
:
On the top navigation, hover over
Transactions
>
Sales
. Click
Create
Invoices
. For detailed instructions on how to fill out the
Invoice page, see Creating an Invoice.
Click
Save
. To generate a payment link, continue
following the steps in this section.
While still on the Invoice page, click the
Billing
tab, and click
Payment
. The payment link is generated
on the
Payment
tab.
Click
Payment Link
, and complete all of the required fields.
Click
Submit
.
After the payment is successful,
refresh the invoice in
Oracle NetSuite
.
Go to
Related Records
to view the customer payment reference.
Testing an Invoice Payment Using Webstore Invoice Payment through Credit and Debit
Card
Follow these steps to test an invoice payment transaction from a credit or debit card:
On the top navigation, hover over
Transactions
>
Sales
. Click
Create Invoices
.
For more information on how to fill out the Invoice page, see Creating an Invoice. Then, continue
following the steps in this section to generate a payment link.
Click
Save
.
After you save the invoice, go to
Commerce > Website
.
Click
Website List
.
Click
Preview
for the applicable website.
Log in to your website using your credentials.
Go to
Billing
and click
Invoices
.
Select the specific invoice that you want to pay.
Click
Make payment
. Select credit or debit card as the
payment method.
Enter the card details, and the billing and shipping address.
Click
Submit
.
If the customer cancels the transaction, the payment record in
Oracle NetSuite
is voided and the customer can reprocess the same
invoice. If the payment is not voided during retry, click
Payment record
,
and then click the
Finalize your Payment
link to void the transaction.
The message "Pending Payment Voided Successfully" appears. Go back to the
invoice in
Billing
, and then
Invoices
to retry the payment.
Due to
Oracle NetSuite
limitations, multiple invoices cannot be processed
simultaneously with the
requires line-level data
option
checked on Payment Methods.
Invoice payment through the web store works only with the latest Suite Commerce and
Suite Commerce Advance versions.
Enabling Payment Instrument Support
You must enable the Payment Instruments configuration to use these specific
features:
Tokenization
Network Tokenization
ACH
Multi-Capture
Delay Shipment
Merchant Initiated Transactions (MIT Mandate)
Invoicing –
Pay by Link
Follow these steps to enable Payment Instruments:
Go to
Setup > Company
. Click
Enable
Features
.
Click the
Transactions
tab.
Scroll down to the Payment Processing section, and click the
Payment
Instruments
box.
Enabling a Payment Facilitator
A Payment Facilitator (PayFac) is registered by an acquirer to facilitate
transactions on behalf of merchants. With the introduction of a PayFac, the merchant
becomes a sub-merchant, and the PayFac becomes the main merchant.
If you are using the multi-subsidiary customer feature in
Oracle NetSuite
, ensure that there is a Payment Processing Profile for each transacting
subsidiary to enable payment processing for transactions pertaining to those
subsidiaries.
The PayFac feature in the SuiteApp is supported only using REST keys. To support
PayFac processing, additional configuration is required in order to enter the
sub-merchant information.
Follow these steps to configure the PayFac feature:
On the top navigation, hover over
Visa Acceptance Solutions
Integration > SuiteApp Integration
. Click
SuiteApp
Integration
.
Hover over
SuiteApp Configuration
. Click
View
Payment Processing Profiles
.
Click
Edit
next to the profile that you need to enable the Payment
Facilitator.
Scroll down to the Payment Facilitator section.
In the
Payment Facilitator
drop-down field, click
New
.
Enter a name for the Payment Facilitator in the
Name
field.
Open the
Aggregator Information
tab and complete all of the mandatory
fields. These include:
ADDITIONAL INFORMATION
Aggregator Name
Aggregator ID
Sub Merchant Name
Sub Merchant Country
Sub Merchant State
Sub Merchant City
Sub Merchant Postal Code
Sub Merchant Address1
Sub Merchant Email
Sub Merchant Phone Number
Sub Merchant Card Acceptor ID
Sub Merchant Region
Open the
Merchant Information
tab and complete all of the mandatory
fields. These include:
ADDITIONAL INFORMATION
Merchant Descriptor Name
Merchant Country
Merchant State
Merchant City
Merchant Postal Code
Merchant Address1
Merchant Contact
Merchant Category Code
Merchant Tax ID
Merchant Sales Organization Code
Save
the Payment Facilitator record.
Enabling Network Tokenization
A network token is a network scheme generated token, that represents customer card
information for secure transactions that reference an actual PAN.
Before you can enable a MID for Network Tokenization, you must provision it with a
Token Requestor ID (TRID) for each card scheme. The Network Tokenization feature in
the SuiteApp supports only REST keys.
Oracle NetSuite
must subscribe to the necessary webhook notifications
and ingest them for changes to the card. The system automatically creates the
subscription when processing the authorization when the webhook subscription feature
is enabled in the profile. If you perform an authorization as an external event, you
must update the subscription ID in
Oracle NetSuite
along with the
import of the tokens to accept webhook notifications for these card changes.
Oracle NetSuite
processes only these token updates:
Active: The system updates the
Payment Card Token Inactive
field based on
this value.
Deleted: The system deletes the Payment Card Token record from
Oracle NetSuite
.
Configuring Network Tokenization
Follow these steps to configure the network tokenization feature:
next to the profile getting a subscription
record.
Scroll down to the Webhook Configuration For Network Tokenization section, and
click
New
.
Complete these required fields:
Subscription ID
: Enter the Webhook Subscription
ID
PPP Record ID
: Enter the internal ID of the
payment processing profile record to use with this subscription.
Keep
the associated payment processing profile active, or update this
field with the active payment processing profile record ID to accept
webhook notifications. If the
PPP Record ID
field is empty, has invalid data, or is associated with an inactive
profile or missing REST keys,
Oracle NetSuite
does not
process the webhook notifications for token updates.
Webhook Security Key
: Enter the Webhook Security
Key
Merchant ID
: Enter the Merchant ID
Click
Save
.
Import the payment card tokens into
Oracle NetSuite
.
Oracle NetSuite
Merchant-Initiated Transactions
The MIT mandate ensures that merchants, acquirers, and issuers understand the transaction processing cycle. The MIT framework introduces a global standard for identifying transaction intent and whether a transaction is merchant initiated (without participation of cardholder).
The MIT framework facilitates exemptions from Strong Customer Authentication (SCA) using
3-D Secure depending on the transaction context (such as recurring transactions or
Mail-Order/Telephone-Order (MOTO) transactions).
Benefits of Complying with the MIT Mandate
Merchants, acquirers, and issuers can link a series of related transactions to get
these benefits:
MIT transactions, token-based transactions in particular, have better approval
rates when the issuer can identify them.
MIT and token-based transactions can be processed without strong customer
authentication (these transactions might otherwise fail, especially in regions
complying with PSD2).
Transaction transparency, which results in higher authorization rates and improved cardholder experience.
Supported MIT Transaction Types
The MIT transaction types mentioned below are industry-specific transactions
supported by the plugin:
Resubmission: A merchant resubmits transactions that request authorization but were declined due to insufficient funds while the goods or services were already delivered to the cardholder. A merchant in this situation can resubmit the request to recover outstanding debt from cardholders.
Reauthorization: A merchant initiates a reauthorization when the original order or service is not complete or fulfilled within the authorization validity limit set by the scheme. Common instances that require reauthorizations include delayed shipments, split shipments, extended stays, and extended rentals.
Delayed Charges: A delayed charge is associated with an agreement between you and the cardholder for services rendered. Merchants might use delayed charges after providing services such as lodging, travel, or auto rental.
No Show: A no-show transaction occurs when you and a cardholder have an agreement for a purchase, but the cardholder does not meet the terms of the agreement. No-show transactions are often used in hotels or restaurants where bookings are not honored despite the agreement entered into by the cardholder.
Unscheduled/Auto Top-up: This type of transaction uses a stored credential for a fixed or variable amount and does not occur on a scheduled or regularly occurring transaction date. The cardholder must provide consent for the merchant to initiate one or more future transactions.
If a MIT type is not selected, the transaction is flagged and processed as MOTO by
default.
To avoid issues processing a MIT with a custom role, you must provide the payment
instrument permission to the role. The
Payment Type
field is supported only
when the Payment Instrument feature is enabled.
Follow these steps to assign the role:
Go to
Setup
.
Click
Users/Roles
, and click
Manage Roles
.
Click
Customize
on the role you want to assign the permission to.
Scroll down, and under the
Permissions
tab, click the
Lists
tab.
Find the
Payment Instrument
row and set the permission
level to
Full
.
Click
Save
.
Initial Authorization of External Merchant Initiated Transactions
Follow these steps to trigger
subsequentAuth
instead of
subsequentAusubsequentAuth
and
authFirst
for
payment card tokens imported into
Oracle NetSuite
.
Go to
Visa Acceptance Solutions
Integration > SuiteApp
Configuration
. Click
SuiteApp
Configuration
.
On the top navigation, hover over
Configuration >
Reporting
.
Click the Payment tab.
In the
Payment Network Reference
field, select
MOTO
transaction
.
Reference Information
This section contains reference information that is useful when integrating
with
Oracle NetSuite
.
Testing Endpoints
Follow these steps to verify the test and live endpoint URLs to be used by the
integration.
Choose
Customization > Lists, Records, and Fields > Record
Types
.
Under Record Types, go to the
Payment API Configuration
record type and click
List
.
Verify that the test and live endpoint URLs are correct. If any changes are
required, confirm with the company team, and update them in the custom record.
You can also check the SuiteApp version on the bottom of the
Oracle NetSuite
Configuration Screen to identify the version in current
use.
To check the SuiteApp version, go to
Visa Acceptance Solutions
Integration > SuiteApp Configuration
. Click
SuiteApp
Configuration
.
Reason Codes for
Oracle NetSuite
The following table describes the reason codes that are returned by
Oracle NetSuite
.
Reason Codes
Reason Code
Description
100
The transaction was successful.
101
Decline: The request is missing one or more fields.
102
Decline: One or more fields in the request contains invalid
data.
104
Decline: The
merchantReferenceCode
sent with this authorization request
matches the
merchantReferenceCode
of another
authorization request that you sent in the last 15 minutes.
110
A partial amount was approved.
150
Error: General system failure.
151
Error: The request was received but there was a server timeout. This error does not include timeouts between the client and the server.
152
Error: The request was received, but a service did not finish running in time.
200
Soft Decline: The authorization request was approved by the
issuing bank but flagged by
Visa Acceptance Solutions
because it
did not pass the Address Verification Service (AVS) check.
201
Decline: The issuing bank has questions about the request.
You do not receive an authorization code programmatically, but by
calling the processor you might receive one verbally.
202
Decline: The card is expired. You might also receive this reason code if the expiration date
you provided does not match the date on file with the issuing bank.
The
ccCreditService
does not check the
expiration date; instead, it passes the request to the payment
processor. If the payment processor allows issuance of credits
to expired cards,
Visa Acceptance Solutions
does not limit
this functionality.
203
Decline: General decline of the card. No other information
was provided by the issuing bank.
204
Decline:The account has insufficient funds.
205
Decline: The card is stolen or lost.
207
Decline: The issuing bank is unavailable.
208
Decline: The card is inactive or not authorized for
card-not-present transactions.
209
Decline: The Card Verification Number (CVN) did not
match.
210
Decline: The card has reached the credit limit.
211
Decline: The CVN is invalid.
220
Decline: Generic decline.
221
Decline: The customer matched an entry on the processor's negative file.
222
Decline: The customer's account is frozen.
230
Soft Decline: The authorization request was approved by the
issuing bank but flagged by
Visa Acceptance Solutions
because it
did not pass the Card Verification Number (CVN) check.
231
Decline: The account number is invalid.
232
Decline: The card type is not accepted by the payment processor.
233
Decline: General decline by the processor.
234
Decline: There is a problem with your
Visa Acceptance Solutions
merchant configuration.
235
Decline: The requested amount exceeds the originally
authorized amount. This can occur if you try to capture an amount
larger than the original authorization amount.
236
Decline: There was a processor failure.
237
Decline: The authorization was already reversed.
238
Decline: The transaction was already settled.
239
Decline: The requested transaction amount must match the previous transaction amount.
240
Decline: The card type sent is invalid or does not correlate
with the credit/debit card number.
241
Decline: The referenced request ID is invalid for all
follow-on transactions.
242
Decline: The request ID is invalid. You requested a capture, but there is no corresponding,
unused authorization record. This can occur if there was not a
previously successful authorization request or if the previously
successful authorization was already used in another capture
request.
243
Decline: The transaction was already settled or reversed.
246
Decline: The capture or credit is not voidable because the capture or credit information was
already submitted to your processor or you requested a void for a
type of transaction that cannot be voided.
247
Decline: You requested a credit for a capture that was previously voided.
248
Decline: The boleto request was declined by your processor.
250
Error: The request was received, but there was a timeout at the payment processor.
251
Decline: The pinless debit card's use frequency or maximum amount per use was
exceeded.
254
Decline: The account is prohibited from processing stand-alone
refunds.
400
Soft Decline: Fraud score exceeds threshold.
450
The apartment number missing or not found.
451
The address information is insufficient.
452
The house/box number not found on street.
453
Multiple address matches were found.
454
The P.O. Box identifier was not found or was out of
range.
455
The route service identifier was not found or was out of
range.
456
The street name was not found in postal code.
457
The postal code was not found in database.
458
Unable to verify or correct address.
459
Multiple address matches were found (international).
460
Address match was not found (no reason given).
461
The character set is unsupported.
475
The cardholder is enrolled in Payer Authentication. Authenticate
the cardholder before continuing with the transaction.
476
Encountered a Payer Authentication problem. The payer could not
be authenticated.
480
The order is marked for review by
Decision Manager
.
481
The order has been rejected by
Decision Manager
.
490
Your aggregator or acquirer is not accepting transactions from you at this time.
491
Your aggregator or acquirer is not accepting this transaction.
520
Soft Decline: The authorization request was approved by the
issuing bank but declined by
Visa Acceptance Solutions
based on
your Smart Authorization settings.
700
The customer matched the Denied Parties List.
701
There was an export
bill_country/ship_country
match.
702
There was an export email_country match.
703
There was an export
hostname_country/ip_country
match.
Export Execution Logs
You can use the Execution Logs Saved Search feature of
Open PrestaShop Back Office and from the Dashboard, choose
Modules >
Module Manager
.
Figure:
Dashboard
The Module Manager page opens.
Click
Upload a Module
on the Module Manager page.
Figure:
Module Manager page
The Upload a module pane appears.
Click
select file
from the Upload a module pane and
select the file you downloaded to your local system. You can also drag the file
into the Upload a module pane.
Figure:
Upload a Module pane
The pane displays the status of the installation. After the Plugin is
installed, the pane indicates that the module is installed. You can close it or
click
Configure
to configure the Plugin.
Configuration
This section describes how to set up the plugin. You
complete most of the Plugin configuration using PrestaShop Back Office.
For information about the configuration settings for the Plugin, see Configuration Settings.
For information about how to access the configuration settings for the Plugin,
see Configuring Plugin Settings.
When merchants support digital payment processing using Apple Pay
or Google Pay, they must complete some configuration using the Apple Pay or
Google Pay Developer websites.
Merchant ID, which is a unique identifier for the merchant.
Merchant Key ID
Merchant Key ID is only required
if
Authentication Type
is set to
Shared
Secret
.
This setting identifies a specific key
or token provided by a payment gateway to authenticate and authorize the
merchant's integration with the gateway.
Merchant Secret Key
Merchant Secret Key is only
required if
Authentication Type
is set to
Shared Secret
.
This setting identifies a confidential or private key used for secure
communication between the merchant's online store and a payment
gateway.
Payer Authentication/3-D Secure
When this setting is set to
Yes
, customers may receive
one-time-password (OTP) pop-ups when placing orders using credit cards.
This enables the exchange of data between the merchant, card issuer,
and, when necessary, the customer, to validate that the transaction is
being initiated by the rightful owner of the account. This might be
required for the country in which you are trading.
Enhanced Logs
When this setting is set to
Yes
, logs are generated and
can be accessed by selecting
Configure > Advanced Parameters
> Logs
.
Payment Action
Use the drop-down menu to choose one of these transaction settings:
Authorize:
This setting generates an authorize-only
transaction for a customer order.
Sale:
This setting generates a sale (bundled authorization
and capture) transaction for a customer order.
If an authorization returns
an
AVS FAILED
error when you are in
Sale
mode, merchants must manually review the transaction and decide
whether to cancel or accept the transaction. If they accept it, they
must manually capture it.
Payment Settings
Figure:
Payment Settings tab
Card Payment
When this setting is set to
Yes
, payment cards are
accepted as a payment method during checkout. The accepted card types
list enables the merchant to control which card types are accepted.
Google Pay
When this setting is set to
Yes
, Google Pay is accepted
as a payment method during checkout. The merchant's ID and name are
needed to use Google Pay. These can be configured from the Google Pay
Merchant account.
Apple Pay
When this setting is set to
Yes
, Apple Pay is accepted
as a payment method during checkout. The merchant's Apple Pay Merchant
ID, Path to Certificate file, and Path to Key file are needed to use
Apple Pay. These can be configured from the Apple Developer account.
eCheck
When this setting is set to
Yes
, customers can use
eCheck
as a payment method.
Fraud Management Settings
Figure:
Fraud Management Settings tab
Fraud Management
When this setting is set to
Yes
, merchants can identify
and prevent fraudulent activities that might occur when their customers
are using
PrestaShop
.
Tokenization
When this setting is set to
Yes
, customers can save and
store their card information so that it can be used for future
purchases.
Enforce Strong Customer Authentication
When this setting is set to
Yes
, the card holder is
challenged to authenticate when saving their card information.
The Enforce Strong Customer
Authentication setting is available only when the Payer
Authentication/
3-D Secure
(general Plugin
setting) and Tokenization (fraud management Plugin setting) are
enabled.
Limited Saved Card Rate
When this setting is set to
Yes
, merchants can specify
the number of cards that customers can save in their account, and they
can specify how long to save the card information:
Saved Card Limit Count
: Maximum number of
cards a customer can save to their account.
Saved Card Limit Time Frame
: Time frame (1 to
24 hours) for which customers can save the specified number of cards
to their account.
Google reCAPTCHA
When this setting is set to
Yes
, merchants enter the
Google reCAPTCHA keys, which are used to provide an advanced risk
analysis engine and adaptive challenges to keep malicious software from
engaging in abusive activities on your website:
reCAPTCHA Site Key: The public key that renders reCAPTCHA on your
web page.
reCAPTCHA Secret key: The private key that provides validation to
the server.
operate in the same time zone so that the Transaction Request Report and
Payment Batch Detail Report work properly.
Conversion Detailed Report
This report retrieves Case Management changes from the
Business Center
at regular intervals to ensure that orders are
updated in PrestaShop.
Latin American Country Settings
Figure:
LATAM Settings tab
Installments
When set to
Yes
, customers can make installment payments
ranging from 1 to 24 months. You can configure installment payment
settings for these Latin American countries: Brazil, Chile, Columbia,
Mexico, and Peru. For more information about configuring installment
payments, see Enabling Installment Payments.
Merchant Descriptor Name
This configuration applies only to Brazil and Mexico.
This setting enables merchants to add a short description that appears on
a customer credit card statement or bank statement to identify a
particular transaction.
Grace Period
This setting stipulates a time period after a due date during which a
payment can be made without incurring late fees or penalties. For more
information about configuring grace period payments for Mexico (the only
country for which this setting currently applies), see Enabling Grace Period Payments.
Message-Level Encryption
Message-Level Encryption (MLE)
enables you to store
information or communicate with other parties while helping to prevent uninvolved
parties from understanding the stored information. MLE is optional and supported
only for payments services.
Before configuring MLE in the module, ensure you have created the .p12
certificate and securely stored the password. This certificate is required to
authenticate and encrypt messages.
The following steps are required for MLE
Key Directory Path
The path to the directory where you have stored the .p12
certificate
Key File Name
The name of your .p12 certificate
Key Password
The password to the .p12 you set when creating the certificate
Back Office to enable installment payments, which
are applicable for payments in Brazil, Chile, Colombia, Mexico, and Peru.
Open
PrestaShop
Back Office and select
Modules >
Module Manager
from the Dashboard. The Module Manager page
opens.
Find the Plugin in the Payment section on the Module Manager page, or enter
Visa Acceptance Solutions
Official
in the
Search
field and click
Enter
.
Click
Configure
. The Configure
Visa Acceptance Solutions
Official page opens.
Select the
LATAM SETTINGS
tab.
From the
Country
drop-down menu, choose the country for
which you want to configure the installment payments.
Choose the relevant options from each drop-down menu for these settings and
click
Save
:
Processor
Installments (In Months)
Choose Card Types
When a specific card type is
selected for a processor in a certain country, it cannot be chosen for
any other processor within that country.
Card types selected in the
LATAM Settings tab must match the accepted card types specified in the
Card Payments payment settings. For more information, see Payment
Settings in the Configuration Settings
section.
Enabling Grace Period Payments
Use
PrestaShop
Back Office to enable grace period payments, which
are applicable only for payments in Mexico.
Open
PrestaShop
Back Office and select
Modules >
Module Manager
from the Dashboard. The Module Manager page
opens.
Find the Plugin in the Payment section on the Module Manager page, or enter
Visa Acceptance Solutions
Official
in the
Search
field and click
Enter
.
Click
Configure
. The Configure
Visa Acceptance Solutions
Official page opens.
Select the
LATAM SETTINGS
tab.
From the
Country
drop-down menu, choose
Mexico
.
You must select Mexico as the country to get access to the Grace Period
setting because this setting is only applicable in Mexico.
To enable grace period payments, set
Grace Period
to
Yes
, and click
Save
.
Enforcing Strong Customer Authentication
Select the
Enforce Strong Customer Authentication
setting to prompt a
3-D Secure
challenge when a customer saves their credit card
information. The customer is challenged to authenticate when a transaction is
declined as reported by response code
478(Strong Customer Authentication
required)
. After the transaction is declined, another request is sent
for the same order.
The
Enforce Strong Customer
Authentication
setting is available only when the Payer
Authentication/
3-D Secure
in the general Plugin setting) and
Tokenization in the fraud management Plugin setting) are enabled. See Configuration Settings for
information about these settings and Configuring Plugin Settings for information about how to set them.
Follow these steps to enable
Enforce Strong Customer
Authentication
:
Open
PrestaShop
Back Office and select
Modules >
Module Manager
from the Dashboard. The Module Manager page
opens.
Find the Plugin in the Payment section on the Module Manager page, or enter
Visa Acceptance Solutions
Official
in the
Search
field and click
Enter
.
Click
Configure
. The Configure
Visa Acceptance Solutions
Official page opens.
Select the
FRAUD MANAGEMENT SETTINGS
tab.
Set the
Enforce Strong Customer Authentication
setting
to
Yes
.
Click
Save
.
Enabling Apple Pay
This section describes the requirements for configuring and using the plugin to process
Apple Pay transactions through
PrestaShop
.
Account and Website Requirements
Before you configure the Plugin to process Apple Pay transactions, ensure that these
requirements are met:
page on
the Apple Developer website. Before proceeding, complete these steps:
ADDITIONAL INFORMATION
Create a Merchant ID
Create a Payment Processing Certificate
Validate the merchant domain
Create a Merchant Identity Certificate
Download the Merchant Identity Certificate.
Convert the downloaded certificate to a PEM format:
openssl x509 -inform der -in merchant_id.cer -out merchant_id.pem
After the certificate is converted, it displays in the Keychain Access
menu.
Double-click the certificate on the Keychain Access menu. The certificate is
installed and the associated private key displays in the Keychain Access menu.
from the Dashboard. The Module Manager page
opens.
Find the Plugin in the Payment section on the Module Manager page, or enter
Visa Acceptance Solutions
Official
in the
Search
field and click
Enter
.
Click
Configure
. The Configure
Visa Acceptance Solutions
Official page opens.
Select the PAYMENT SETTINGS tab and enter the complete path to the certificate
and key in the Apple Pay section.
Enabling Google Pay
This section describes the requirements for using and configuration steps to enable the
plugin to process Google Pay transactions through
PrestaShop
.
Account Requirements
Before you configure the Plugin to process Google Pay transactions, you must have a
Google Pay Developer account.
Generating a Google reCAPTCHA Site Key and Secret Key
The Google reCAPTCHA site and secret keys enable you to safely process Google Pay
payments. These keys protect your website when your customers use Google Pay to make
payments.
Choose the Score based (v3) option for the reCAPTCHA type.
Enter the domain on which
PrestaShop
is
hosted.
Enter the email address of the website owner.
Check the box to accept the terms of service and click
Submit
.The reCAPTCHA site key and secret key
are generated.
Open
PrestaShop
Back Office and select
Modules >
Module Manager
from the Dashboard. The Module Manager page
opens.
Find the Plugin in the Payment section on the Module Manager page, or enter
Visa Acceptance Solutions
Official
in the
Search
field and click
Enter
.
Click
Configure
. The Configure
Visa Acceptance Solutions
Official page opens.
Select the
FRAUD MANAGEMENT SETTINGS
tab and enter the
keys in the Google reCAPTCHA section of the tab.
Scheduling Report Generation
Schedulers on a Linux, Mac, or Windows system specify how often a specified report is
generated. Schedulers for Linux and Mac systems are set up using a Cron Tab. The
scheduler for a Windows system is set up using the Windows Task Scheduler app.
When setting up a schedule for generating a specific report, use this format:
When setting up the reporting schedule on a Linux or Mac system, you use
crontab
commands that determine how often and when the report
is generated.
The syntax is:
* * * * * [command]
The asterisk (*) represents each of these timing parameters:
Minute (0-59)
Hour (0-23)
Day of Month (1-31)
Month (1-12)
Day of week (0-6), (0-Sunday)
For example, these timing parameters indicate how often a specified report is
generated:
* * * * * [command]
: Runs every minute of every day of
every week of every month.
0 * * * * [command]
: Runs every hour of every day of every
week of every month.
30 2 * * * [command]
: Runs at 2:30 a.m. every day of every
week of every month.
0 0 2 * * [command]
: Runs once a month every month on the
second day of the month.
0 * * * 1 [command]
: Runs every Monday at every hour.
0,10,20 * * * * [command]
: Runs at 0, 10, 20 minute of
every hour of every day of every week of every month.
0 5-10 * * * *[command]
: Runs every hour between 5 a.m. and
10 a.m.
@reboot [command]
: Runs each time the server reboots.
*/5 * * * * [command]
: Runs every five minutes of every
day.
Setting Up Cron Scheduler for Linux
Open a Linux terminal.
Enter
crontab-e
to enter editor mode. For example:
root@PrestashopQA4:/etc# crontab -e
Editor mode displays and look similar to the editor mode shown in the image
below.
Enter the command to set the timing for the cron job. For example, this command
sets the cron job to run every 15th minute of every hour, every day, every week,
and every month:
Editor mode displays and look similar to the editor mode shown in the image
below.
Enter the command to set the timing for the cron job. For example, this command
sets the cron job to run every 45th minute of every hour, every day, every week,
and every month:
Order status is triggered and updated when transactions are processed. The plugin
supports these custom and default statuses for orders.
Custom order statuses:
Awaiting payment
Awaiting cancel
Cancel rejected
Cancelled, refund initiated
Payment pending for review
Partial payment accepted
Partial payment cancelled
Payment cancelled
Partial refunded (before shipped)
Partial refunded (after shipped)
Partial refund cancelled (before shipped)
Partial refund cancelled (after shipped)
Payment error
Refund cancel error
Payment cancel error
Refund error
Refund cancelled
Order cancelled by merchant
Default order statuses:
Payment accepted
Cancelled
Shipped
Delivered
Refunded
Only the shipped and delivered statuses can be manually updated.
Order Management Workflows
This section describes the order of events that the merchant completes after a customer
submits an order.
After-Authorization Workflow
This workflow comprises the sequence of events that occur after a customer places a new
order using
PrestaShop
Front Office. The workflow shows how the
order status is updated when the authorized transaction is captured or reversed (full
authorization reversal). The new order displays in
PrestaShop
Back
Office, and the order status is
Awaiting payment
.
The merchant chooses one of these options:
Standard capture
: When the merchant initiates a full capture, the entire
authorization amount is captured, and the order status is set to
Payment
accepted
.
Partial capture
: When the merchant initiates a multiple partial capture,
they choose how many quantities to capture and whether to include the shipping
costs. After multiple partial captures are processed, the order status is set to
P
artial payment accepted
.
Cancel products
For a full authorization reversal, the merchant must also
cancel the order, which requires that they select all the quantities and all the
items included in the order. A partial authorization reversal is not supported.
When the merchant initiates a full authorization reversal, the authorization is
cancelled and the order status is set to
Cancelled
.
After-Capture Workflow
This workflow comprises the sequence of events that occur after an authorization is
captured. The workflow shows how the order status is updated when the captured
transaction is refunded or voided.
The merchant chooses one of these options:
Standard refund
: If the merchant initiates a standard refund
before
updating the order status to
shipped
, the
order status is set to
Partial refunded (before shipped)
until
the refunded amount becomes equal to the captured amount. When the refunded
amount becomes equal to the captured amount, the order status is set to
Refunded
.
Partial refund
: When the merchant selects a refund
after
updating the order status to
shipped
, the order status is set
to
Partial refunded (after shipped)
until the refunded amount
becomes equal to the captured amount. After the refunded amount becomes equal to
the captured amount, the order status is set to
Refunded
. If
only a few quantities are captured, only the captured quantities are voided, and
the order status is set to
Partial payment accepted
.
Void capture
: If the merchant voids the capture, the captured
transactions are voided. When all quantities of the transaction are captured,
the entire order is voided and the order status is set to
Payment
cancelled
.
To refund the amount of an order, merchants can either generate a voucher or
a credit slip for the refund. Depending on the type of refund they select
and whether they issue a voucher or a credit slip, one of these actions
occurs:
When the merchant chooses
Generate a voucher
for a partial refund, the sum of the items is not refunded. Instead, a voucher
is generated that can be used for future transactions.
When the merchant chooses
Generate a voucher
and enters the amount in the shipping costs field for a partial refund, then a
voucher equal to the sum of the items and the shipping amount is generated.
When the merchant chooses
Generate a credit
slip
for a standard refund, the sum of the items is
refunded.
When the merchant chooses both
Generate a credit
slip
and
Repay shipping costs
for a
standard refund, the sum of the items and the shipping amount are both
refunded.
When the merchant chooses both
Generate a
voucher
and
Repay shipping costs
for a
standard refund, a voucher equal to the sum of the items and shipping amount is
generated.
When the merchant chooses both
Generate a
voucher
and
Generate credit slip
for a
standard refund, a voucher is generated and a refund for the sum of the items is
not generated.
After-Refund Workflow
This workflow comprises the sequence of events that occur when the merchant voids a
refund under specific conditions:
When the refund is processed
before
the order is shipped, the refund is
cancelled and the order status is set to
Partial refund cancelled
(Before shipped)
.
When the refund is processed
after
the order is shipped, the refund is
cancelled and the order status is set to
Partial refund cancelled (After
shipped)
.
When the voided refund amount is
equal
to the refund amount, the
refund is cancelled and the order status is set to
Refund
cancelled
.
Customer Tasks
Customers can use the
My Account
option on the merchant's
PrestaShop
website to manage orders and their payment information. The
following sections contain the steps to complete these tasks.
Saving Credit/Debit Card Information
Saving card information enables customers to use that information for future transactions. Using
PrestaShop
Front Office, customers can save their card
information during the checkout process, or they can add their card information to
their registered
PrestaShop
accounts using the My cards
feature.
If a customer wants to save their card
information during the checkout process, they can select the
Save my card
for future payment
option when entering their credit/debit card
payment during checkout.
The card information can also be saved on the My cards
page in PrestaShop:
Open
PrestaShop
Front Office.
Go to the My cards section of the page and click
Add
Card
.
ADDITIONAL INFORMATION
If no current address is associated with the customer account, the
customer is prompted to add an address. The customer can enter the
required address information and click
Save
.
If there is already an address associated with the customer account, the
customer can select and use the address or add a new address.
After the
address information is complete and selected, the customer can update
the card expiration
information.
To update the expiration information for the card, click
Update
, or click
Delete
to remove
the card from the account. The customer can also change the billing address for
the card by clicking
Change
.
Customers can only add the number of cards that the merchant specified in
the account configuration. The updated card information is tokenized and
securely saved. The customer can use the saved card information for future
transactions during the checkout process.
Selecting a Default Credit/Debit Card
When a customer has multiple cards associated with their account, they can
designate the default card. By default, the first card added to the account is set as
the default card. In the My cards page, the default card is identified with an asterisk
(*) that appears to the right of the card number.
To change the default card, the
customer follows these steps:
Open
PrestaShop
Front Office.
Open the My cards page. The page displays the saved cards associated with the
account.
Choose a card to set as the default card, and choose
More > Set as
Default
. The card is set as the default card. Note that the
default card cannot be deleted unless all other saved cards from the My cards
section are deleted.
Cancelling an Order
After the customer cancels an order, the merchant can accept or reject the order cancellation (as
instructed in Processing a Cancelled Order). If the merchant
accepts the cancellation request, a refund for the order amount is initiated, and
the order status is set to
Cancelled, refund initiated
. If the
merchant rejects the cancellation request, the order status is set to
Cancel
rejected
. This task provides the steps to cancel an order. Customers
cannot cancel an order in review with the merchant.
Open
PrestaShop
Front Office.
Select
My Account > Order History
. The Order history
page displays the customer's
orders.
Select the
Details
for the order to cancel. The Order
details page
appears.
Click the
Cancel
to cancel the order. An Order
cancellation confirmation notice appears.
Click
Yes
on the Order cancellation confirmation notice.
ADDITIONAL INFORMATION
The order is cancelled and the order status is set to
Cancelled
.
If
the order was a sales transaction or was captured, the cancellation is sent to
the merchant and the status is set to
Awaiting cancel
.
Merchant Tasks
Merchants use
PrestaShop
Back Office to manage orders. This section
describes the steps to complete these tasks.
Processing a Cancelled Order
When a customer cancels an order, a request is sent to the merchant, and the order
status is set to
Awaiting cancel
. Merchants can accept or reject an
order that a customer cancels.
Open
PrestaShop
Back Office and select
Orders >
Orders
from the Dashboard.
Locate and select the order that the customer cancelled. The information for
that order displays.
Choose one of these options:
ADDITIONAL INFORMATION
Accept cancellation
to accept and process the
cancelled order. A refund for the order amount is processed, and the
order status is set to
Cancelled, refund initiated
.
ADDITIONAL INFORMATION
Reject cancellation
to reject the cancelled
order. The order status is set to
Cancel rejected
.
Processing a Merchandise Return
When a customer requests to return merchandise, the information appears on the Merchandise
Returns page in
PrestaShop
Back Office. Follow these steps to
process the return.
Open
PrestaShop
Back Office and select
Customer
Service > Merchandise Returns
. The Merchandise Returns page
appears and identifies the orders that customers want to return.
Select the order to process for a return. The
Edit > Return
Merchandise Authorization (RMA)
menu displays.
From the
Status
drop-down menu, choose an option. The
options are:
ADDITIONAL INFORMATION
Waiting for confirmation
Waiting for package
Package received
Return completed
Click
Save
. The status is updated for the order on the
Merchandise Returns page. Continue by selecting a return or refund option for
the order.
Select
Orders > Orders
from the Dashboard.
Select the order to process a return, and select one of these options:
ADDITIONAL INFORMATION
Return products
Partial refund
Fraud Management
The plugin provides fraud management functionality for merchants who also use the
Visa Acceptance Solutions
Business Center
. You can apply fraud management functionality to transactions in
these situations:
Fraud management is enabled in the plugin.
You have a fraud management profile in the
Business Center
.
Fraud screening includes these features:
Fraud Management Essentials (FME): used to enforce the rules created by the
Visa Acceptance Solutions
Machine Learning System (MLS). Fraud management defines the
merchant’s rules.
Fraud Management Rules:
When the decision status from the
Business Center
is
AUTHORIZED_PENDING_REVIEW
or
PENDING_REVIEW
, the order is in review and the order
status is set to
Payment pending for review
.
When the decision status from the
Business Center
is
AUTHORIZED_RISK_DECLINED
, the order is rejected and the
order status is set to
Order cancelled by merchant
.
The table below describes the possible decisions, outcomes, and timing that
Decision Manager
uses when an order is triggered for review.
When the following transactions are in a
Decision Manager
review state, certain settlement considerations apply:
For authorizations:
When accepting this transaction, it is not
recommended to settle it in the
Business Center
. When the transaction is
settled in the
Business Center
, the follow-on services initiated from
PrestaShop Back Office are impacted.
For sales:
The entire authorized amount should be settled in the
Business Center
when accepting the transaction. When the settlement
is not performed in the
Business Center
, the follow-on services
initiated from PrestaShop Back Office fail.
A follow-on void capture will not initiate from
PrestaShop
Back Office.
While accepting review transactions, merchants should not select the
settle option.
Decision Manager Decisions, Execution Timings, and Outcomes for Orders
Decision
Execution Timing
Outcome of Decision
Monitor
Before authorization
Authorization is successful and no action
from the
Decision Manager
is required. Use this decision to
understand the outcome of a rule.
Accept
Before authorization
The order is processed normally and is
placed successfully.
Review
Before authorization
The authorization is successful, and
follow-on services are put on hold until the merchant accepts or rejects
it. The order status is set to
Payment pending for
review
.
Reject
Before authorization
The order is rejected and the authorization
is not processed. The merchant is not able to view the order in
PrestaShop
Back Office.
Monitor
After authorization
The authorization is successful and no
action from
Decision Manager
is required. Use this decision to
understand the outcome of a rule.
Accept
After authorization
The order is processed normally and placed
successfully.
Review
After authorization
The authorization is successful, and
follow-on services are put on hold until the merchant accepts or rejects
it. The order status will be set to
Payment pending for
review
.
Reject
After authorization
The original authorization is successful
and then is automatically reversed and the order status is set to
Order cancelled by merchant
.
Reporting
The plugin provides reporting functionality
for merchants who also use the
Business Center
. You can import these reports from the
Business Center
into PrestaShop:
Transaction Request Report:
Includes details for individual
transactions that are processed each day.
Payment Batch Detail Report:
Includes transactions that are processed
with the applications. This report is available shortly after captured
transactions are batched.
Conversion Detail Report:
Includes Case Management changes recorded
in the
Business Center
to ensure that updated orders are also
included in PrestaShop. This report is generated at regular intervals and
includes the results of the converted orders for each reviewer. This
information provides an overview of all orders that are not immediately
accepted.
Scheduling
The Plugin reporting functionality works with a system scheduler to generate and
update reports for
PrestaShop
. There are some Cron Job modules
available for
PrestaShop
, such as the Cron Tab, that support
reporting. Merchants can use any Cron Job module supported by
PrestaShop
or any other online Cron service provider to generate
reports.
The reports are processed and orders are updated in
PrestaShop
as
described in this workflow:
Orders with an
AUTHORIZED_PENDING_REVIEW
or
AUTHORIZED_RISK_DECLINED
status are included in the
ps_cybersourceofficial_order table in the
PrestaShop
database.
If a review is trigged for an order based on the profile rule in
Decision Manager
, a
Payment pending for review
order status displays for that order on the
PrestaShop
Back Office Orders page.
The merchant uses the
Business Center
to accept the order that is in
review, and, if not already enabled, the merchant enables the reports using
the Report Settings on the Plugin Configuration page.
The scheduler runs the report at regular intervals according to the
intervals that the merchant configured. The order is accepted or rejected by
the merchant in the
Business Center
, the order is retrieved, and the
order status is updated as
AUTHORIZED
or
DECLINED
. The updated order status displays in the
ps_
Visa Acceptance Solutions
official_order
table in the
PrestaShop
database.
The original decision and the new decision are updated and displayed in the
ps_
Visa Acceptance Solutions
official_conversion_detail_report
table in the
PrestaShop
database.
The order is updated as
Awaiting payment
status for the authorization
and displayed on the
PrestaShop
Back Office Orders page.
The payment is accepted for the sale and any associated follow-on
transactions (capture, void capture, refund, void refund, and full
authorization reversal).
Testing
If you have not done so already, configure these settings
using
After configuring the Plugin, complete this task to test the configuration using
PrestaShop Front Office to place an order and PrestaShop Back Office to manage the
order.
Open
PrestaShop
Front Office to place an order.
Enter any required personal information and select the payment method to place
the order.
Enter the card information to use for the order and click
Pay
. If the order is successful, an order
confirmation message displays.
Open
PrestaShop
Back Office to manage the order.
Select
Orders > Orders
from the Dashboard. The Orders
page displays and lists all active orders.
Select and open the order you processed in Step 1. The order status for the
order should display
Awaiting payment
.
Click
Standard Capture
to capture the authorized amount,
and click
Yes
to capture the entire order. The order
status changes to
Payment accepted
.
Click
Standard Refund
to refund the full captured
amount. The order status changes to
Refunded
.
Click
Void Refund
to void the refunded amount.
The order status changes to
Refund cancelled
.
For more information about testing, including test cards to use, see
Upgrading
You can install a newer version of the plugin using
PrestaShop
Back Office.
Open
PrestaShop
Back Office and from the Dashboard, select
Improve > Modules > Module Manager
.
Click the arrow beside the plugin
Configure
icon and
choose
Upgrade
from the drop-down menu.
Troubleshooting
This section might help you resolve specific issues that can occur during the
installation and upgrade processes for the plugin.
SMTP password: Password for the email address provided above.
Encryption: Select
TLS
.
Port:
587
Click
Save
.
Test your email configuration by entering an email address to receive the test
message, and click
Send a test email
.
Configuring Order Status Visibility
You can hide order status messages that you do not want customers to view.
Open
PrestaShop
Back Office, and from the Dashboard, select
Customer Service > Order Messages
.
Click the pencil icon beside the order status message you want to hide.
In the Order status pane, select
hide this status in all customer
orders
.
Click
Save
.
Troubleshooting Assistance
For help with troubleshooting, contact [email protected] and provide the following information:
Summary of the issue
Steps to reproduce the issue
Platform version
Plugin version
Platform Merchant ID
Configuration screenshots
List of themes/additional extensions installed
Log file and any other data or screenshots related to the issue
Shopify
This section details the features, transaction types, and fraud solutions available
in
Shopify
.
The Cybersource app on
Shopify
provides commerce tools to start,
grow, market, and manage retail businesses. You can accept payments in multiple
currencies and get paid in your local currency. The Cybersource app on
Shopify
supports popular payment methods to meet your business needs.
The Cybersource app on
Shopify
supports these features:
3-D Secure
Apple Pay
Card payments
Google Pay
Fraud Management tools
Shopify Subscriptions
Cybersource supports these transaction types on
Shopify
:
Authorization (authorize only)
Sale (auth and capture)
Capture (capture only)
Payer Authentication
(3-D Secure)
Refund (credit)
Void (reversal)
The Cybersource app on
Shopify
supports the following fraud
solutions:
Decision Manager
(DM)
Fraud Management Essentials
(FME)
We recommend an accept/reject model only for fraud management.
Configuring Security Credentials
You must have a Cybersource
Business Center
account. If you do not have one,
you must create one before installing the Cybersource app on
Shopify
. You also must retrieve details from that account to install
the plugin.
Follow the email instructions that you received to activate your merchant
account.
Log in to the Business Center to complete the
registration process.
Installing the Cybersource App on
Shopify
You must enable the Cybersource app in your
Shopify
account
settings. You can install the Cybersource CAS app if you are using a sandbox
account, or the live app if you have completed the go live process.
Installing the Cybersource CAS App
Follow these steps to install the Cybersource CAS app:
View the Org Unit ID, API Identifier, and API Key to use in
Shopify
to verify your credentials.
Because you verified the
Payer Authentication
credentials and enabled the
3-D Secure feature when you installed the Cybersource app, the transactions will
support 3-D Secure flows.
Reference Information
This section contains reference information to help you use the Cybersource app on
Shopify
.
Testing
Testing is not available in the sandbox environment. Cybersource tested and validated the
Shopify
app before it was released.
Troubleshooting
Contact Cybersource using this email address to troubleshoot transactions and request
support: [email protected]
Include this information when you contact Cybersource:
Cybersource merchant ID
Shopify
store name
Shopify
payment ID
Shopify
reason string and code
Date and time
Production environment
Steps to recreate the error
WooCommerce
The following sections provide an overview of the plugin, installation steps, and a
guide for how to generate and add security credentials to WooCommerce.
Recent Revisions to This Document
25.07.01
This revision contains only editorial changes and no technical
updates.
25.01.01
Initial release.
Plugin Overview
The Visa Acceptance Solutions payment plugin for WooCommerce is a plugin that enables
you to accept
Unified Checkout
payments through Visa Acceptance
Solutions directly on your website, such as Payment Cards, Google Pay, and
Click to Pay
. For added security and compliance, the Visa Acceptance
Solutions plugin also supports
Payer Authentication
and
3-D Secure
. You can also use the Cybersource
Decision Manager
tool to help prevent
fraudulent transactions and enable Google Pay and
Click to Pay
to offer digital wallet payment options in your store.
Cart and checkout blocks are available as the default experience in WooCommerce 8.3
and later versions. The Visa Acceptance Solutions plugin is compatible with these
blocks.
Install the Plugin
These are the requirements for plugin installation:
A Visa Acceptance Solutions account with
Unified Checkout
enabled
WooCommerce 7.6 or later
WordPress 6.6 or later
PHP 7.4 or later. You can view your PHP version in the
Server
environment
section under
WooCommerce
>
Status
.
An SSL certificate
Follow these steps to install the Visa Acceptance Solutions plugin for
WooCommerce.
You can create multiple keys. To view all of your created keys, use the Key
Management page.
Add Credentials to WooCommerce
Follow these steps to add your Visa Acceptance Solutions credentials to
WooCommerce:
Copy the
Key
,
Shared Secret
, and
Merchant ID
to add to the
plugin settings.
You can click
Download Key
to save the key for future
reference.
Go to
WooCommerce > Settings > Payments > Visa Acceptance
Solutions
Add your
Merchant ID
,
Key
, and
Shared Secret
, to the
appropriate sections on the Visa Acceptance Solutions page.
Configure the Plugin
To configure the plugin, go to
WooCommerce
>
Settings
>
Payments
and select
Manage
next to Visa Acceptance Solutions.
Payment Option Settings
These settings allow you to customize the Visa Acceptance Solutions checkout
experience for customers.
Enable/Disable
: Allow customers to use the gateway to process payments
using Visa Acceptance Solutions at checkout. With the gateway enabled, credit
card payments are enabled by default.
Title
: The text entered here is shown for the payment during checkout and
on the Order Received page.
Description
: The text entered here is shown under the gateway’s title
during checkout.
Transaction Type
: Controls how transactions are submitted to Visa
Acceptance Solutions. Select Charge to automatically capture payments. If you
select
Authorization
, you must manually capture and settle payments after
the transaction has been submitted. You can do this in your Visa Acceptance
Solutions account or on the WooCommerce orders screen. The default authorization
setting is Charge.
Charge Virtual-Only Orders
: If the Transaction Type is set to
Authorization
:
Enabling this setting will create an exception for virtual-only
product orders to automatically capture payments.
Capture Paid Orders
: If the Transaction Type is set to
Authorization
:
Enabling this setting will automatically capture orders when
they are changed to Processing or Completed.
Debug Mode
: Enable this setting to generate a log for every transaction.
Environment
: Switch between
Test
and
Production
credentials.
Enable
Test
to send transactions to your Visa Acceptance
Solutions test Account.
Enable
Production
to switch to production.
Merchant ID
: The ID assigned to you by Visa Acceptance Solutions or your
reseller. This is the same ID that you use to log in to the
WooCommerce > Settings > Payments > Visa Acceptance
Solutions
Select
Enable Google Pay
.
Click
Save Changes
.
Enabling Click to Pay
Follow these steps to enable
Click to Pay
.
If you want to
accept
Click to Pay
:
Go to
WooCommerce > Settings > Payments > Visa Acceptance
Solutions
.
Select
Enable
Click to Pay
.
Click
Save Changes
.
Payer Authentication
and
3-D Secure
Follow these steps to enable
Payer Authentication
and
3-D Secure
.
If you want to use
3-D Secure
:
Go to
WooCommerce > Settings > Payments > Visa Acceptance
Solutions
.
Select
Enable 3-D Secure
.
Click
Save Changes
at the bottom of the page.
Strong Customer Authentication
Follow these steps to enforce SCA.
Payer authentication and tokenization
needs to be enabled to use this feature.
Go to
WooCommerce > Settings > Payments > Visa Acceptance
Solutions
.
Select
Enable Strong Customer Authentication while saving card
.
Select
Allow customers to securely save their payment details for future
checkout
.
Click
Save Changes
at the bottom of the page.
The cardholder will be
3-D Secure
challenged while saving a card.
If a transaction gets declined with the reason provided as SCA required, then
an additional request is automatically sent by WooCommerce for the same order. The
customer will then be
3-D Secure
challenged.
Tokenization
Follow these steps to enable Tokenization.
Customers can save payment methods
during the checkout process, or from the my account section. This feature enables
customers to securely save their payment details for future checkouts.
To
enable Tokenization:
Go to
WooCommerce > Settings > Payments > Visa Acceptance Solutions
.
Select
Allow customers to securely save their payment details for future
checkout
.
Click
Save Changes
at the bottom of the page.
Credit card information is not stored
on your website’s server. It is instead tokenized and stored on Visa Acceptance
Solutions' secure servers. This reduces your website’s PCI compliance
burden.
For more information about Tokenization with Visa Acceptance Solutions, see Token Management Service.
Managing Orders
As a website administrator, you can use the Visa Acceptance Solutions plugin to
manually capture charges. You can perform full authorization reversal, partial
refund, and refund transactions as needed.
You may also utilize Cybersource tools such as
Decision Manager
to help
prevent and manage fraudulent orders.
Decision Manager
Follow these steps to use Cybersource’s
Decision Manager
tool to help
identify and manage fraudulent orders.
You must have
Decision Manager
enabled on your Cybersource account before you can use it in WooCommerce
When enabled in the plugin settings, WooCommerce Visa Acceptance Solutions will
approve, hold, or reject orders based on your
Decision Manager
fraud
settings:
Approved orders will go directly to the
Processing
status.
Held orders will go to the
On Hold
status until they are reviewed and
approved or rejected in your Cybersource dashboard.
Rejected orders will either go to the
Failed
or
Cancelled
status,
depending upon the rules applied under
Decision Manager
's custom
profiles. Other details are available in the order notes.
If your
Transaction Type
setting is set to
Authorize
, your accepted orders will go to the
On
Hold
status until you manually capture them in WooCommerce. This is done
whether they are approved directly or approved after review in the Cybersource
Decision Manager
. Your settled orders will go to the
Processing
status. You will not need to manually capture transactions
in WooCommerce.
The Visa Acceptance Solutions WooCommerce plugin checks for updates to orders in
the Cybersource
Decision Manager
every 15 minutes. You might experience a
delay between when an order is approved or rejected in the Cybersource dashboard and
when the order is updated in WooCommerce.
You can follow these steps to
manually trigger status verification.
You must be logged into your Visa
Acceptance Solutions dashboard to view this document.
Capture Charges
Follow these steps to manually capture payments in WooCommerce.
If the Transaction Type setting is set to
Authorization
you can manually
capture these payments:
From the:
WooCommerce > Orders
page, click the relevant order in the
list of orders.
Click the
Capture Charge
button on the order screen.
Process Refunds
You can process refunds directly in WooCommerce without needing to log into your Visa
Acceptance Solutions account.
Follow these steps to process refunds in WooCommerce:
Click the order and then click
Refund
.
Enter the
Refund Amount
.
You may optionally enter a Reason for refund.
Click
Refund Confirmation
. The button name dynamically updates based
on the entered info.
You can partially refund and fully refund transactions directly in WooCommerce in the
following circumstances:
If your Transaction Type setting is set to
Authorization
, when the
transaction has been authorized but not yet captured, you can refund. For
example, select all the quantities under all items and perform a full
authorization reversal. The Order Status will be updated to
Cancelled.
If your Transaction Type setting is set to
Charge
, you can either perform
a partial refund or a full refund.
You can perform multiple partial refunds either by entering the quantity of the
product or the amount that needs to be refunded of the captured amount:
The Order Status will still be
Processing
if the refund amount is
less than the fully captured amount.
If the full captured amount is refunded, then the status updates to
Refunded
.
Partial authorization reversal is not
supported.
WooCommerce
The
Visa Acceptance Solutions
extension for
WooCommerce
allows merchants to connect their
WooCommerce
store to the
Visa Acceptance Solutions
platform to directly take credit/debit card, Google Pay, and Click to Pay payments.
Supported Features
Credit/Debit cards
Apple Pay
Google Pay
Click to Pay
Payer Authentication/3-D Secure
Tokenization
Decision Manager
and
Fraud Management Essentials
WooCommerce
Subscriptions
WooCommerce
Checkout Blocks
Supported Versions
The
WooCommerce
extension requires these versions:
WooCommerce
7.6+
WordPress 6.1.0+
PHP 8.0+
Visa Acceptance Solutions
Prerequisites
This section outlines the required and optional prerequisites for using the
Visa Acceptance Solutions
extension with
WooCommerce
.
Required Products
The Unified Checkout product must be enabled and configured for your merchant ID. See
the
These extension settings must be configured to accept payments with
Visa Acceptance Solutions
:
Enable/Disable
Set to
enable
to allow the extension to take payments from your
WooCommerce
store. When the extension is enabled,
card payments are enabled by default.
Title
Enter the
title
text that you want to display for your customers on
the checkout and order received page.
Description
Enter the
description
text that you want to display during the
checkout process.
Transaction Type
Charge:
When this option is selected, the transaction is
automatically captured if the authorization is approved.
Authorization
: When this option is selected, the system only
sends an authorization request and if approved. If the authorization
is approved, you need to manually request a capture.
Charge Virtual-Only Orders
When this setting is selected, if the order is exclusively for digital or
virtual items, this the transaction is automatically captured if the
authorization is approved.
Capture Paid Order
When this setting is selected, if you mark an order as
Processing
or
Completed
, capture requests are automatically sent.
Environment
Set to
Test
for testing to your test account.
Set to
Production
for live transactions.
Merchant ID/Test Merchant ID
Enter the transacting merchant ID (MID) assigned to you when you set-up your
account.
API Key Detail/Test API Key Detail
Enter the key from your REST API shared secret key.
API Shared Secret Key/Test API Shared Secret Key
Enter the shared secret from your REST API shared secret key
Accepted Card Types
Select the card brands you want to accept.
Message Level Encryption
Message-Level Encryption (MLE) enables you to store information or communicate with
other parties while helping to prevent uninvolved parties from understanding the
stored information. MLE is optional and supported only for payments services. A REST
certificate is required for MLE.
Follow these steps to enable MLE,:
Check
Message Level Encryption
.
Enter the
Key Directory Path
where you have stored the certificate in
your
WooCommerce
/WordPress environment.
Enter the
Key File Name
.
Enter the
Key Password
which you set when generating the REST
certificate.
Digital Payment Methods
Digital Payment Methods
: Choose from Apple Pay, Google Pay, and Click to
Pay.
Tokenization allows you to offer the ability for your customers to save their
payment cards securely for future payments.
Select
Tokenization
to enable this feature.
Select
Saved Card Verification
to request customers to enter their card
security code when paying with a saved card.
Payer Authentication/3-D Secure
Select
Payer Authentication/3-D Secure
to enable added payment security.
Some countries/regions mandate this feature.
Select
Strong Consumer Authentication
to force a 3-D Secure Challenge
when a customer chooses to save their card for future transactions.
Fraud Screening
Select
Fraud Screening
to enable
Decision Manager
or
Fraud Management Essentials
.
Configure your fraud screening profiles using the
Business Center
.
Debug Mode
Select one of these debugging mode options:
On:
enables the creation of detailed logs for
every transaction. This setting is recommended only for use in the test
environment or when troubleshooting issues in the production (live)
environment.
Off:
enables the creation of basic logs for
transactions.
Order Management
Orders are marked differently, depending on the selected transaction type:
Authorization:
if this option is selected, successful transactions are marked
as
On Hold
.
Charge
: if this option is selected, successful transactions are marked as
Processing
.
Fraud Screening
If fraud screening is enabled, transactions are marked as follows:
Approved orders are marked as
On Hold
or
Processing
, depending on
your transaction type setting.
Orders to review are marked as
On Hold
.
Rejected orders are marked as
Failed
or
Cancelled
.
Orders marked as
On Hold
need to be reviewed in the
Business Center
.
The extension checks for transaction status updates every 15 minutes. Rejected
transactions are marked as
Cancelled
.
Accepted transactions are marked according to your transaction type settings.
If you need to manually trigger the transaction update, follow these steps using the
WooCommerce
Dashboard:
Select T
Tools > Scheduled Actions > Pending
.
Find and select
wc_payment_gateway_update_order
.
Click
Apply
.
Capture an Order
There are two ways to capture an order if you have the transaction type set to
Authorization
. Enter the order from the list of orders and choose one of
these actions:
Click the
Capture Charge
button.
Change the order status to
Processing
, then click
Apply
.
Refund an Order
To refund an order, enter the order from the list of orders and complete these
steps:
Click the
Refund
button.
Enter the refund amount.
Click
Refund via
Visa Acceptance Solutions
.
Void an Order
Voids can only be performed for transactions when the transaction type is set to
Authorization
and the transaction has not yet been captured.
To void an
authorization, complete these steps:
Click the
Refund
button.
Enter the refund amount.
Click
Refund via
Visa Acceptance Solutions
.
Upgrade the Extension
Follow these steps to upgrade to a later version of the
WooCommerce
extension.
Select
Extensions > Installed Extensions
.
Locate the
Visa Acceptance Solutions
extension and click
Update
Now
.
Support and Troubleshooting
If you need support installing or using this extension, contact the Support Center to raise a case, and provide this information:
Summary of the issue
Steps needed to reproduce the issue
Platform version
Extension version
Platform merchant ID
Configuration screenshots
List of themes and additional extensions installed
Log file and any other data or screenshots related to the issue
Built by Our Partners
Explore solutions built by our industry-leading partners that offer real-time fraud
screening, account takeover protection, and comprehensive payment solutions. Our
partners provide potential use cases such as personalizing shopping experiences through
advanced analytic. Offer your customers a seamless omnichannel experience and improve
site performance for higher customer satisfaction. Benefit from the centralized
management of product information, automated order processing and fulfillment, and
real-time data synchronization between SAP Commerce Cloud and existing ERP systems.
Moreover, our partners' solutions offer scalable infrastructure, flexible integration
capabilities, advanced reporting tools, and enhanced visibility into supply chain and
inventory management.
Visa Acceptance Solutions Payments for Adobe Commerce User Guide
Recent Revisions to This Document
25.01
Initial release.
About this Guide
This section describes how to use this guide and where to find further information.
Audience and Purpose
This document outlines the configuration details for the Visa Acceptance Solutions
payment extension in the Adobe Commerce platform. The configuration steps are related
to payment acceptance, payment security, fraud management, and order management
services for
Unified Checkout
, including Payment Card, Google Pay, and
Click to Pay
. This guide also applies to Magento Open Source.
Adobe Commerce will be referenced throughout for simplicity.
Conventions
These statements appear in this document:
An
Important
statement contains information essential to successfully completing a task or learning a concept.
Customer Support
For support information about any service, visit the Support Center:
Before using the extension, ensure that you have done these prerequisites:
A Visa Acceptance Solutions account with
Unified Checkout
enabled.
Payer Authentication direct connection if
3-D Secure
is
required.
A Token Management Service if you allow customers to save their payment
cards on your website.
Contact support or your reseller if any of these prerequisites
are not completed.
If you do not yet have a Visa Acceptance Solutions account, you can create one
here. Demo accounts are created with
United States dollars as the default currency.
Refer to this article on how to create REST API keys in
the
Business Center
.
General Settings
This section provides General Settings Configuration details for the Visa
Acceptance Solutions extension in Adobe Commerce.
Serial Number
Settings
Description
1
Environment
Configure the sandbox or production environment by providing
the Merchant ID, API key detail, and API shared secret key. If
sandbox is chosen, the website is available for testing new
changes and experiments.
2
Merchant ID
Your Visa Acceptance Solutions Merchant ID
3
API Key
Refers to a specific key provided by a payment gateway to
authenticate and authorize the merchant's integration with the
gateway.
4
API Shared Secret
Refers to a confidential or private key used for secure
communication between the merchant's online store and a payment
gateway.
5
Debug Mode
Enabling debug mode provides an option to troubleshoot using
the Visa Acceptance Solutions logs, named visaacceptance.log.
The diagnostic information will be stored in log files in the
Adobe Commerce web server.
Configuration Details
To configure the Visa Acceptance Solutions extension, a merchant needs to log in
to the administration section of their Adobe Commerce website.
The
configuration panel can be accessed by navigating to the Payment Methods
screen:
Stores > Configuration > Sales > Payment
Methods
.
On this screen, you can see the settings to configure
the Visa Acceptance Solutions extension.
Secure Payment Methods
This section provides the configuration details of the services supported by Visa Acceptance Solutions extension in Adobe Commerce for
Unified Checkout
.
Sl. No.
Settings
Description
1
Enable
Choose
Yes
to enable the Visa Acceptance
Solutions extension.
2
Title
Customers see the text saved here as the payment method
name.
3
Payment Action
Choose either
Authorize
or
Capture
to decide the payment action during
customer checkout.
4
Payment Card Types
Choose accepted payment card brands.
5
Allowed Payment Method
Choose payment methods through which customer can complete their
order.
6
Select Layout
Choose
Embedded
or
Side bar
as
the layout to display the
Unified Checkout
payment
widget.
7
Payment from Applicable Countries
By choosing
All Allowed Countries
, the payment
method will use the Adobe Commerce global settings for the
customer’s country. By choosing
Specific Countries
,
the merchant can manually choose the allowed countries for the
customer.
8
Payment from Specific Countries
Choosing countries in this setting allows the store owner to
specify which countries are allowed for our payment method.
9
Payer Authentication/
3-D Secure
Enabling this option adds an additional layer of security to
payments by authenticating the customer’s identity before
authorization.
10
Tokenization
Enabling this option allows customers to save their payment cards
for future payments.
11
Tokenization Title
This text specifies the title of the saved card payment
method.
12
Saved Card Verification
This option allows the merchant to configure whether saved card
transactions are processed with CVV.
13
Enforce Strong Customer Authentication
If enabled, the card holder will be
3-D Secure
challenged when saving a card.
Tokenization
This setting determines if registered customers can save cards securely to their
account.
To use this feature choose
Yes
in the tokenization setting in the admin configuration panel. If you want the
customer to enter CVV while using the saved card, choose
Yes
for Saved
Card Verification as well.
Payer Authentication
Visa Acceptance Solutions supports
3-D Secure
2.x services. To
process with
3-D Secure
, choose
Yes
in the Payer
Authentication/
3-D Secure
setting in the admin configuration
panel.
Strong Customer Authentication
Payer Authentication (
3-D Secure
) is used for Strong Consumer
Authentication (SCA) in e-commerce payments. Some card issuers require cardholders
to authenticate with a
3-D Secure
challenge when saving their card with
a merchant. If you operate in a region where this is common, you can enable this
setting to require a challenge each time a customer saves a card. To enforce SCA,
choose
Yes
in the
Enforce Strong Customer
Authentication
setting in the admin configuration panel.
If
SCA is not enforced and an issuer requires it, this extension replays the
transaction and requests the challenge.
Managing Orders
Merchants can manage follow-up order management services in Adobe Commerce Back
Office after placing an order from the Adobe Commerce Front Office.
The merchant side services in Adobe Commerce Back Office are:
Full authorization reversal
Authorization capture
or multiple partial captures
Standard refund and partial refund
Full Authorization Reversal
Merchants can perform a full authorization reversal after an authorization. To
cancel a completed order authorization, the merchant can click
Cancel
.
Capture an Authorization
While in authorize mode, the system will create an
order record, but not an invoice. Capturing funds for authorized transactions is
done implicitly when you prepare an invoice.
To create an invoice, navigate
to the below path in the administration section of Adobe Commerce:
Navigate
to
Sales > Orders >
choose an
Order Pending
invoice > then click
Invoice
.
The merchant can perform a full capture or multiple partial captures using the invoice button.
When creating an invoice, the merchant can do multiple partial captures by choosing
specific quantities. Alternatively, the merchant can do complete capture by choosing
the entire order.
To complete invoice creation and capture funds, click
Submit Invoice
.
Refund a Captured Order
You must create a credit memo to refund a captured order.
To refund an order, navigate to the administration section of your Adobe Commerce
website:
Sales > Orders >
open an invoiced order
>
click
Invoices
from the left panel
>
and click
View
.
Click
View
on an invoice to open
it. You can create a credit memo within the invoice record.
When creating a credit memo, you can refund all or part of an invoice. To issue a
partial refund, alter the numbers in the
Qty to Refund
column. Click the
Update Qty’s
button.
To complete the credit memo, click
Refund
.
Payment Methods and Services
This extension supports the following payment methods and services.
These
services can be enabled or disabled using the admin panel configuration:
Payment Card
Payment acceptance services
Payment security services
Fraud management services
Order management services
Google Pay
Payment acceptance services
Fraud management services
Order management services
Click to Pay
Payment acceptance services
Order management services
Appendix
Saving Card at Checkout
Customers can
choose
Save for later use
for payment cards only. Once the order is placed,
card information is securely stored in
Visa Acceptance Platform
.
Payment With a Saved Card
Customers can
make payments using previously saved cards under
Stored Cards
by choosing a
card to proceed with.
Deleting a Card
Customers can view their
stored cards under
My Account
in Adobe Commerce by navigating to
Stored
Payment Methods
. The customer has the option to delete their previously
saved cards by clicking
Delete
.
Unsupported Adobe Commerce Features
The following features are not supported by this module:
Multi-shipping
Multiple node implementation
Google reCAPTCHA
BigCommerce
BigCommerce
provides a software-as-a-service (SaaS) payment
platform where you can manage your online business.
BigCommerce
provides customizable functionality ready for you to build and integrate with
Visa Acceptance Solutions
. This section describes the payment methods and
services that the platform provides. These payment features and methods are
supported:
Card Payments
Apple Pay
Google Pay
3-D Secure
Token Management Service
Decision Manager
and
Fraud Management Essentials
OAuth for connecting your
BigCommerce
account with
Visa Acceptance Solutions
Release Information
This section provides information about the releases for
BigCommerce
.
Version 2 includes the following features:
Global availability in more than 190 countries
Transaction currency support in all available countries
Token Management Service (TMS): Removes your customer's stored card information
from your environment and exchanges sensitive payment data for tokens that
cannot be reversed. Contact to request that TMS be enabled to use the Stored credit cards feature on your
: Determines whether your store is in Test Mode.
When you are ready to take payments, set to
No
(Recommended)
.
Require CVV
(credit card security codes): Using this option
requires users to enter the CVV/CVV2/CVD code for their credit card during checkout.
Enabling this option adds extra security on credit card transactions.
Enable
3-D Secure
: This option enables an additional security layer that helps to
prevent unauthorized transactions. For more information, see
partner, you have access to a range of solutions that
can help grow your business and offer your customers more ways to pay. You can use
Visa's global network, innovative products, and trusted brand to enhance your value
proposition and drive revenue.
Visa solutions are designed to meet the diverse needs of different partners and their
customers. You can choose options that match your business model, target market, and
integration preferences.
The benefits of partnering with Visa:
Access to the world's largest payment network, reaching over 200 countries and
territories
Ability to offer your customers multiple payment methods, including contactless,
mobile, online, and in-app payments
Opportunity to use Visa's expertise, resources, and tools to support your business
growth and innovation
Exposure to Visa's extensive network of merchants, acquirers, issuers, and other
partners
Visa offers three brands to deliver payment solutions to your merchants and customers,
each with a unique integration process:
Visa Acceptance Platform
Cybersource
Authorize.Net
Partnership Models
The Visa partnership program offers flexible commercial models that adapt to your
business needs and growth. The available partnership models are:
Referral Partners:
Diversify your revenue streams with low commitment by
referring merchants to Visa Acceptance Solutions where they can build great
payment experiences. For more information, see Referral | Visa Acceptance
Solutions.
Enablement Partners:
Integrate our offerings into your platform and build
innovative, custom payment solutions for your merchants. For more information,
see Enablement | Visa Acceptance
Solutions.
Reseller Partners:
Sell our solutions directly to your merchants with the
option to deliver them under your brand. For more information, see Reseller | Visa Acceptance
Solutions.
Authorize.Net Partners:
Complement your own merchant account offering
with the Authorize.Net payment gateway. Partner with Authorize.Net as a
reseller, enablement or referral partner. For more information, see Become a partner | Authorize.Net.
Becoming a Partner
To become a
Visa Acceptance Solutions
technology partner, complete these steps:
Register for a Tech Partner Sandbox.
Explore available products and services to integrate.
Activate your
Business Center
account and log in to manage your solutions.
Develop and test your integration.
Validate your integration with
Visa Acceptance Solutions
.
Access your production account information.
The following sections guide you through each of these steps in detail:
After you create your tech partner sandbox, you must onboard a solution to receive a
Partner Solution ID for testing purposes.
Follow these steps to onboard a solution in your partner sandbox account:
In the left navigation panel, go to
Partner Management
.
Click
Manage Solutions
and then click
Add
Solution
.
Follow the guided process to enter the required information for onboarding your
solution.
Define the
Visa Acceptance Solutions
products that are part of your integration
during solution onboarding. You can find the products and services available for
integration on the Developer Center API
Reference. The solution onboarding flow presents the product scopes that
align with the available products and services.
After you successfully onboard, you receive a test Partner Solution ID. Your Partner
Solution ID is effectively an organization ID. This is the unique identifier for your
integration with the platform. Use this Partner Solution ID for testing purposes only.
Test your integration and provide details to the
Visa Acceptance Solutions
solutions
team. The team will validate your integration and provide production access with a live
Partner Solution ID.
The Partner Solution ID may also be referenced as the Partner Solution Org ID,
Solution ID, or PSID. These terms are interchangeable and represent the same unique
ID associated with the integration. If you have access to an existing Partner
Solution ID, certain functionalities within this guide may not be available.
page to ensure proper agreements and updated partner details for
future integration and to get access to the latest functionality.
Develop Your Integration
Learn about integration models, best practices, and authentication options for developing your integration with
Visa Acceptance Solutions
.
This section provides an overview of the available integration models and supporting resources to help you develop your integration.
Develop your integration according to the product specifications for the APIs you are
integrating. For guidance on the products to include in your integration, see the
integration guides in the Developer Center.
Best Practices
Visa Acceptance Solutions
recommends using the
Visa Acceptance Solutions
REST APIs and the hosted payment fields. These integration methods capture sensitive payment data securely. Use Microform, Unified Checkout, and tokenization methods to ensure the safety of the cardholder data and reduce PCI requirements for your customers. For more information, see Secure Integration Methods.
Legacy APIs, such as Simple Order API, are supported but may not include the full feature set.
Many regions require the use of the 3-D Secure feature, which facilitates Strong Customer Authentication (SCA).
Visa Acceptance Solutions
recommends using the Payer Authentication service to ensure your software is available in those regions.
Consider your customers' needs when deciding which products and services to include in your integration.
SDKs and GitHub
You can access various APIs with the REST API SDKs to begin development of your
solution. For more information about the
Determine the authentication method for your integration. The options include:
Merchant API Key Credentials:
Support both HTTP signature and JWT authentication mechanisms. The merchant generates the relevant key type from within the Business Center and shares it with you (Tech Partner) to include in the integration and API requests to our acceptance platform.
Partner Solution API Key Credentials (Pilot):
Support JWT authentication
mechanisms with REST API integrations. This delegate authentication method,
where you (the Tech Partner) generate and manage the key lifecycle, is currently
in pilot.
OAuth 2.0 (Pilot):
OAuth 2.0 is offered as a pilot for tech partners
exploring secure, token-based, permission-scoped API integrations. This
industry-standard authorization protocol allows applications securely access
APIs on behalf of merchants, without exposing sensitive credentials. It enables
safer, more controlled interactions by issuing short-lived access tokens with
specific scopes. For more information, see the OAuth 2.0 Developer Guide.
To become an early adopter for Partner Solution Key or OAuth 2.0, contact your
Visa Acceptance Solutions
representative.
Including your Partner Solution ID in your Integration
Include your Partner Solution ID with transaction requests to identify all requests going
through your integration. Including your Partner Solution ID in your integration enables
Visa Acceptance Solutions
to accurately track your transaction volumes, and
provide monitoring, servicing and troubleshooting.
Currently, this functionality and reporting is only available from within
Visa Acceptance Solutions
Payments APIs by including your Partner Solution ID within the
body of the payloads.
To integrate with
Visa Acceptance Solutions
payments APIs, include your assigned
Partner Solution ID with every payments API request you make in your integration, both
in the test and production environments.
Validate that your Partner Solution ID has been passed and captured properly.
This example show you how to include the Partner Solution ID value in the
After you develop your integration, send a test transaction using the sandbox merchant
org ID you created during the sandbox sign up. Ensure you include the merchant org ID in
the headers as required and outlined in the product integration guides.
You must also include your Partner Solution ID in the
clientReferenceInformation.partner.solutionId
field in the request
body.
Validating your Partner Solution ID in the
Business Center
Validate the receipt of your Partner Solution ID within the
Business Center
from
your test merchant account, when you view a transaction:
Log in to the test
Business Center
using your merchant sandbox account.
Go to the
Transaction Details Search
page.
Filter search results for transactions with your Partner Solution ID.
Your search finds your assigned Partner Solution ID, confirming successful partner
integration.
The Transaction Details Page
The following image shows an example of
the Transaction Details page:
Get Listed on the Partner Directory
The Partner Directory is a public platform that showcases your solutions as a
Visa Acceptance Solutions
integrated partner. It highlights your offerings, helps you stand
out, and demonstrates how your solutions integrates with the
Visa Acceptance Solutions
. This directory increases your visibility to merchants and acquirers seeking
technology partners for new projects.
The primary function of the Partner Directory is to facilitate connections between
Acceptance Solutions ISVs, technology partners, and
Visa Platform Connect
-connected
acquirers.
After developing a full integration, you can list your offering in the Partner Directory. For more information, see Partner Directory.
Prerequisites to Getting Listed
Before submitting information for your partner listing, ensure you have:
An active partner agreement with
Visa Acceptance Solutions
.
Agreed to be listed under Visa Acceptance Solutions branding (signed our legal
addendum).
Designated two directory editors from your team to create and edit your listing
information.
Signing Up Steps
Follow these steps to sign up for the Partner Marketing Directory:
Enter a partnership agreement. For more information, see Becoming a Partner.
Complete integration with
Visa Acceptance Solutions
.
Submit transactions in production using your assigned Partner Solution ID.
Return the signed Trademark Consent Agreement.
Register for an account on the Acceptance Solutions Partner Marketing portal.
Fill out the directory profile on the Acceptance Solutions Marketing Partner
portal.
Completing the Directory Profile
Create and update your listing on the Acceptance Solutions Partner Marketing portal. Managing
your content is seamless. Add, remove, and update information about your company and
products.
Visa Acceptance Solutions
approves your content before you publish it.
Follow the framework and best practices outlined in this section of the guide.
Accessing your Company Profile in the Partner Portal
From the
Company Profile
page, make these changes and updates:
Add your company logo.
Indicate which
Visa Acceptance Solutions
products your offering is compatible
with.
Indicate which countries your offering is available in.
Click your user profile at the top right of the page.
Click
Company Profile
.
Accessing the Company Information
Review the information under the
Company Information
section
on the Company Profile page. Add or make changes, including your company's logo.
Accessing the Marketplace Profile
Click
Marketplace Profile
on the left panel of the Partner
Portal. Add information for your partner listing on this page.
Entering your Directory Profile Information
Enter information in each section to complete the Directory Profile Information:
In the
Headline
section, enter a short headline for your
business.
In the
Company Description
section, enter two to three
sentences summarizing your company and product offerings.
In the
Value Proposition
section, enter two to three
sentences summarizing the value of your company and offering.
In the
Graphics
section, enter an image at least 575px.
Include any images you want to display on your listing (jpeg or png files).
In the optional
Video
section, enter a video you would
like to display on your listing (link or mp4 files).
In the
Product Overview
section, enter this information:
Available version number
System requirements
Product compatibility
Under the
Integration Information
section, provide
instructions for merchants on how to integrate and configure their merchant
accounts with
Visa Acceptance Solutions
's offerings. Enter instructions in
each text box on how to complete these tasks:
Create a sandbox account
: Describe how to create a sandbox
account. Merchants must set up their integration to register for a
sandbox account. From this account, they create their security
certificates and test their implementation. Link detailed instructions
in Step 8.
Create your Credentials
: Describe how to create credentials.
Merchants must create REST keys to connect
Visa Acceptance Solutions
to your company's accounts. Link detailed instructions in Step 8.
Configure the Plug-in
: Describe how to configure the plug-in.
Enter the link to your
Visa Acceptance Solutions
's offerings page. The
page must allow merchants to view and checkout your offerings. After
checkout, explain how your company grants them access keys to download
your company's instance. Link detailed instructions in Step 8.
In the
Resources
field, add any relevant links to content
you want to share. These links can include documentation, listing information,
GitHub sites, and other links.
In the
Downloadable Assets
field, add any relevant files
you want to share. These files will be available for download on your listing
(pdf files).
Click
Request Review
to send a draft of your listing for
review to the
Visa Acceptance Solutions
team.
Requesting a Review of the Company Profile
Submit the listing to the
Visa Acceptance Solutions
team for review. After the
review, the team approves and publishes your listing to the Partner Directory or
requests changes.
If changes are required, you can repeat the steps above to access your Marketplace
profile, make changes, and request another review. You will receive an email
notification when the status of your listing changes.
Contact your account executive if you have any questions or concerns.
Support Resources and Forums
Access these resources to learn about Card Not Present (e-commerce) and Card Present
(in-person) integrations:
How do I sign up for the Partner Marketing portal?
Sign up at this link: Partner Marketing portal. You receive portal
approval and login details through email within 2-5 business days.
What does the partner marketing portal contain?
The Visa Acceptance Solutions partner portal is a self-service resource to help
partners succeed in maximizing mutual partnership value. Through the portal, you
access helpful product and leadership content, product trainings, register
referral leads (only for referral partners), view the
Visa Acceptance Solutions
event calendar, and edit your directory listing.
How many users can we have in the marketing partner portal?
You can have as many users as you need! However, designate only two users as
directory editors.
What if I have future edits to my listing?
If you want to make changes to your partner listing, follow the same process as
when you first created it. Log back in to the partner portal, make edits to your
Profile page, and request a review by the Visa team.
Create a Shared Secret Key Pair
Follow these steps to create a shared secret key pair.
 The Module Manager page opens.
 The Upload a module pane appears.
 Configureto configure the Plugin.
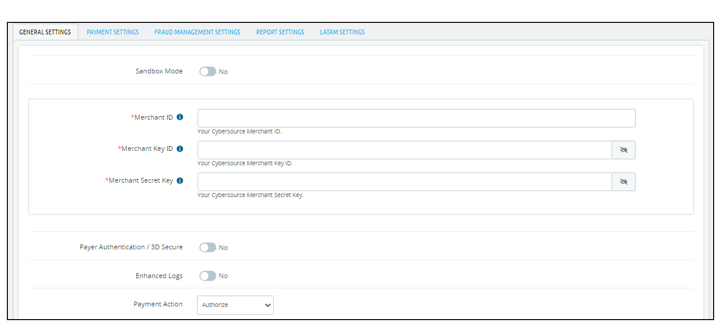
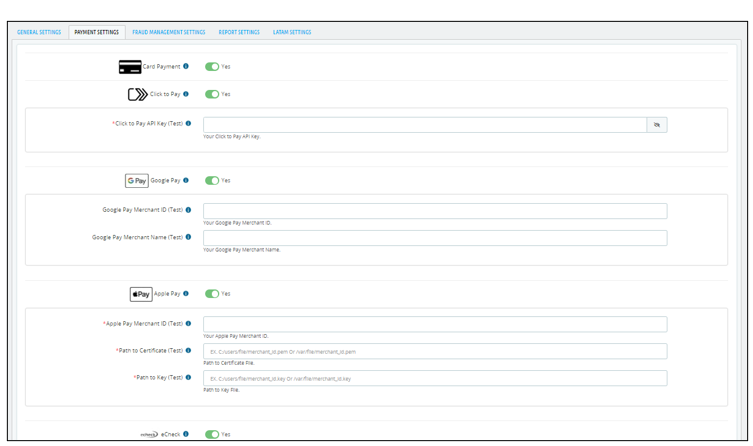
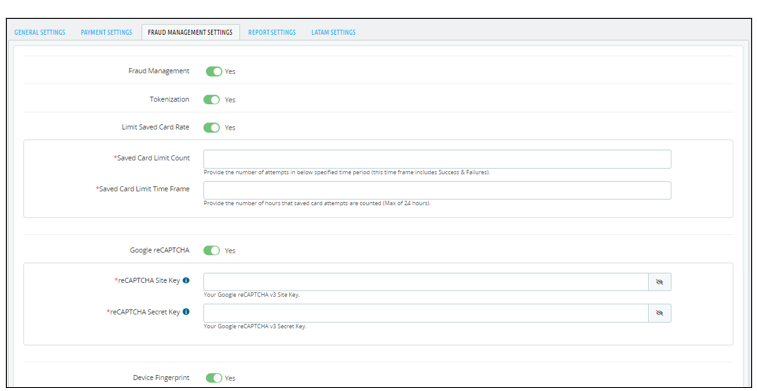
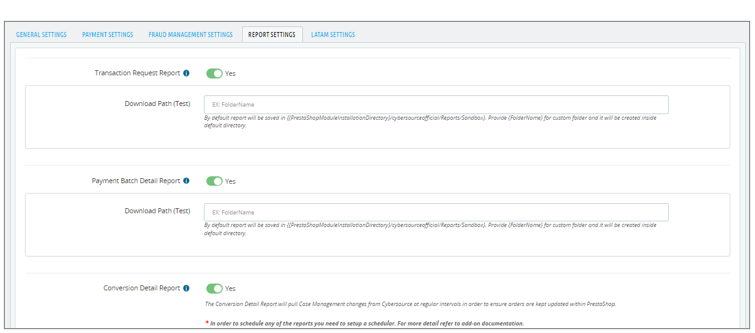
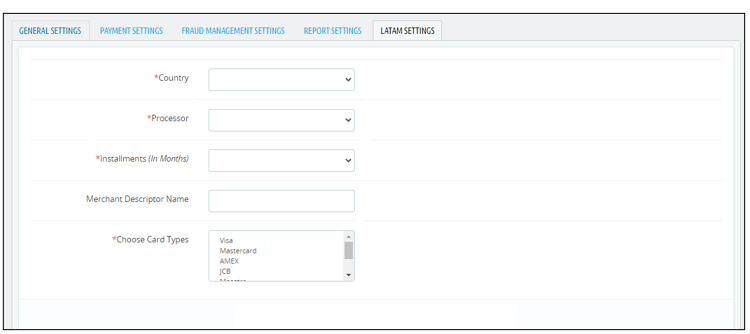
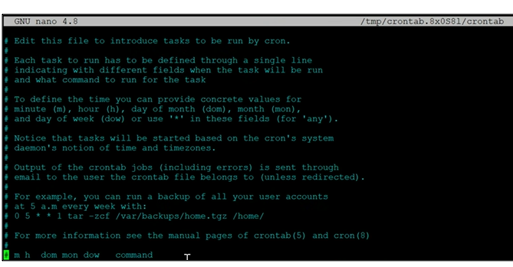
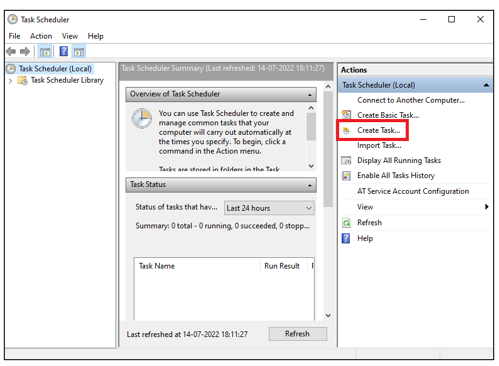
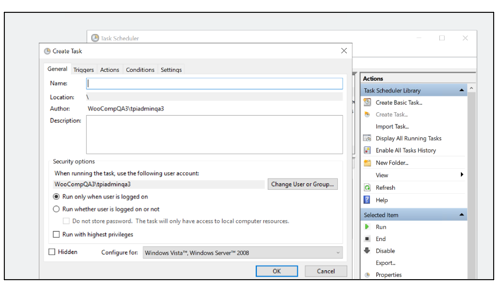
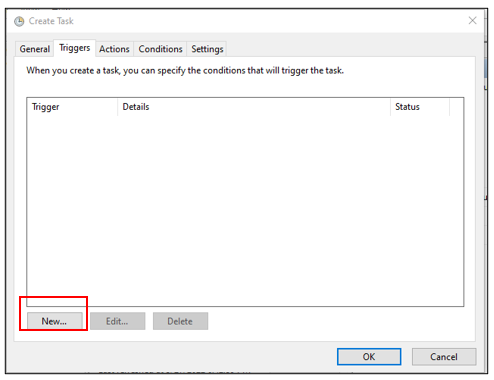
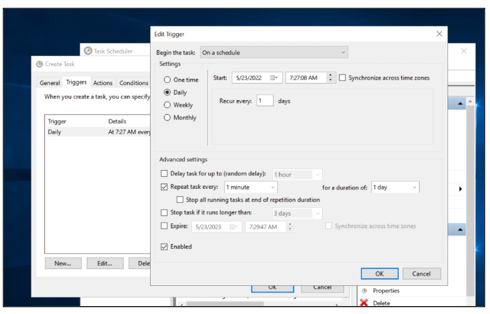
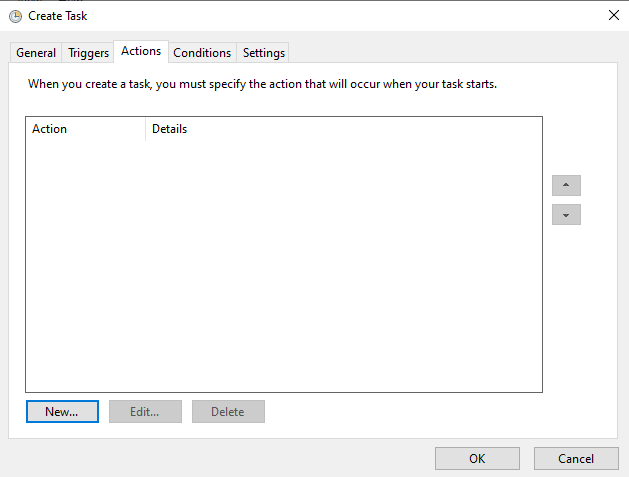
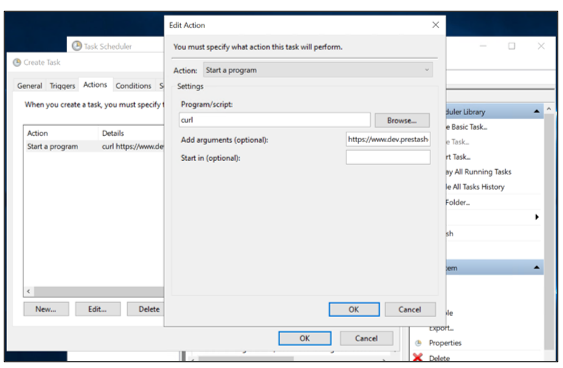
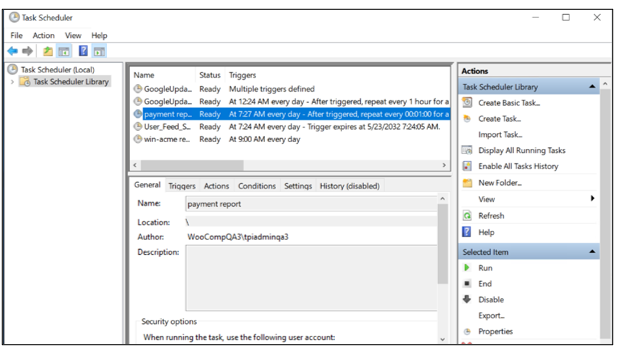
 Payment Configuration > Key Management.
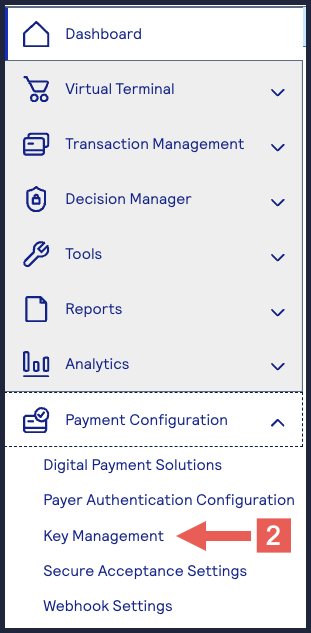
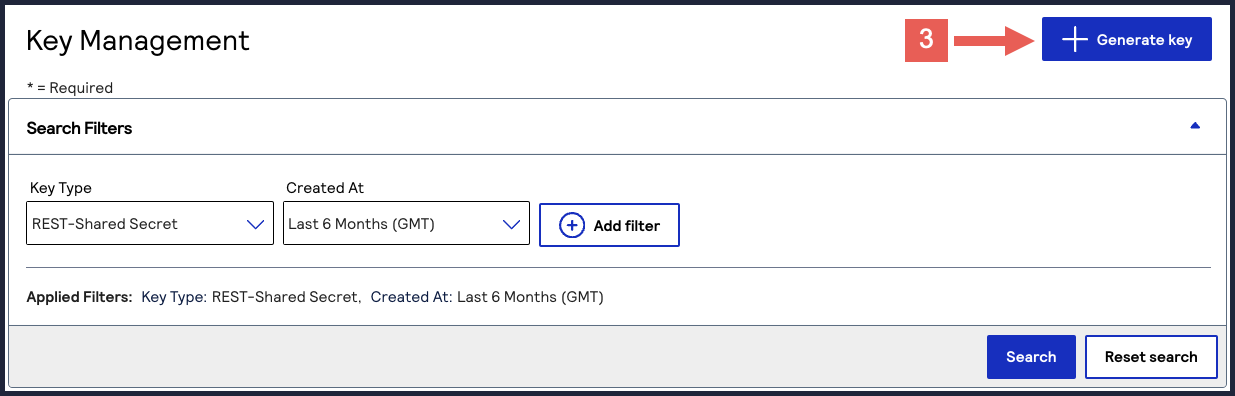
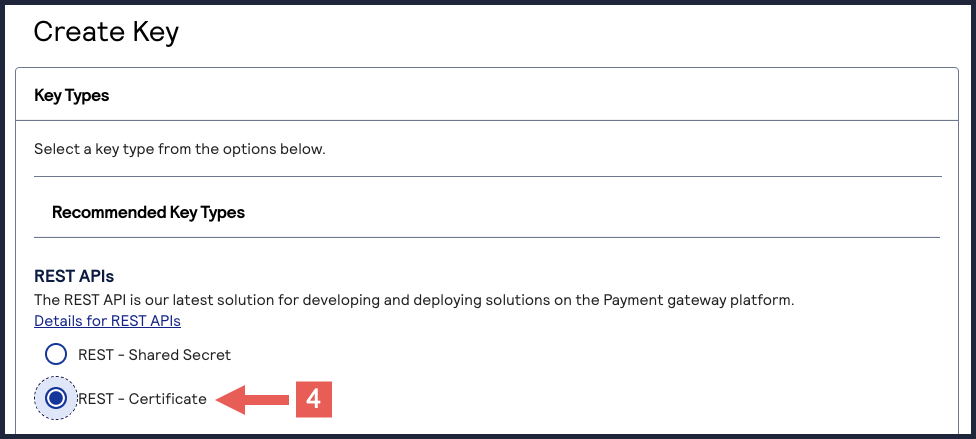

 .
.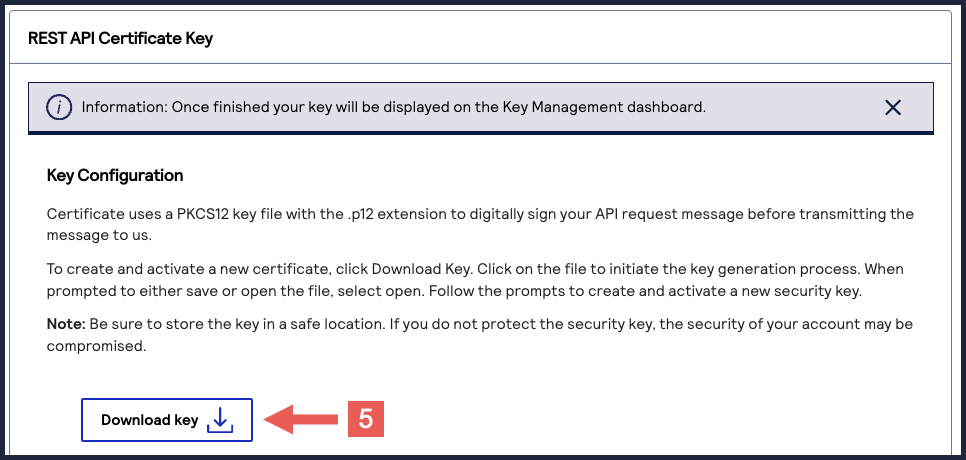
 { "http-basic": { "repo.magento.com": { "username": "Your_Public_Key", "password": "Your_Private_Key" } } }