On This Page
Webhooks Implementation Guide
This guide provides information about Webhook features that you can include in your
system:
- Multiple security options. For example, server security policy and digital signature verification.
- Multiple possible workflows based on the security policy you choose.
- The process for setting up and using the feature.
- Convention
- This special statement is used in this document:IMPORTANTAnImportantstatement contains information essential to successfully completing a task or learning a concept.
- Related Documentation
- Refer to the Technical Documentation Portal for more technical documentation:
- Customer Support
- For support information about any service, visit the Support Center:
Limited Availability Release
This document provides information about the limited availability release of the Webhooks REST
API.
Recent Revisions to This Document
25.10.01
This revision contains only editorial changes and no technical updates.
25.09.02
Added support for the
tms.networktoken.binding
webhook event type,
which notifies you of the binding status of a network token to a device. See Supported Products and Event Types.25.09.01
Added examples of creating a webhook subscription for
eCheck
events. See
the eCheck
section in Request Examples for Creating a Subscription for all Products and Event Types.25.08.01
This guide has been reorganized.
25.03.01
- Managing Subscriptions
- Added additional information about why you should include a health check URL when subscribing to a webhook event. See Webhook Health Check URL and Automatic Revalidation.
- Product and Events
- Removed support for thecns.report.keyExpiration.detailwebhook event type, which would notify you when a key is expiring. See Supported Products and Event Types.
25.02.02
- Products and Events
- Added support for new Invoicing product events. See Supported Products and Event Types.
25.02.01
- Products and Events
- Added support for new Invoicing product events. See Supported Products and Event Types.
Updated product event types and descriptions. See Supported Products and Event Types.
VISA Platform Connect: Specifications and Conditions for
Resellers/Partners
The following are specifications and conditions that apply to a Reseller/Partner enabling
its merchants through
Visa Acceptance platform
. Failure to meet any of the specifications and conditions below is
subject to the liability provisions and indemnification obligations under
Reseller/Partner’s contract with Visa/Cybersource.- Before boarding merchants for payment processing on a VPC acquirer’s connection, Reseller/Partner and the VPC acquirer must have a contract or other legal agreement that permits Reseller/Partner to enable its merchants to process payments with the acquirer through the dedicated VPC connection and/or traditional connection with such VPC acquirer.
- Reseller/Partner is responsible for boarding and enabling its merchants in accordance with the terms of the contract or other legal agreement with the relevant VPC acquirer.
- Reseller/Partner acknowledges and agrees that all considerations and fees associated with chargebacks, interchange downgrades, settlement issues, funding delays, and other processing related activities are strictly between Reseller and the relevant VPC acquirer.
- Reseller/Partner acknowledges and agrees that the relevant VPC acquirer is responsible for payment processing issues, including but not limited to, transaction declines by network/issuer, decline rates, and interchange qualification, as may be agreed to or outlined in the contract or other legal agreement between Reseller/Partner and such VPC acquirer.
DISCLAIMER: NEITHER VISA NOR CYBERSOURCE WILL BE RESPONSIBLE OR LIABLE FOR ANY ERRORS OR
OMISSIONS BY THE
Visa Platform Connect
ACQUIRER IN PROCESSING TRANSACTIONS. NEITHER VISA
NOR CYBERSOURCE WILL BE RESPONSIBLE OR LIABLE FOR RESELLER/PARTNER BOARDING MERCHANTS OR
ENABLING MERCHANT PROCESSING IN VIOLATION OF THE TERMS AND CONDITIONS IMPOSED BY THE
RELEVANT Visa Platform Connect
ACQUIRER. Introduction to Webhooks
Webhooks are automated notifications that are generated and sent to you when specific system
events occur. By using the Webhooks REST API, you can subscribe to receive these
notifications for events of your choice and designate a URL in your system to receive
the notifications. This is helpful for events that are not a part of an API request and
response, or are not available through the Reporting API. For example, you can receive
webhook notifications when these events occur:
- Fraud alerts
- Invoice status updates
- Network token is provisioned
- Transaction monitoring
- Recurring billing
You can also configure your system to respond to the events in any way you choose.
The Webhooks REST API enables you to:
- Create webhook subscriptions to receive automatic system notifications
- Update and delete existing webhook subscriptions
- Check the status of a webhook notification
- Retrieve webhook notification history and details
For more information about the products and event types that you can receive
notifications for, see Supported Products and Event Types.
Benefits
The Webhooks API provides these key benefits:
- Visibility into system events that are otherwise not visible.
- Ability to respond to events programmatically and to automate workflows.
Test Methods for Webhooks
You can test the Webhooks REST API using the Postman application or the
Visa Acceptance Solutions
Developer Center's live console.- Postman
- A Postman collection is available for you to test the Webhooks REST API. Contact your account manager to request the collection.
- Developer Center Live Console
- TheVisa Acceptance SolutionsDeveloper Center offers the live console for you to test complete examples and view the API field descriptions. See the Webhooks section in the REST API Reference.
How to Prepare Your System to Support Webhooks
You must complete these prerequisites before beginning to set up your webhooks
subscriptions.
Webhooks Server
You must set up a server with a URL to receive webhook notifications. You can also
set up an additional URL for the health check service. For more information about
how
Visa Acceptance Solutions
uses your health check URL, see Webhook Health Check URL and Automatic Revalidation.Security Policy Options
Your system must support the
mutual trust
security policy to authenticate
webhook notifications. Mutual trust is a simple authentication scheme that is
included in the HTTP protocol. It is often used in conjunction with HTTPS to provide
confidentiality through encryption.In addition to mutual trust, you can also use the
OAuth
or OAuth JWT
security policy to authenticate your webhook notifications.Business Center Account and Security Keys
Business Center
Account and Security KeysYou must have an organization or merchant account
(MID) and REST API security keys.
If you do not have an account, you can sign up for
test
account on the Developer Center: During the test account signup, you receive a REST API security key to test the
APIs.
To create new REST API security keys, see the
Creating and Using Security
Keys User Guide
.Getting Started with the REST API
To begin implementing webhooks through
Visa Acceptance Solutions
, you must set up
your system to be REST compliant. Visa Acceptance Solutions
uses the REST
architecture for developing web services. REST enables communication between a
client and server using HTTP protocols.If you have not set up secure communications between your client and server using
either a
JSON Web Token
or HTTP signature
, see theHow to Set Up Webhook Subscriptions
Follow these steps to set up your system to support the Webooks REST API. Some of these steps
are dependent on your system's security policy.
Figure:
Set Up Webhook Subscriptions Workflow

- Configure your server security to receive webhooks notifications. For more information, see Set Up Your Server Security.
- Create a REST API security key that is compliant with your security policy. Security keys are used to authenticate the requests you send toVisa Acceptance Solutions. You must create separate keys for the testing and production environments. For more information, see Create REST API Keys.
- Request a digital signature key fromVisa Acceptance Solutions. For more information, see Create a Digital Signature Key.
- If your system uses theOAuthorOAuth with JWTsecurity policy, you must provide your OAuth credentials toVisa Acceptance Solutions. For more information, see Provide Your OAuth Credentials.
- Request a list of the products that your organization is enabled to receive webhook notifications for. For more information, see Retrieve a List of Products and Events.
- Create your webhook subscription event notifications. For more information, see Create a Webhook Subscription.
Optional Set Up Tasks
These are optional tasks you can complete after creating a webhook subscription.
- Include a health check URL to enableVisa Acceptance Solutionsto monitor your server's status for reliability. For more information, see Webhook Health Check URL and Automatic Revalidation.
- Customize the retry policy for unresponsive webhook and health check URLs. For more information, see Configure the Retry Policy.
- Validate your digital signature. For more information, see Validate a Webhook Notification.
Supported Products and Event Types
This section describes all of the products and event types that are supported by the Webhooks
REST API
.When you create a webhook subscription, you must include a
Visa Acceptance Solutions
product
and one of its corresponding event types
in your request. You can
include multiple products and event types in the same request. Every time one of the
events that you subscribe to occurs, you receive a notification. If you subscribe to a
product that is not enabled for your account, you receive a notification when it is
enabled. To retrieve a list of the enabled products that your organization can subscribe
to, see Retrieve a List of Products and Events. When you send a
create a webhook subscription
request, set the
productId
field to a value listed in the Product ID column. Set
the eventTypes
field array to a value listed in the Event Types
column. If you are subscribing to multiple products and event types, separate each value
with the comma character (,
). For reference examples of how to properly
format these fields and values in a request, see Examples of all Products and Event Types.These are all of the webhook supported products, event types, and their corresponding
field values:
Alternative Payment Methods
Product ID | Event Types | Description |
|---|---|---|
alternativePaymentMethods | payments.payments.updated | Notifies you that an alternative payment transaction's status has
been updated. |
eCheck
eCheck
Product ID | Event Types | Description |
|---|---|---|
eCheck | payments.credits.accepted | Notifies you of a successful eCheck credit
transaction. |
payments.credits.failed | Notifies you of an eCheck credit transaction
failure. | |
payments.payments.accepted | Notifies you of a successful eCheck debit
transaction. | |
payments.payments.failed | Notifies you of an eCheck debit transaction
failure. | |
payments.voids.accepted | Notifies you of a successful eCheck void
transaction. | |
payments.voids.failed | Notifies you of an eCheck void transaction
failure. |
Fraud Management Essentials
Fraud Management Essentials
Product ID | Event Types | Description |
|---|---|---|
fraudManagementEssentials | risk.casemanagement.decision.accept | Notifies you that a Fraud Management Essentials case
has been accepted. |
risk.casemanagement.addnote | Notifies you that a note has been added to a
Fraud Management Essentials case. | |
risk.profile.decision.reject | Notifies you that a transaction was
rejected. | |
risk.casemanagement.decision.reject | Notifies you that a Fraud Management Essentials case
has been rejected. | |
risk.profile.decision.monitor | Notifies you of a profile decision to monitor a
transaction. | |
risk.profile.decision.review | Notifies you of a profile decision to review a
transaction. |
Invoicing
Product ID | Event Types | Description |
|---|---|---|
customerInvoicing | invoicing.customer.invoice.send | Notifies you that an invoice has been sent. |
invoicing.customer.invoice.cancel | Notifies you that an invoice has been cancelled. | |
invoicing.customer.invoice.paid | Notifies you that an invoice has been paid. | |
invoicing.customer.invoice.partial-payment | Notifies you that an invoice has been partially paid. | |
invoicing.customer.invoice.reminder | Notifies you 5 days before the invoice payment is due. This
event is triggered if you have invoice reminders enabled in your
invoice settings. | |
invoicing.customer.invoice.overdue-reminder | Notifies you 1 day after the invoice payment is due. This event
is triggered if you have invoice reminders enabled in your
invoice settings. |
Payments
Product ID | Event Types | Description |
|---|---|---|
payments | payments.capture.status.accepted | Notifies you that a payment capture request is accepted by
Visa Acceptance Solutions . |
payments.capture.status.updated | Notifies you that a payment capture is updated. |
Pay by Link
Pay by Link
Product ID | Event Types | Description |
|---|---|---|
payByLink | payByLink.merchant.payment | Merchants can subscribe to this event type to automate how
their system is informed when a customer completes a
payment. |
payByLink.customer.payment | Partner resellers can subscribe to this event type to control
the distribution of the payment confirmation email sent to their
merchants' customers. |
Recurring Billing
Product ID | Event Types | Description |
|---|---|---|
recurringBilling | rbs.subscriptions.charge.failed | Notifies you of a recurring payment failure. |
rbs.subscriptions.charge.pre-notified | Notifies you of an upcoming recurring payment. | |
rbs.subscriptions.charge.created | Notifies you of successful recurring payment. |
Token Management Service
Token Management Service
Product ID | Event Types | Description |
|---|---|---|
tokenManagement | tms.networktoken.updated | Notifies you of a network token's change in
expiration date or status (suspend, resume, or
deactivate). |
tms.networktoken.provisioned | Notifies you when a network token provision for
an instrument identifier token has been
successful. | |
tms.networktoken.binding | Notifies you of the binding status of a network token with a
device. |
Set Up Your Server Security
Complete these tasks to configure your server to receive secure webhook notifications.
Allowlist
Add these IP addresses to your allowlist to permit
Visa Acceptance Solutions
to
deliver your webhook
notifications:- 198.241.206.21
- 198.241.207.21
Trusting the Root Certificate
Download the
Visa Corporate Root CA G2
certificate from the Visa Public Key
Infrastructure webpage, and add it to your Java keystore: http://enroll.visaca.com
Create REST API Keys
The Webhooks REST API requires you to create a
shared secret key pair
. You may
have already completed this requirement if your system is currently REST compliant. If
you are using the OAuth with JWT security policy, you must also create a P12
certificate
. The shared secret key pair and P12 certificate are also known as
REST API keys. REST API keys are used to enable secure communication between you and
Visa Acceptance Solutions
when using the REST API.- Shared secret key pair:A key pair used for HTTP signature authentication. It is consists of a key and a shared secret key. See Create a Shared Secret Key Pair.
- P12 certificate:A key used for JSON Web Token authentication. It consists of.p12file and a password that you must set to use the file. See Create a P12 Certificate.
When using the test and production environments, you must create
separate keys for each environment.
Securely store your created keys in your system. You must be able to access your key
credentials while implementing and managing webhook subscriptions.
REST API keys expire after 3 years.
Create a Shared Secret Key Pair
The Webhook REST API requires you to create a shared secret key pair. You may have
already completed this requirement if your system is currently REST compliant.
Follow these steps to create a shared secret key pair.
- On the left navigation panel, choose
 Payment Configuration > Key Management.
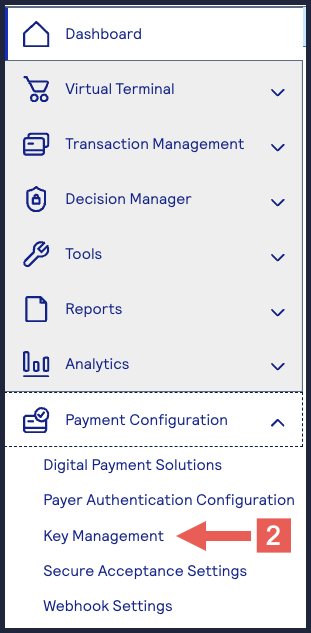
- Click+ Generatekey.
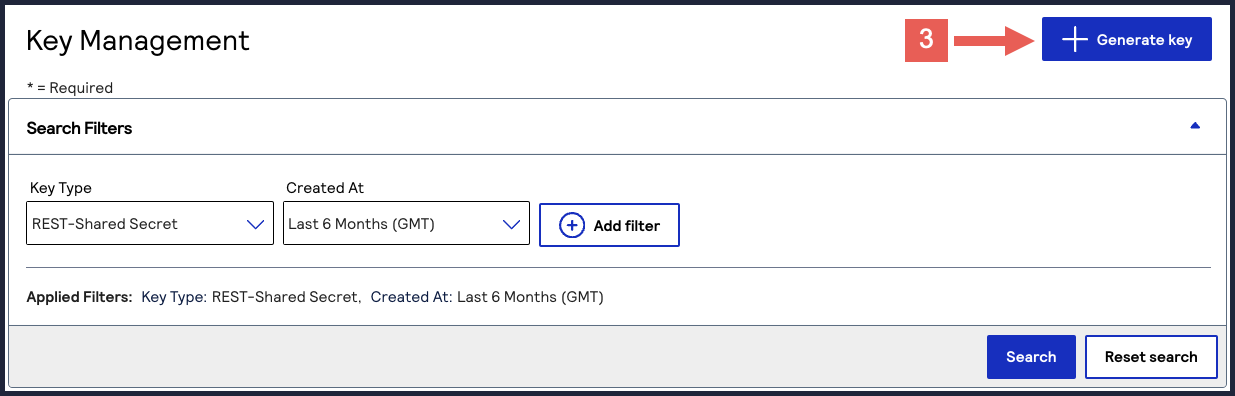
- Under REST APIs, chooseREST – Shared Secretand then clickGenerate key.
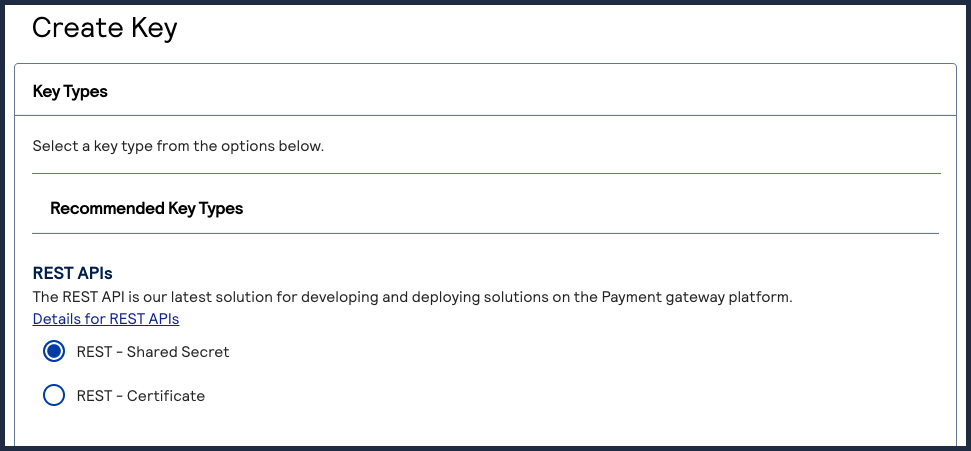
 The REST API Shared Secret Key page appears.
 - ClickDownload key
 .The .pem file is downloaded to your desktop.
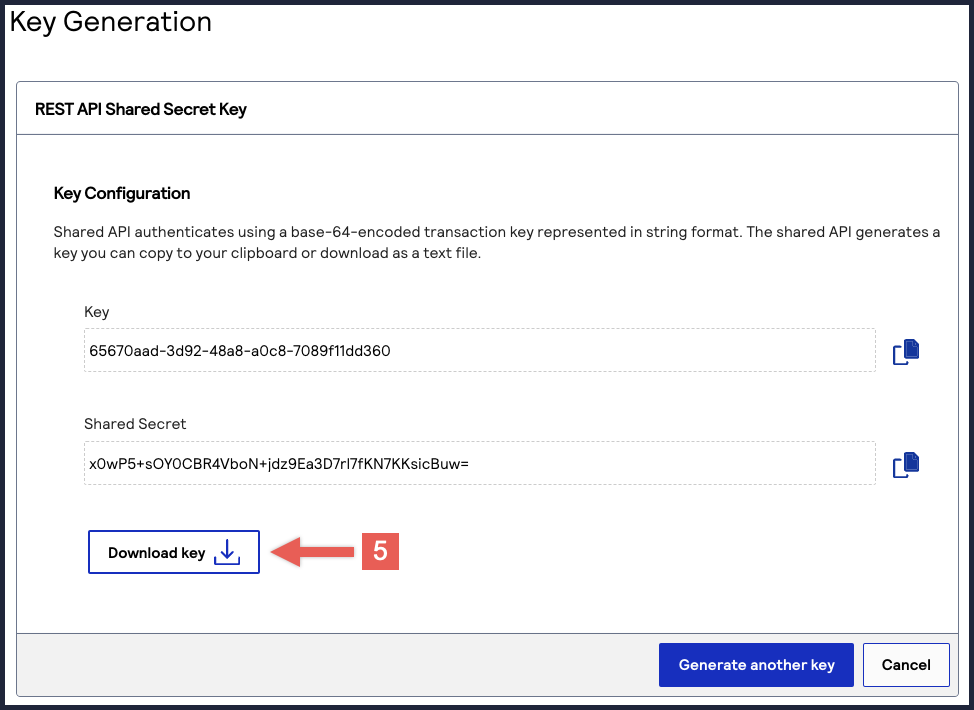
You can create or upload another key by clicking
Generate another key
. To
view all of your created keys, use the Key Management page.IMPORTANT
Securely store the shared secret key pair in your system. You must be
able to retrieve these credentials to implement the Webhooks REST API.
Create a P12 Certificate
If you are using the OAuth with JWT security policy, you must create a P12 certificate in
addition to a shared secret key pair. You may have already completed this requirement if
your system is currently REST compliant.
Follow these steps to create a
.p12
file if you are using JSON Web Tokens to
secure communication.- Log in to theBusiness Center:
- On the left navigation panel, choose
Payment Configuration > Key Management.
- Click+ Generatekey.
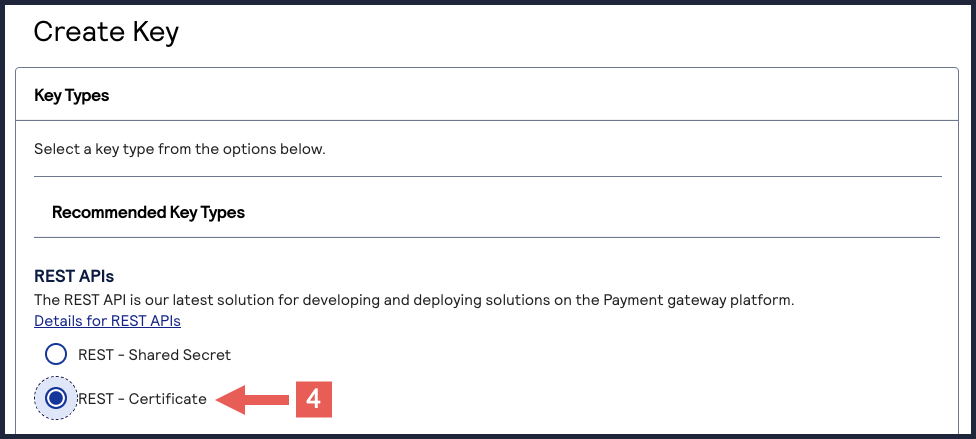
- Under REST APIs, chooseREST – Certificate, and then clickGenerate key.If you are using aportfolioaccount, the Key options window appears, giving you the choice to create a meta key. For more information about how to create a meta key, see Meta Key Creation and Management.
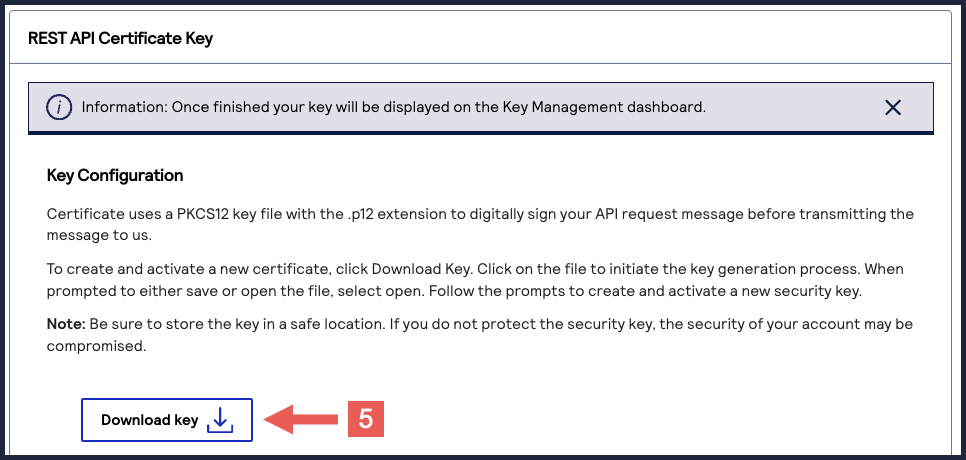
- ClickDownload key
.
- Create a password for the certificate by entering the password into theNew PasswordandConfirm Passwordfields, and then clickGenerate key.
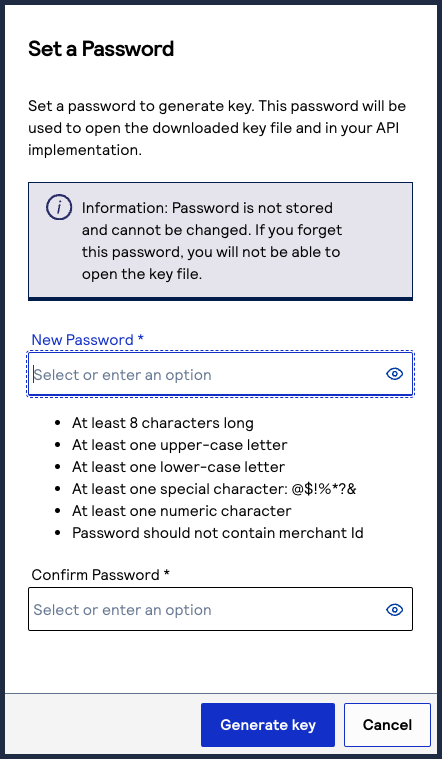 The.p12file downloads to your desktop.If prompted by your system, approve the location for where the key downloads.
You can create or upload another key by clicking
Generate another key
. To
view all of your created keys, use the Key Management page.IMPORTANT
Securely store the
.p12
file and password in your
system.Create a Digital Signature Key
This section describes how to create a
digital signature key
. You must create a digital
signature key in order for Visa Acceptance Solutions
to send notifications to your
servers. You only need to send this request once for each account. Sending this request
again using the same account credentials results in the same digital signature key.IMPORTANT
Store the created digital signature key in a secure location in your
system.
Optional Notification Validation
After you set up a webhook subscription, you can validate each notification you receive using
your digital signature key. When
Visa Acceptance Solutions
sends you a
notification, your digital signature key is included in the notification's header.
You can configure your system to validate that each notification contains your
digital signature key in its header. Validating a webhook notification verifies the
notification's integrity and prevents replay attacks. For more information, see
Validate a Webhook Notification.Endpoints
Send a POST request to one of these endpoints:
- Test:POSThttps://apitest.visaacceptance.com/kms/egress/v2/keys-sym
- Production:POSThttps://api.visaacceptance.com/kms/egress/v2/keys-sym
Required Fields for Creating a Digital Signature Key
- clientRequestAction
- Set the value toCREATE.
- keyInformation.expiryDuration
- keyInformation.keyType
- Set the value tosharedSecret.
- keyInformation.organizationId
- Set the value to the organization ID of the organization requesting the key.
- keyInformation.provider
- Set the value tonrtd.
- keyInformation.tenant
- Set the value to the organization ID of the organization requesting the key.
Example: Creating a Digital Signature Key
{
  "clientRequestAction": "CREATE",
  "keyInformation": {
    "provider": "nrtd",
    "tenant": "merchantName",
    "keyType": "sharedSecret",
    "organizationId": "merchantName"
  }
}
{
"submitTimeUtc": "2021-03-17T06:53:06+0000",
"status": "SUCCESS",
"keyInformation": {
"provider": "NRTD",
"tenant": "merchantName",
"organizationId": "merchantName",
"keyId": "bdc0fe52-091e-b0d6-e053-34b8d30a0504", //ID associated with the key in the key field
"key": "u3qgvoaJ73rLJdPLTU3moxrXyNZA4eo5dklKtIXhsAE=", //Base64 encoded key
"keyType": "sharedSecret",
"status": "Active",
"expirationDate": "2022-03-17T06:53:06+0000"
}
Provide Your OAuth Credentials
If your system uses the
OAuth
or OAuth with JWT
security policy, you must provide
your OAuth credentials to Visa Acceptance Solutions
. When Visa Acceptance Solutions
sends you webhook notifications in the future, Visa Acceptance Solutions
will use your
OAuth credentials to access your server and deliver the notification message.IMPORTANT
If you are only using the default
mutual trust
security policy, you
do not need to provide OAuth credentials to Visa Acceptance Solutions
.- OAuth
- The OAuth security policy with client credentials is an authentication method that is designed for applications to communicate with each other. Basic authentication is the most common mechanism for authenticating a client with the client credentials. This authentication method enablesVisa Acceptance Solutionsservices to obtain only the relevant user data without exposing the user's credentials.
- OAuth with JWT
- The OAuth with JWT security policy is an authentication method in which your system sends a JSON Web Token. This method bypasses domain headers and minimizes the need for server-side authentication checks.
Endpoints
Send a POST to one of these endpoints:
- Test:POSThttps://apitest.visaacceptance.com/kms/egress/v2/keys-sym
- Production:POSThttps://api.visaacceptance.com/kms/egress/v2/keys-sym
Required Fields for Providing Your OAuth Credentials
- clientRequestAction
- Set toSTORE.
- keyInformation.clientKeyId
- Set to the OAuth client's username.
- keyInformation.expiryDuration
- Set to365.
- keyInformation.key
- Set to the client's secret key.
- keyInformation.keyType
- Set tooAuthClientCredentials.
- keyInformation.organizationId
- Set to the organization ID or merchant ID of the organization requesting the key.
- keyInformation.provider
- Set to the organization ID that the requesting organization belongs to.
- keyInformation.tenant
- Set tonrtd.
Example: Providing Your OAuth Credentials
{
  "clientRequestAction": "STORE",
  "keyInformation": {
    "provider": "merchantName",
    "tenant": "nrtd",
    "keyType": "oAuthClientCredentials",
    "organizationId": "merchantName",
    "clientKeyId": "client username",
    "key": "client secret",
    "expiryDuration": "365"
  }
}
{
    "submitTimeUtc": "2022-02-18T19:49:52Z",
    "status": "SUCCESS",
    "keyInformation": {
        "provider": "org1",
        "tenant": "nrtd",
        "organizationId": "org1",
        "clientKeyId": "ef400ac1-edfe-406e-94b3-0d73be09a1a0",
        "keyId": "d8512fb5-1d8c-4f2d-e053-3cb8d30a764c",
        "key": "KTTY1LLGYR6A2LL4XZTT9W9RGCVJ5Z4XZAP6AFTRUFWLSXX0NX4N88N9EJED3BMM",
        "keyType": "oAuthClientCredentials",
        "status": "active",
        "expirationDate": "2023-02-18T19:49:52Z"
    }
}
Retrieve a List of Products and Events
This section describes how to retrieve a list of the products and event types that are enabled
for your organization. Use this list to know which products and events that you can
subscribe to. A successful response lists the enabled products and events in the
productId
and eventTypes.eventName
fields. You
can use these same fields values when you send a create a webhook subscription
request.If the list you retrieve does not contain an expected product or event type, the product
may not be enabled for your organization. Contact your account manager for more
information.
For a list of all the products and event types that are supported by the Webhooks
REST API
, see the Supported Products and Event Types.Endpoints
Send a GET request to one of these endpoints. The is
your organization ID.
{organizationId}
- Test:GEThttps://apitest.visaacceptance.com/notification-subscriptions/v2/products/{organizationId}
- Production:GEThttps://api.visaacceptance.com/webhooks/notification-subscriptions/v2/products/{organizationId}
Example: Retrieving a List Products and Event
GEThttps://api.visaacceptance.com/notification-subscriptions/v2/products/{organizationId}
[
  {
    "productId": "terminalManagement",
    "eventTypes": [
      {
        "eventName": "terminalManagement.status.update",
        "payloadEncryption": false
      },
      {
        "eventName": "terminalManagement.assignment.update",
        "payloadEncryption": false
      },
      {
        "eventName": "terminalManagement.reAssignment.update",
        "payloadEncryption": false
      }
    ]
  }
]
Create a Webhook Subscription
This section describes how to create a webhook subscription using the REST API.
The request you send is dependent on your system's security policy:
- Mutual trust (default)
- Mutual trust andOAuth
- Mutual trust andOAuth with JWT
The Webhooks REST API uses the mutual trust security policy by default. In addition to
mutual trust, you can also use the OAuth or OAuth JWT security policy. If you are not
using OAuth security to authenticate your webhook notifications, use the default mutual
trust request.
Create a Webhook Subscription Using Mutual Trust
This section describes how to create webhook subscription using mutual trust. You can subscribe
to multiple webhook products and event types in the same request.
Mutual trust
is the default security policy for webhooks. It is a simple authentication
scheme that is included in the HTTP protocol. Mutual trust is often used in conjunction
with HTTPS to provide confidentiality through
encryption.Health Check URL
Visa Acceptance Solutions
recommends that you include a health check URL in the subscription
request. A health check URL ensures that you do not miss any notifications. For more
information, see Webhook Health Check URL and Automatic Revalidation.Retry Policy
If your webhook URL or health check URL are unresponsive when sent a notification,
Visa Acceptance Solutions
resends the notification according to the subscription's
retry policy
. By default, Visa Acceptance Solutions
sends you 3
notification attempts, beginning 1 minute after the initial failed attempt. Each
retry attempt occurs in 1 minute intervals if your URL remains unresponsive. You can
configure the default retry policy when you create or update a subscription. For
more information about how to configure the retry policy, see Configure the Retry Policy.Subscription ID
IMPORTANT
After sending this request, you receive a response with a subscription ID
in the
webhookId
field. Save this ID in your system to send
follow-on requests that enable you to update and manage the subscription. For
more information about the follow-on requests, see Manage Webhook Subscriptions Requests.Endpoints
Send a POST request to one of these endpoints:
- Test:POSThttps://apitest.visaacceptance.com/notification-subscriptions/v2/webhooks
- Production:POSThttps://api.visaacceptance.com/notification-subscriptions/v2/webhooks
Required Fields for Subscribing to Webhooks Using Mutual Trust
- description
- name
- organizationId
- Set to your organization ID or merchant ID.
- products.eventTypes
- For a list of event types, see Supported Products and Event Types.
- products.productId
- For a list of product IDs, see Supported Products and Event Types.
- securityPolicy.securityType
- Set toKEY.
- webhookUrl
Optional Fields for Subscribing to Webhooks Using Mutual Trust
- deactivateflag
- Required ifhealthCheckUrlfield is present.
- Set totrueto automatically activate the subscription.
- healthCheckUrl
- Set to the health check URL. Required to auto-activate the subscription. If you do not include this field, the created subscription is inactive. An inactive subscription does not send notifications. For more information, see Webhook Health Check URL and Automatic Revalidation.
- notificationScope.scopeData
- Set to the organization IDs that you want to receive notifications for when events occur in those organizations. Concatenate each organization ID with the comma character (,).
- retryPolicy.deactivateFlag
- For more information, see Configure the Retry Policy.
- retryPolicy.firstRetry
- For more information, see Configure the Retry Policy.
- retryPolicy.interval
- For more information, see Configure the Retry Policy.
- retryPolicy.numberOfRetries
- For more information, see Configure the Retry Policy.
- retryPolicy.repeatSequenceCount
- For more information, see Configure the Retry Policy.
- retryPolicy.repeatSequenceWaitTime
- For more information, see Configure the Retry Policy.
Example: Creating a Webhook Subscription Using Mutual Trust
{
  "name": "My Custom Webhook",
  "description": "Sample Webhook from Developer Center",
  "organizationId": "<SET TO YOUR ORGANIZATION ID OR MERCHANT ID>",
  "products": [
    {
      "productId": "product.name",
      "eventTypes": [
        "product.name.event.type"
      ]
    }
  ],
  "webhookUrl": "https://MyWebhookServer.com:8443/simulateClient",
  "securityPolicy": {
    "securityType": "KEY"
  }
}
Response to a Successful Request
{
  "organizationId": "organizationId",
  "productId": "terminalManagement",
  "eventTypes": [
    "terminalManagement.assignment.update"
  ],
  "webhookId": "ddb9bced-c3e3-1b1d-e053-9c588e0a3c42",
  "name": "My Custom Webhook",
  "webhookUrl": "https://MyWebhookServer.com:443/simulateClient",
  "healthCheckUrl": "https://MyWebhookServer.com:443/simulateClientHealthCheck",
  "createdOn": "2022-04-28T15:39:56.928Z",
  "status": "ACTIVE",
  "description": "Sample Webhook from Developer Center",
  "retryPolicy": {
    "algorithm": "ARITHMETIC",
    "firstRetry": "1",
    "interval": "1",
    "numberOfRetries": "3",
    "deactivateFlag": "false",
    "repeatSequenceCount": '0",
    "repeatSequenceWaitTime": "0"
  },
  "securityPolicy": {
    "securityType": "KEY",
    "digitalSignatureEnabled": "yes"
  },
  "version": "3",
  "notificationScope": "SELF"
}
Response Codes
Response Codes
A successful request is indicated by the 200-level response code.
For more information about all of the possible
response codes you can receive, see
.Transaction Response
Codes
Notification Scope Response Indicators
Notification Scope Response Indicators
The
notificationScope
response field indicates which organizations receive
the webhook notification. By default, notifications use the DESCENDANTS
setting. To modify this setting, include the
notificationScope.scopeData
field in your request.These are all possible field values:
- SELF
- Only the organization creating the webhook subscription receives notifications when a subscribed event occurs.
- DESCENDANTS(default)
- The organization creating the webhook subscription receives notifications when a subscribed event occurs in their organization and in any of their children/descendant accounts in their portfolio hierarchy. This is the default notification setting.
- CUSTOM
- The organization creating the webhook subscription receives notifications when a subscribed event occurs in their organization and in any organization listed in thenotificationScope.scopeDatarequest field.
Subscription Statuses
Subscription Statuses
When you create a subscription, its status is indicated in the
status
response field. If you did not include a health check URL in your request, the
subscription is set to INACTIVE
. If you included a health check URL and
Visa Acceptance Solutions
receives a response from the health check URL, the
subscription status is set to ACTIVE
. These are the three possible statuses a subscription can be set to:
- ACTIVE
- The subscription is ready to send notifications or is actively sending notifications.
- INACTIVE
- The subscription has not been activated. Add a health check URL to activate it. For more information, see Webhook Health Check URL and Automatic Revalidation.
- SUSPENDED
- The subscription was active, but the webhook URL or the health check URL became unreachable. When the URL becomes reachable, the status changes toACTIVEand notifications resume.
Create a Webhook Subscription Using OAuth
This section describes how to create a webhook subscription using the OAuth security policy.
You can subscribe to multiple webhook products and event types in the same request.
After creating a subscription, you receive a notification every time your subscribed
events occur.
The
OAuth
security policy with client credentials is an authentication method that is
designed for applications to communicate with each other. Basic authentication is the
most common mechanism for authenticating a client with the client credentials. This
authentication method enables Visa Acceptance Solutions
services to obtain only the
relevant user data without exposing the user's credentials.Health Check URL
Visa Acceptance Solutions
recommends that you include a health check URL in the subscription
request. A health check URL ensures that you do not miss any notifications. For more
information, see Webhook Health Check URL and Automatic Revalidation.Retry Policy
If your webhook URL or health check URL are unresponsive when sent a notification,
Visa Acceptance Solutions
resends the notification according to the subscription's
retry policy
. By default, Visa Acceptance Solutions
sends you 3
notification attempts, beginning 1 minute after the initial failed attempt. Each
retry attempt occurs in 1 minute intervals if your URL remains unresponsive. You can
configure the default retry policy when you create or update a subscription. For
more information about how to configure the retry policy, see Configure the Retry Policy.Subscription ID
IMPORTANT
After sending this request, you receive a response with a subscription ID
in the
webhookId
field. Save this ID in your system to send
follow-on requests that enable you to update and manage the subscription. For
more information about the follow-on requests, see Manage Webhook Subscriptions Requests.Endpoints
Send a POST request to one of these endpoints:
- Test:POSThttps://apitest.visaacceptance.com/notification-subscriptions/v2/webhooks
- Production:POSThttps://api.visaacceptance.com/notification-subscriptions/v2/webhooks
Required Fields for Subscribing to Webhooks Using OAuth
- description
- name
- organizationId
- Set to your organization ID or merchant ID.
- products.eventTypes
- For a list of event types, see Supported Products and Event Types.
- products.productId
- For a list of product IDs, see Supported Products and Event Types.
- securityPolicy.config.oAuthTokenExpiry
- securityPolicy.config.oAuthTokenType
- Set toBearer
- securityPolicy.config.oAuthURL
- securityPolicy.securityType
- Set tooAuth.
- webhookUrl
Optional Fields for Subscribing to Webhooks Using OAuth
- deactivateflag
- Required ifhealthCheckUrlfield is present.
- Set totrueto automatically activate the subscription.
- healthCheckUrl
- Set to the health check URL. Required to auto-activate the subscription. If you do not include this field, the created subscription is inactive. An inactive subscription does not send notifications. For more information, see Webhook Health Check URL and Automatic Revalidation.
- notificationScope.scopeData
- Set to the organization IDs that you want to receive notifications for when subscribed events occur in those organizations. Concatenate each organization ID with the comma character (,).
- retryPolicy.deactivateFlag
- For more information, see Configure the Retry Policy.
- retryPolicy.firstRetry
- For more information, see Configure the Retry Policy.
- retryPolicy.interval
- For more information, see Configure the Retry Policy.
- retryPolicy.numberOfRetries
- For more information, see Configure the Retry Policy.
- retryPolicy.repeatSequenceCount
- For more information, see Configure the Retry Policy.
- retryPolicy.repeatSequenceWaitTime
- For more information, see Configure the Retry Policy.
Example: Creating a Webhook Subscription Using OAuth
{
  "name": "My Custom Webhook",
  "description": "",
  "organizationId": "<INSERT ORGANIZATION ID HERE>",
  "products": [
    {
      "productId": "product.name",
      "eventTypes": [
        "product.name.event.type"
      ]
    }
  ],
  "webhookUrl": "https://MyWebhookServer.com:8443/simulateClient",
  "securityPolicy": {
    "securityType": "oAuth",
    "config": {
      "oAuthTokenExpiry": 365,
      "oAuthURL": "https://MyWebhookServer.com:8443/oAuthToken",
      "oAuthTokenType": "Bearer"
    }
  }
}
{
  "organizationId" : "org1",
  "productId" : "terminalManagement",
  "eventTypes" : [
	"terminalManagement.assignment.update"
],
  "webhookId" : "d7399cb6-ff9f-72d9-e053-3cb8d30a62ee",
  "webhookUrl" : "https://mywebhookserver.com/simulateclient",
  "healthCheckUrl" : "https://mywebhookserver.com/simulateclient/healthcheck",
  "createdOn" : "2022-02-04T22:17:43.045Z",
  "status" : "INACTIVE",
  "retryPolicy" : {
    "algorithm" : "ARITHMETIC",
    "firstRetry" : "1",
    "interval" : "1",
    "numberOfRetries" : "3",
    "deactivateFlag" : "false",
    "repeatSequenceCount" : "0",
    "repeatSequenceWaitTime" : "0"
  },
  "securityPolicy" : {
    "securityType" : "oAuth",
    "proxyType" : "internal",
    "digitalSignatureEnabled" : "yes",
    "config" : {
      "oAuthTokenExpiry" : "300,
      "oAuthURL" : "https://myoauthserver.com/simulator/v1/token",
      "oAuthTokenType" : "Bearer"
    }
  },
  "version" : "3",
  "notificationScope" : "SELF"
}
Response Codes
Response Codes
A successful request is indicated by the 200-level response code.
For more information about all of the possible
response codes you can receive, see
.Transaction Response
Codes
Notification Scope Response Indicators
Notification Scope Response Indicators
The
notificationScope
response field indicates which organizations receive
the webhook notification. By default, notifications use the DESCENDANTS
setting. To modify this setting, include the
notificationScope.scopeData
field in your request.These are all possible field values:
- SELF
- Only the organization creating the webhook subscription receives notifications when a subscribed event occurs.
- DESCENDANTS(default)
- The organization creating the webhook subscription receives notifications when a subscribed event occurs in their organization and in any of their children/descendant accounts in their portfolio hierarchy. This is the default notification setting.
- CUSTOM
- The organization creating the webhook subscription receives notifications when a subscribed event occurs in their organization and in any organization listed in thenotificationScope.scopeDatarequest field.
Subscription Statuses
Subscription Statuses
When you create a subscription, its status is indicated in the
status
response field. If you did not include a health check URL in your request, the
subscription is set to INACTIVE
. If you included a health check URL and
Visa Acceptance Solutions
receives a response from the health check URL, the
subscription status is set to ACTIVE
. These are the three possible statuses a subscription can be set to:
- ACTIVE
- The subscription is ready to send notifications or is actively sending notifications.
- INACTIVE
- The subscription has not been activated. Add a health check URL to activate it. For more information, see Webhook Health Check URL and Automatic Revalidation.
- SUSPENDED
- The subscription was active, but the webhook URL or the health check URL became unreachable. When the URL becomes reachable, the status changes toACTIVEand notifications resume.
Create a Webhook Subscription Using OAuth with JWT
This section describes how to create a webhook subscription using OAuth with a JSON Web Token
(JWT). You can subscribe to multiple webhook products and event types in the same
request. After creating a subscription, you receive a notification every time your
subscribed events occur.
The
OAuth with JWT
security policy is an authentication method in which your system
sends a JSON Web Token. This method bypasses domain headers and minimizes the need for
server-side authentication checks.Health Check URL
Visa Acceptance Solutions
recommends that you include a health check URL in the subscription
request. A health check URL ensures that you do not miss any notifications. For more
information, see Webhook Health Check URL and Automatic Revalidation.Retry Policy
If your webhook URL or health check URL are unresponsive when sent a notification,
Visa Acceptance Solutions
resends the notification according to the subscription's
retry policy
. By default, Visa Acceptance Solutions
sends you 3
notification attempts, beginning 1 minute after the initial failed attempt. Each
retry attempt occurs in 1 minute intervals if your URL remains unresponsive. You can
configure the default retry policy when you create or update a subscription. For
more information about how to configure the retry policy, see Configure the Retry Policy.Subscription ID
IMPORTANT
After sending this request, you receive a response with a subscription ID
in the
webhookId
field. Save this ID in your system to send
follow-on requests that enable you to update and manage the subscription. For
more information about the follow-on requests, see Manage Webhook Subscriptions Requests.Endpoints
Send a POST request to one of these endpoints:
- Test:POSThttps://apitest.visaacceptance.com/notification-subscriptions/v2/webhooks
- Production:POSThttps://api.visaacceptance.com/notification-subscriptions/v2/webhooks
Required Fields for Subscribing to Webhooks Using OAuth with JWT
- description
- name
- organizationId
- Set to your organization ID or merchant ID.
- products.eventTypes
- For a list of event types, see Supported Products and Event Types.
- products.productId
- For a list of product IDs, see Supported Products and Event Types.
- securityPolicy.config.additionalConfig.aud
- securityPolicy.config.additionalConfig.client_id
- securityPolicy.config.additionalConfig.keyId
- securityPolicy.config.additionalConfig.scope
- securityPolicy.config.oAuthTokenExpiry
- Set to365.
- securityPolicy.config.oAuthTokenType
- Set toBearer.
- securityPolicy.config.oAuthUrl
- securityPolicy.securityType
- Set tooAuth_JWT.
- webhookUrl
Optional Fields for Subscribing to Webhooks Using OAuth with JWT
- deactivateflag
- Required if thehealthCheckUrlfield is present.
- Set totrueto automatically activate the subscription.
- healthCheckUrl
- Set to the health check URL. Required to auto-activate the subscription. If you do not include this field, the created subscription is inactive. An inactive subscription does not send notifications. For more information, see Webhook Health Check URL and Automatic Revalidation.
- notificationScope.scopeData
- Set to the organization IDs that you want to receive notifications for when events occur in those organizations. Concatenate each organization ID with the comma character (,).
- retryPolicy.deactivateFlag
- For more information, see Configure the Retry Policy.
- retryPolicy.firstRetry
- For more information, see Configure the Retry Policy.
- retryPolicy.interval
- For more information, see Configure the Retry Policy.
- retryPolicy.numberOfRetries
- For more information, see Configure the Retry Policy.
- retryPolicy.repeatSequenceCount
- For more information, see Configure the Retry Policy.
- retryPolicy.repeatSequenceWaitTime
- For more information, see Configure the Retry Policy.
Example: Creating a Webhook Subscription Using OAuth with JWT
{
  "name": "My Custom Webhook",
  "description": "Sample Webhook from Developer Center",
  "organizationId": "<INSERT ORGANIZATION ID HERE>",
  "products": [
    {
      "productId": "product.id",
      "eventTypes": [
        "product.id.event.type"
      ]
    }
  ],
  "webhookUrl": "https://MyWebhookServer.com:8443/simulateClient",
  "securityPolicy": {
    "securityType": "oAuth_JWT",
    "config": {
      "oAuthTokenExpiry": "365",
      "oAuthURL": "https://MyWebhookServer.com:443/oAuthToken",
      "oAuthTokenType": "Bearer",
      "additionalConfig": {
        "aud": "idp.api.myServer.com",
        "client_id": "650538A1-0000-0000-0000-932ABC57AD70",
        "keyId": "y-00000000000000-eAZ34pR9Ts",
        "scope": "merchantacq:rte:write"
      }
    }
  }
}
{
  "organizationId": "organizationId",
  "productId": "product.id",
  "eventTypes": [
    "product.id.event.type"
  ],
  "webhookId": "fe46bf08-3918-21ba-e053-a1588d0aeefa",
  "name": "My Custom Webhook",
  "webhookUrl": "https://MyWebhookServer.com:443/simulateClient",
  "healthCheckUrl": "https://MyWebhookServer.com:443/simulateClientHealthCheck",
  "createdOn": "2023-06-16T21:19:54.667Z",
  "status": "INACTIVE",
  "description": "Sample Webhook from Developer Center",
  "retryPolicy": {
    "algorithm": "ARITHMETIC",
    "firstRetry": 1,
    "interval": 1,
    "numberOfRetries": 3,
    "deactivateFlag": false,
    "repeatSequenceCount": 0,
    "repeatSequenceWaitTime": 0
  },
  "securityPolicy": {
    "securityType": "oAuth_JWT",
    "proxyType": "external",
    "digitalSignatureEnabled": "yes",
    "config": {
      "oAuthTokenExpiry": 365,
      "oAuthURL": "https://MyWebhookServer.com:443/oAuthToken",
      "oAuthTokenType": "Bearer",
      "additionalConfig": {
        "aud": "idp.api.myServer.com",
        "client_id": "650538A1-0000-0000-0000-932ABC57AD70",
        "keyId": "y-00000000000000-eAZ34pR9Ts",
        "scope": "merchantacq:rte:write"
      }
    }
  },
  "version": "3",
  "deliveryType": "nrtdCentral",
  "notificationScope": "SELF"
}
Response Codes
Response Codes
A successful request is indicated by the 200-level response code.
For more information about all of the possible
response codes you can receive, see
.Transaction Response
Codes
Notification Scope Response Indicators
Notification Scope Response Indicators
The
notificationScope
response field indicates which organizations receive
the webhook notification. By default, notifications use the DESCENDANTS
setting. To modify this setting, include the
notificationScope.scopeData
field in your request.These are all possible field values:
- SELF
- Only the organization creating the webhook subscription receives notifications when a subscribed event occurs.
- DESCENDANTS(default)
- The organization creating the webhook subscription receives notifications when a subscribed event occurs in their organization and in any of their children/descendant accounts in their portfolio hierarchy. This is the default notification setting.
- CUSTOM
- The organization creating the webhook subscription receives notifications when a subscribed event occurs in their organization and in any organization listed in thenotificationScope.scopeDatarequest field.
Subscription Statuses
Subscription Statuses
When you create a subscription, its status is indicated in the
status
response field. If you did not include a health check URL in your request, the
subscription is set to INACTIVE
. If you included a health check URL and
Visa Acceptance Solutions
receives a response from the health check URL, the
subscription status is set to ACTIVE
. These are the three possible statuses a subscription can be set to:
- ACTIVE
- The subscription is ready to send notifications or is actively sending notifications.
- INACTIVE
- The subscription has not been activated. Add a health check URL to activate it. For more information, see Webhook Health Check URL and Automatic Revalidation.
- SUSPENDED
- The subscription was active, but the webhook URL or the health check URL became unreachable. When the URL becomes reachable, the status changes toACTIVEand notifications resume.
Examples of all Products and Event Types
This section shows examples of creating a subscription with every supported product and event
type. Use these examples as references for how to properly format the product IDs and event
types when you create a subscription.
Request Examples for Creating a Subscription for all
Products and Event Types
Alternative Payments Request
{
  "name": "My Custom Webhook",
  "description": "Sample Webhook from Developer Center",
  "organizationId": "<SET TO YOUR ORGANIZATION ID OR MERCHANT ID>",
  "products": [
    {
      "productId": "alternativePaymentMethods",
      "eventTypes": [
        "payments.payments.updated"
      ]
    }
  ],
  "webhookUrl": "https://MyWebhookServer.com:8443/simulateClient",
  "securityPolicy": {
    "securityType": "KEY"
  }
}
eCheck
Request{ "name": "My Custom Webhook", "description": "Sample Webhook from Developer Center", "organizationId": "<SET TO YOUR ORGANIZATION ID OR MERCHANT ID>", "products": [ { "productId": "eCheck", "eventTypes": [ "payments.credits.accepted", "payments.credits.failed", "payments.payments.accepted", "payments.payments.failed", "payments.voids.accepted", "payments.voids.failed" ] } ], "webhookUrl": "https://MyWebhookServer.com:8443/simulateClient", "securityPolicy": { "securityType": "KEY" } }
Fraud Management Essentials
Request{ "name": "My Custom Webhook", "description": "Sample Webhook from Developer Center", "organizationId": "<SET TO YOUR ORGANIZATION ID OR MERCHANT ID>", "products": [ { "productId": "fraudManagementEssentials", "eventTypes": [ "risk.casemanagement.decision.accept", "risk.casemanagement.addnote", "risk.profile.decision.reject", "risk.casemanagement.decision.reject", "risk.profile.decision.monitor", "risk.profile.decision.review" ] } ], "webhookUrl": "https://MyWebhookServer.com:8443/simulateClient", "securityPolicy": { "securityType": "KEY" } }
Invoicing Request
{
  "name": "My Custom Webhook",
  "description": "Sample Webhook from Developer Center",
  "organizationId": "<SET TO YOUR ORGANIZATION ID OR MERCHANT ID>",
  "products": [
    {
      "productId": "customerInvoicing",
      "eventTypes": [
        "invoicing.customer.invoice.send",
        "invoicing.customer.invoice.cancel",
        "invoicing.customer.invoice.paid",
        "invoicing.customer.invoice.partial-payment",
        "invoicing.customer.invoice.reminder",
        "invoicing.customer.invoice.overdue-reminder"
      ]
    }
  ],
  "webhookUrl": "https://MyWebhookServer.com:8443/simulateClient",
  "securityPolicy": {
    "securityType": "KEY"
  }
}
Payments Request
{
  "name": "My Custom Webhook",
  "description": "Sample Webhook from Developer Center",
  "organizationId": "<SET TO YOUR ORGANIZATION ID OR MERCHANT ID>",
  "products": [
    {
      "productId": "payments",
      "eventTypes": [
        "payments.capture.status.accepted",
        "payments.capture.status.updated"
      ]
    }
  ],
  "webhookUrl": "https://MyWebhookServer.com:8443/simulateClient",
  "securityPolicy": {
    "securityType": "KEY"
  }
}
Pay by Link
Merchant Request { "name": "My Custom Webhook", "description": "Sample Webhook from Developer Center", "organizationId": "<SET TO YOUR ORGANIZATION ID OR MERCHANT ID>", "products": [ { "productId": "payByLink", "eventTypes": [ "payByLink.merchant.payment" ] } ], "webhookUrl": "https://MyWebhookServer.com:8443/simulateClient", "securityPolicy": { "securityType": "KEY" } }
Pay by Link
Partner Reseller Request{ "name": "My Custom Webhook", "description": "Sample Webhook from Developer Center", "organizationId": "<SET TO YOUR ORGANIZATION ID OR MERCHANT ID>", "products": [ { "productId": "payByLink", "eventTypes": [ "payByLink.customer.payment" ] } ], "webhookUrl": "https://MyWebhookServer.com:8443/simulateClient", "securityPolicy": { "securityType": "KEY" } }
Recurring Billing Request
{
  "name": "My Custom Webhook",
  "description": "Sample Webhook from Developer Center",
  "organizationId": "<SET TO YOUR ORGANIZATION ID OR MERCHANT ID>",
  "products": [
    {
      "productId": "recurringBilling",
      "eventTypes": [
        "rbs.subscriptions.charge.failed",
        "rbs.subscriptions.charge.pre-notified",
        "rbs.subscriptions.charge.created"
      ]
    }
  ],
  "webhookUrl": "https://MyWebhookServer.com:8443/simulateClient",
  "securityPolicy": {
    "securityType": "KEY"
  }
}
Token Management Service
Request{ "name": "My Custom Webhook", "description": "Sample Webhook from Developer Center", "organizationId": "<SET TO YOUR ORGANIZATION ID OR MERCHANT ID>", "products": [ { "productId": "tokenManagement", "eventTypes": [ "tms.networktoken.updated", "tms.networktoken.provisioned," "tms.networktoken.binding" ] } ], "webhookUrl": "https://MyWebhookServer.com:8443/simulateClient", "securityPolicy": { "securityType": "KEY" } }
Optional Set-Up Tasks
This section describes optional set-up tasks that you can complete while or after creating a
webhook subscription. These tasks are optional and are not required to successfully
set-up webhook subscriptions.
- Include a health check URL to enableVisa Acceptance Solutionsto monitor your server's status for reliability.
- Validate the integrity of a webhook notification.
- Set up a retry policy for how to receive notifications when your server URL is initially unresponsive.
Webhook Health Check URL and Automatic Revalidation
When you create a webhook subscription,
Visa Acceptance Solutions
recommends that you include
a health check URL in the request. Including a health check URL enables Visa Acceptance Solutions
to monitor your server's status for reliability. When Visa Acceptance Solutions
detects that your health check URL is unresponsive, notification
deliveries are withheld until your health check URL becomes responsive again. A health
check URL ensures that you do not miss any notifications.To add a health check URL to your
create a subscription
request, include the healthCheckurl
field and set it to your health check URL.
You must also include the deactivateflag
field and
set it to true
to enable Visa Acceptance Solutions
to withhold
notifications for periods when your server becomes unresponsive.Automatic Activation
After you successfully create or update a subscription,
Visa Acceptance Solutions
pings your
health check URL within 5—10 minutes. If Visa Acceptance Solutions
receives a
response, the subscription status automatically becomes ACTIVE
and
notifications are delivered. When Visa Acceptance Solutions
does not receive a
response, your subscription status remains SUSPENDED
until Visa Acceptance Solutions
receives a response. If you did not include a health check
URL when you created the subscription, Visa Acceptance Solutions
pings your
webhook URL for automatic activation instead. You can also activate a subscription
that is not automatically activated by sending a PUT request. For more information,
see Activate a Webhook Subscription.Figure:
Webhook Automatic Activation

Automatic Revalidation
After the subscription's initial activation,
Visa Acceptance Solutions
continues to monitor
your server status. If Visa Acceptance Solutions
detects that your server is
unavailable, your subscription status automatically updates to
SUSPENDED
, and notifications are withheld. When Visa Acceptance Solutions
detects that your server is available again, your
subscription status automatically updates to ACTIVE
, and all
withheld notifications are delivered.Configure the Retry Policy
If your webhook URL or health check URL are unresponsive,
Visa Acceptance Solutions
resends
the webhook notifications according to the subscription's retry policy
. All
subscriptions are created with a default retry policy. You can configure the default
retry policy when you create a subscription or update the webhook subscription.To configure a subscription's retry policy, include these required fields in the
create a
subscription
request or an update a subscription
request: - retryPolicy.deactivateFlag
- Set to one of these possible values:
- false: Notifications arenotwithheld when your webhook URL or health check URL are unresponsive. This is the default value.
- true: Notifications are withheld when your webhook URL or health check URL are unresponsive, and the subscription status updates toSUSPENDED. When the URLs become responsive again, the withheld notifications are sent and the subscription status updates toACTIVE.
- retryPolicy.firstRetry
- The number of minutes before the notification is resent. The default value is1.
- retryPolicy.interval
- The number of minutes between each retry attempt. The default value is1.
- retryPolicy.numberOfRetries
- The number of retry attempts. The default value is3.
- retryPolicy.repeatSequenceCount
- The number of times to repeat the retry sequence. The default value is0.
- retryPolicy.repeatSequenceWaitTime
- The number of minutes between each repeat sequence. The default value is0.
Example: Retry Policy in a Subscription Request
This excerpt example shows how to format a retry policy in a request.
  "retryPolicy": {
    "firstRetry": "1",
    "interval": "1",
    "numberOfRetries": "3",
    "deactivateFlag": "false",
    "repeatSequenceCount": "0",
    "repeatSequenceWaitTime": "0"
  }
Validate a Webhook Notification
You can verify that the webhook notifications that you receive are from
Visa Acceptance Solutions
. Verifying your webhook notifications validates their integrity
and helps prevent replay attacks.When you receive a webhook notification from
Visa Acceptance Solutions
, it contains a
digital signature. You can configure your system to compare the notification's digital
signature to the digital signature you created. If both of the digital signatures match,
the notification is validated. You must complete these tasks to validate the webhook notifications that you receive:
- You create a digital signature key by sending acreate a digital signature keyrequest toVisa Acceptance Solutions. You may have already completed this requirement while setting up your first webhook subscription. For more information, see Create a Digital Signature Key.
- You extract the digital signature from the digital signature key that you created.
- You configure your system to compare your digital signature to the digital signatures in the notifications that you receive. A webhook notification is valid if the notification's digital signature matches your digital signature.
Digital Signature Format
When you receive a webhook notification from
Visa Acceptance Solutions
, it contains a
v-c-signature
header in this format:v-c-signature: t=1617830804768;keyId=bf44c857-b182-bb05-e053-34b8d30a7a72;sig=CzHY47nzJgCSD/BREtSIb+9l/vfkaaL4qf9n8MNJ4CY=";
The header contains these three parameters concatenated with semicolons:
- t: The timestamp at which the digital signature key was created.
- keyId: The digital signature key ID.
- sig: The digital signature. It is encrypted using the HMAC-SHA256 algorithm.
How to Create Your Digital Signature
Create your own digital signature using the above format. Use the key values you received from
creating a digital signature key in your digital signature. When you request the
creation of a digital signature key, the response contains a
digital signature
key
and a key ID
. The digital signature key is in the
keyInformation.keyinformation.key
field and the key ID is in
the keyInformation.keyinformation.keyId
field.Validating
a Notification
Follow these steps to validate the integrity of your webhook notifications.
- Separate the signature parameters with a semicolon (;) and extract thet,keyId, andsigvalues.
- Use thekeyIdvalue to fetch the digital signature key.
- Generate the payload by concatenating the timestamp with a period (.) and the payload from the body of the notification.
- Use the SHA256 algorithm to encrypt the generated payload from Step 3 using the key from Step 2.
- Verify that the encrypted value matches the value insigparameter.
Example: Validating a Notification
This is an example of a system script that validates webhook notifications by the
merchant's digital signature with the webhook notification's signature. Use this
example as a reference for how to potentially configure your system.
import javax.crypto.Mac;
import javax.crypto.spec.SecretKeySpec;
import java.nio.charset.StandardCharsets;
import java.util.Arrays;
import java.util.Base64;

public class Validator {
    public static void main(String[] args) {

        // Sample signature header
        String signatureHeader = "v-c-signature: t=1617830804768;keyId=bf44c857-b182-bb05-e053-34b8d30a7a72;sig=CzHY47nzJgCSD/BREtSIb+9l/vfkaaL4qf9n8MNJ4CY=";
        String payload = "this is a decrypted payload";
        // Convert the received signatureHeader into timestamp, keyId, and signature.
        DigitalSignature companySignature = new DigitalSignature(signatureHeader);
        // Check if the timestamp is within tolerance.
        if (companySignature.isValidTimestamp()) {
            // Client regenerates their signature using the timestamp from header and received payload.
            byte[] signature = regenerateSignature(companySignature.getTimestamp(), payload);
            // Check if the generated signature is same as signature received in header.
            if (isValidSignature(signature, companySignature.getSignature())) {
                System.out.println("Success - Signature is valid");
            } else {
                System.out.println("Error - Signatures do not match");
            }
        } else {
            System.out.println("Error - timestamp is outside of tolerance level");
        }
    }
    /**
     * Compute HMAC with the SHA256 hash function.
     * key is your private key.
     * message is timestamp.payload.
     * @return
     */
    public static byte[] regenerateSignature(long timestamp, String message) {
        String timestampedMessage = timestamp + "." + message;
        String key = getSecurityKey();
        // Generate the hash using key and message.
        return calcHmacSHA256(Base64.getDecoder().decode(key), timestampedMessage.getBytes(StandardCharsets.UTF_8));
    }
    /**
    * A mechanism to fetch the security key using keyId from a source. We're using Base64encoded version of
    (test_key).
    * @return
    */
    private static String getSecurityKey() {
        return "dGVzdF9rZXk="; //test_key
    }
    /**
     * Generate SHA256 using secretKey and a message.
     * Sample Hmacgenerator to test: https://8gwifi.org/hmacgen.jsp
     * @param secretKey
     * @param message
     * @return
     */
    private static byte[] calcHmacSHA256(byte[] secretKey, byte[] message) {
        byte[] hmacSha256 = null;
        try {
            Mac mac = Mac.getInstance("HmacSHA256");
            SecretKeySpec secretKeySpec = new SecretKeySpec(secretKey, "HmacSHA256");
            mac.init(secretKeySpec);
            hmacSha256 = mac.doFinal(message);
        } catch (Exception e) {
            throw new RuntimeException("Failed to calculate hmac-sha256", e);
        }
        return hmacSha256;
    }
    /**
     * Compare the Base64 decoding of the signature with the signature received in the header.
     * Sample encoder/decoder to test:
     * https://www.base64encode.org/
     * https://www.base64decode.org/
     * @param bankSignature
     * @param companySignature
     * @return
     */
    private static boolean isValidSignature(byte[] bankSignature, String companySignature) {
        return Arrays.equals(bankSignature, Base64.getDecoder().decode(companySignature));
    }
}

import java.time.Clock;

public class DigitalSignature {
    private long timestamp;
    private String keyId;
    private String signature;

    public DigitalSignature(String digitalSignature) {
        try {
            //split the header by space. first part is the key "v-c-signature" second part is the actual signature
              String signature = digitalSignature.split(" ")[1];

            //separate the actual signature by semicolon. this creates 3 parts (timestamp, keyId, sig)
            String[] signatureParts = signature.split(";");

            //timestamp section is the first block. split timestamp section by = sign and actual timestamp is in the second block
            this.timestamp = Long.parseLong(signatureParts[0].split("=")[1]);

            //keyId section is the second block. split keyId section by = sign and actual keyId is in the second block
            this.keyId = signatureParts[1].split("=")[1];

            //digital signature is the third block. split digital signature by = sign and actual signature is in the second block. This is Base64 encoded
            this.signature = signatureParts[2].split("=")[1];

            if unable to format exactly like the above then would recommend the following edit:
            /* split the header by space. first part is the key "v-c-signature" second part is the actual signature */
              String signature = digitalSignature.split(" ")[1];

            /* separate the actual signature by semicolon. this creates 3 parts (timestamp, keyId, sig) */
            String[] signatureParts = signature.split(";");

            /* timestamp section is the first block. split timestamp section by = sign and actual timestamp is in the second block */
            this.timestamp = Long.parseLong(signatureParts[0].split("=")[1]);

            /* keyId section is the second block. split keyId section by = sign and actual keyId is in the second block */
            this.keyId = signatureParts[1].split("=")[1];

            /* digital signature is the third block. split digital signature by = sign and actual signature is in the second block. This is Base64 encoded */
            this.signature = signatureParts[2].split("=")[1];
        } catch (Exception e) {
            System.out.println("Invalid digital signature format");
        }
    }
    public long getTimestamp() {
        return timestamp;
    }
    public void setTimestamp(long timestamp) {
        this.timestamp = timestamp;
    }
    public String getKeyId() {
        return keyId;
    }
    public void setKeyId(String keyId) {
        this.keyId = keyId;
    }
    public String getSignature() {
        return signature;
    }
    public void setSignature(String signature) {
        this.signature = signature;
    }
    /**
     * Using a tolerance of 60 mins
     * Compute the current time in UTC and make sure the timestamp was generated within the tolerance period.
     * UTC millis generator to test: https://currentmillis.com/
     *
     * @return
     */
    public boolean isValidTimestamp() {
        long tolerance = 60 * 60 * 1000L; //60 mins
        // return Clock.systemUTC().millis() - timestamp  < tolerance; // Enable this if you want timestamp
        validation.
        return true;
    }
}
Webhook Notification Header and Message Body Descriptions
Each webhook notification for an event update contains headers and a message body with fields.
This section describes the possible fields and values you can receive in a notification.
Notification Headers
These headers are sent in every notification. Some headers contain duplicate information from
the fields in the message body.
- V-C-signature
- The digital signature, which you can use to validate the security of the notification.
- V-C-event-type
- The type of event that generated the notification.
- V-C-organization-id
- The identifier of the organization that is subscribed to the notification.
- V-C-product-name
- The name of the product for which the event occurred.
- V-C-request-type
- The indicator of whether the notification is new or a retry attempt.
- V-C-retry-count
- The number of times the notification was resent.
- V-C-transaction-trace-id
- The identifier of the notification attempt. Every retry attempt has a unique transaction trace ID. The notification ID remains the same.
- v-c-webhook-id
- The identifier of the webhook subscription that generated the notification.
Notification Message Body
The message body contains fields associated with the notification and the payload of the event
that generated the notification.
- webhookId
- The identifier of the webhook subscription that generated the notification.
- transactionTraceId
- The identifier of the notification attempt. Every retry attempt has a unique transaction trace ID. The notification ID remains the same.
- productId
- The identifier of the product that generated the event.
- organizationId
- The identifier of the organization that is subscribed to the notification.
- eventType
- The type of event that generated the notification.
- eventDate
- The timestamp of when the event occurred.
- payload
- The data generated by the event.
- requestType
- The indicator of whether the notification is new or a retry attempt.
Example: Webhook Notification
This is an example of a received webhook notification. Use this example to know what
your system can expect when you receive a notification.
Invoicing Webhook Notification
POST /test HTTP/1.1
Host: invoicetest.example.com
Content-Length: 1647
Content-Type: application/json
User-Agent: Vert.x-WebClient/3.9.8
V-C-Event-Type: invoicing.customer.invoice.send
V-C-Organization-Id: invoicetest
V-C-Product-Name: customerInvoicing
V-C-Request-Type: NEW
V-C-Retry-Count: 0
V-C-Signature: t=168506218354;keyId=facdaf45-db00-233c-e053-5a588d0a743a;sig=kJgSHwHrRgUmXJdaSSqtPVzOTMlV3SW90WAFIfPj4XA=
V-C-Transaction-Trace-Id: 8c01a8e9b3334d19528d9b69a21fe797ebaf8dd3dee52f422dd699af26bd866-0
V-C-Webhook-Id: fc8a9385-723e8e28-e053-a2588e0a536d

{
   "notificationId":"fc8f1cae-1232-5dd-e053-a0588e0a5eeb",
   "retryNumber":0,
   "eventType":"invoicing.customer.invoice.send",
   "eventDate":"2023-05-25T17:49:40.309-07:00",
   "webhookId":"fc8a9385-723e-8e28-e053-a2588e0a536d",
   "payloads":[
      {
         "data":{
            "merchantZip":"12345",
            "thankYou":"Thank you for your business!",
            "subject":"You've received an invoice 202203789 from Company, Inc.",
            "dueDate":"2023-05-25",
            "link":"Click the link below to view and pay the invoice.",
            "body":"You have a new invoice from Company, Inc. for 102.00 ALL due on 2023-05-25.",
            "merchantState":"OH",
            "merchantName":"Company, Inc.",
            "button":"VIEW AND PAY INVOICE",
            "invoiceBalance":"102.00",
            "merchantAddress2":" ",
            "invoiceNumber":"20220389",
            "payerName":"Firstname Lastname",
            "customMessage":"Thank you for your business. By clicking the view and pay invoice you agree to the terms and conditions here: https://paymenttermsandconditions.example.com",
            "currency":"ALL",
            "merchantCity":"Placeville",
            "emailTo":"[email protected]",
            "eventType":"invoicing.customer.invoice.send",
            "balanceAmount":"102.00",
            "organizationID":"invoicetest",
            "merchantPhone":"321-321-3211",
            "emailLanguage":"en-us",
	     "invoiceUrl":"https://businesscentertest.visaacceptance.com/ebc2/invoicing/payInvoice/u2wJqUKII4FsqtIrZx51lUuvYr5Msz23nqIx12xqJhs7wqT6Th2mJcDOYHSC5hE?version=v2.1",
            "merchantAddress":"39 E. Road St",
            "correlationID":"dceb3ce-d787-453c-84a3-ce33b141cc76",
            "hello":"Hello Person,"
         },
         "preferences":{
            "contacts":[
               {
                  "firstName":"Invoicing",
                  "lastName":"Email",
                  "contact":"[email protected]",
                  "type":"EMAIL"
               }
            ]
         },
         "organizationId":"invoicetest",
         "metadata":{
            "from.displayName":"Company, Inc.",
            "reply.email":"[email protected]",
            "sentBy":"Invoice"
         }
      }
   ]
}
Create a Sample Webhook Subscription
Follow these steps to create a sample webhook subscription and then trigger a test
webhook notification. This sample subscription uses the
Token Management Service
(TMS
).IMPORTANT
You must first confirm that
your organization ID is enabled for
TMS
and that a TMS
vault is set up. For assistance, contact Visa Acceptance Solutions
Customer Support.- Create aTMSwebhook subscription for your organization ID using this endpoint:POSThttps://apitest.visaacceptance.com/notification-subscriptions/v2/webhooksSet theproductIdfield totokenManagementand theeventTypesfield totms.networktoken.provisioned. This example creates a webhook subscription using Mutual trust, which is the default security policy.{ "name": "TMS Webhook", "description": "Sample TMS Webhook from Developer Center", "organizationId": "organizationId", "productId": "tokenManagement", "eventTypes": [ "tms.networktoken.provisioned" ], "webhookUrl": "https://MyWebhookServer.com:8443/simulateClient", "healthCheckUrl": "https://MyWebhookServer.com:8443/simulateClientHealthCheck", "notificationScope": "SELF", "retryPolicy": { "algorithm": "ARITHMETIC", "firstRetry": 1, "interval": 1, "numberOfRetries": 3, "deactivateFlag": "false", "repeatSequenceCount": 0, "repeatSequenceWaitTime": 0 }, "securityPolicy": { "securityType": "KEY", "proxyType": "external" } }
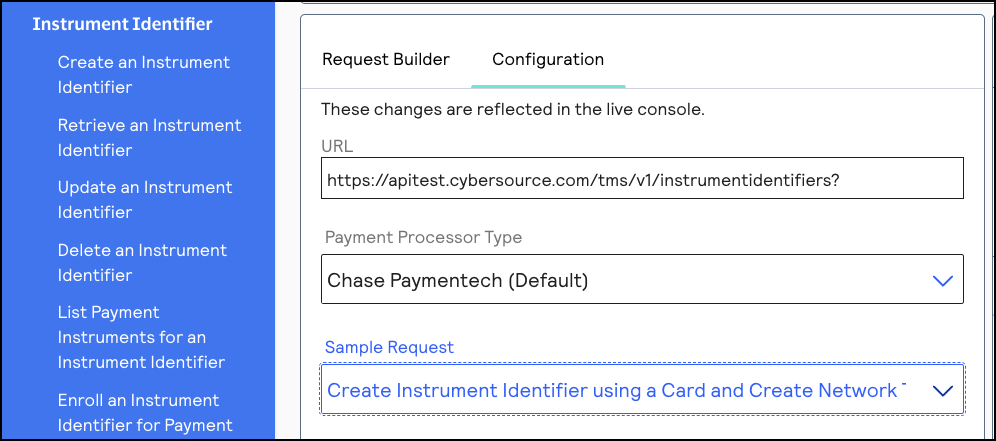
- Go to the Create an Instrument Identifier section in the API Field Reference.
- Click theConfigurationtab.
- In the Sample Request drop-down menu, chooseCreate Instrument Identifier using a Card and Create Network Token:
- Set thecard.numberfield to a test PAN. If you need a test PAN, contactVisa Acceptance Solutionscustomer support. Send the request to this endpoint:POSThttps://apitest.visaacceptance.com/tms/v1/instrumentidentifiers{ "type": "enrollable card", "card": { "number": "411111111111XXXX", // Replace the ‘X’s with 1 "expirationMonth": "12", "expirationYear": "2031" } }IMPORTANTA test PAN can only have one associated instrument identifier. If you need to test multiple webhook notifications, delete the instrument identifier created for that PAN before using theDelete an Instrument Identifier API.
- ClickSend. After you receive a successful response, your system should receive a webhook event notification.For an example of a complete webhook notification, including the header and payload information, see Example: Webhook Notification.
Manage Webhook Subscriptions Requests
This section describes how to manage your webhook subscriptions using the REST API. These
follow-on requests require the webhook subscription ID.
After you set up a webhook subscription, you can manage your subscription using these
requests:
- Retrieve the details of a subscription
- Retrieve a list of subscriptions by product and event
- Update a subscription
- Delete a subscription
- Verify a subscription's configuration
- Activate a subscription
- Deactivate a subscription
Retrieve the Details of a Webhook Subscription
This section describes how to retrieve the details of a webhook subscription, such as the
subscription status, which organizations are receiving the notifications, and other
useful details.
This request requires the webhook subscription ID. The subscription ID is in the
webhookId
response field from the create a webhook
subscription
request.Endpoints
Send a GET request to this endpoint. The is the webhook
subscription ID.
{webhookId}
- Test:GETapitest.visaacceptance.com/notification-subscriptions/v2/webhooks/{webhookId}
- Production:GETapi.visaacceptance.com/notification-subscriptions/v2/webhooks/{webhookId}
Example: Retrieving the Details of a Webhook Subscription
GEThttps://apitest.visaacceptance.com/notification-subscriptions/v1/webhooks/ddb9bced-c3e3-1b1d-e053-9c588e0a3c42
{
  "organizationId": "organizationId",
  "productId": "terminalManagement",
  "eventTypes": [
    "terminalManagement.assignment.update"
  ],
  "webhookId": "ddb9bced-c3e3-1b1d-e053-9c588e0a3c42",
  "webhookUrl": "https://MyWebhookServer.com:443/simulateClient",
  "healthCheckUrl": "https://MyWebhookServer.com:443/simulateClientHealthCheck",
  "createdOn": "2022-04-28 15:39:56.931",
  "status": "SUSPENDED",
  "retryPolicy": {
    "algorithm": "ARITHMETIC",
    "firstRetry": 1,
    "interval": 1,
    "numberOfRetries": 3,
    "deactivateFlag": false,
    "repeatSequenceCount": 0,
    "repeatSequenceWaitTime": 0
  },
  "securityPolicy": {
    "securityType": "KEY",
    "digitalSignatureEnabled": "yes"
  },
  "version": "3",
  "deliveryType": "nrtdCentral",
  "notificationScope": "DESCENDANTS"
}
Response Codes
A successful request is indicated by the 200-level response code.
For more information about all of the possible
response codes you can receive, see
.Transaction Response
Codes
Retrieve all of an Organization's Subscriptions
This section describes how to retrieve a list of the webhook subscriptions that an organization
is subscribed to. This request requires you to include the organization ID in the
endpoint as a query parameter. You have the option to include a product ID and event
type as additional query parameters. If you include any of the optional query
parameters, you must concatenate them by separating each parameter with the ampersand
character (
&
).Endpoints
Send a GET request to one of these endpoints. The is
the organization ID or merchant
ID.
{organization.id}
- Test:GEThttps://apitest.visaacceptance.com/notification-subscriptions/v2/webhooks?organizationId={organization.id}
- Production:GEThttps://api.visaacceptance.com/notification-subscriptions/v2/webhooks?organizationId={organization.id}
Required Query Parameters for Retrieving all of an Organization's Subscriptions
- eventType
- Set to an event type. For a list of event types, see Supported Products and Event Types.
- organizationId
- Set to your organization ID or merchant ID.
- productId
- Set to a product ID. For a list of product IDs, see Supported Products and Event Types.
Optional Query Parameters for Retrieving all of an Organization's Subscriptions
- eventType
- Set to an event type that corresponds to the chosen product ID. For a list of event types, see Supported Products and Event Types.
- productId
- Set to a product ID. For a list of product IDs, see Supported Products and Event Types.
Example: Retrieving all of an Organization's
Subscriptions
GEThttps://apitest.visaacceptance.com/notification-subscriptions/v2/webhooks?organizationId=organization123&productId=tokenManagement&eventType=tms.networktoken.provisioned
Response Codes
A successful request is indicated by the 200-level response code.
For more information about all of the possible
response codes you can receive, see
.Transaction Response
Codes
Update a Webhook Subscription
This section describes how to update a webhook subscription, such as updating the notification
scope, health check URL, or retry policy. Include only the fields that you want to
update in your request.
This request requires the webhook subscription ID. The subscription ID is in the
webhookId
response field from the create a webhook
subscription
request.Endpoints
Send a PATCH request to one of these endpoints. The is the
webhook subscription ID.
{webhookId}
- Test:PATCHapitest.visaacceptance.com/notification-subscriptions/v2/webhooks/{webhookId}
- Production:PATCHapi.visaacceptance.com/notification-subscriptions/v2/webhooks/{webhookId}
Optional Fields for Updating a Webhook
Subscription
- deactivateflag
- Required if thehealthCheckUrlfield is present.
- Set totrueto automatically activate the subscription.
- description
- healthCheckUrl
- Set to the health check URL. Required to auto-activate the subscription. If you do not include this field, the created subscription is inactive. An inactive subscription does not send notifications. For more information, see Webhook Health Check URL and Automatic Revalidation.
- name
- organizationId
- Set to your organization ID or merchant ID.
- products.eventTypes
- For a list of event types, see Supported Products and Event Types.
- products.productId
- For a list of product IDs, see Supported Products and Event Types.
- retryPolicy.deactivateFlag
- For more information, see Configure the Retry Policy.
- retryPolicy.firstRetry
- For more information, see Configure the Retry Policy.
- retryPolicy.interval
- For more information, see Configure the Retry Policy.
- retryPolicy.numberOfRetries
- For more information, see Configure the Retry Policy.
- retryPolicy.repeatSequenceCount
- For more information, see Configure the Retry Policy.
- retryPolicy.repeatSequenceWaitTime
- For more information, see Configure the Retry Policy.
- securityPolicy.config.additionalConfig.aud
- securityPolicy.config.additionalConfig.client_id
- securityPolicy.config.additionalConfig.keyId
- securityPolicy.config.additionalConfig.scope
- securityPolicy.config.oAuthUrl
- webhookUrl
Example: Updating a Webhook Subscription
{
  "name": "My Sample Webhook",
  "description": "Sample decision manager webhook reject event.",
  "products": [
    {
      "productId": "decisionManager",
      "eventTypes": [
        "risk.profile.decision.reject"
      ]
    }
  ],
  "webhookUrl": "https://MyWebhookServer.com:8443:/simulateClient",
  "healthCheckUrl": "https://MyWebhookServer.com:8443:/simulateClientHealthCheck",
  "notificationScope": {
    "scope": "CUSTOM"
  }
}
Response Codes
A successful request is indicated by the 200-level response code.
For more information about all of the possible
response codes you can receive, see
.Transaction Response
Codes
Delete a Webhook Subscription
This section describes how to delete a webhook subscription. Deleting a webhook subscription
does not delete the history of webhook notifications.
This request requires the webhook subscription ID. The subscription ID is in the
webhookId
response field from the create a webhook
subscription
request.Endpoints
Send a DELETE request to one of these endpoints. The
is the webhook subscription ID.
{webhookId}
- Test:DELETEapitest.visaacceptance.com/notification-subscriptions/v2/webhooks/{webhookId}
- Production:DELETEapi.visaacceptance.com/notification-subscriptions/v2/webhooks/{webhookId}
Example: Deleting a Webhook Subscription
DELETEhttps://apitest.visaacceptance.com/notification-subscriptions/v2/webhooks/b555a545-58a9-47c7-aef9-10a8e17f201a
{
    "status": "successfully deleted"
}
Response Codes
A successful request is indicated by the 200-level response code.
For more information about all of the possible
response codes you can receive, see
.Transaction Response
Codes
Verify a Webhook Subscription's Configuration
This section describes how to test if a webhook subscription is configured correctly. Use
this request to verify that the details you are expecting in the webhook notification
are included, such as the notification message and the product and event types.
A successful response includes the expected notification message and the product and
event type. Only the first event type in your subscription is listed in the
eventType
response field.This request requires the webhook subscription ID. The subscription ID is in the
webhookId
response field from the create a webhook
subscription
request.IMPORTANT
This endpoint uses the
/v1/
path
segment.Endpoints
Send a POST request to one of these endpoints. The
is the webhook subscription ID.
{webhookId}
- Test:POSTapitest.visaacceptance.com/notification-subscriptions/v1/webhooks/{webhookId}
- Production:POSTapi.visaacceptance.com/notification-subscriptions/v1/webhooks/{webhookId}
Example: Verifying a Webhook Subscription's
Configuration
Request
Response to a Successful Request
{
   "eventDate": "2024-05-08T16:15:23",
    "eventType": "tms.networktoken.updated",
    "organizationId": "npr_gpn",
    "payloads": {
        "testPayload": {
            "message": "Yay! Your webhook integration worked! This is only a test and an example of what a webhook message payload looks like. Thank you for using our test feature."
        }
    },
    "productId": "tokenManagement",
    "requestType": "NEW",
    "retryNumber": "0",
    "transactionTraceId": "ddd8883c-f14d-48af-bd35-ff9b4a51ca35",
    "webhookId": "17915c64-73d9-5475-e063-7cb8d30a8089"
}
Response Codes
A successful request is indicated by the 200-level response code.
For more information about all of the possible
response codes you can receive, see
.Transaction Response
Codes
Activate a Webhook Subscription
This section describes how to activate a webhook subscription.
This request requires the webhook subscription ID. The subscription ID is in the
webhookId
response field from the create a webhook
subscription
request.Endpoints
Send a PUT request to one of these endpoints. The
is the webhook subscription ID.
{webhookId}
- Test:PUTapitest.visaacceptance.com/notification-subscriptions/v2/webhooks/{webhookId}/status
- Production:PUTapi.visaacceptance.com/notification-subscriptions/v2/webhooks/{webhookId}/status
Example: Activate a Webhook Subscription
Request
Response to a Successful Request
{
  "status": "ACTIVE"
}
Response Codes
A successful request is indicated by the 200-level response code.
For more information about all of the possible
response codes you can receive, see
.Transaction Response
Codes
Deactivate a Webhook Subscription
This section describes how to deactivate a webhook subscription.
This request requires the webhook subscription ID. The subscription ID is in the
webhookId
response field from the create a webhook
subscription
request.Endpoints
Send a PUT request to one of these endpoints. The
is the webhook subscription ID.
{webhookId}
- Test:PUTapitest.visaacceptance.com/notification-subscriptions/v2/webhooks/{webhookId}/status
- Production:PUTapi.visaacceptance.com/notification-subscriptions/v2/webhooks/{webhookId}/status
Example: Deactivate a Webhook Subscription
Request
Response to a Successful Request
{
  "status": "INACTIVE"
}
Response Codes
A successful request is indicated by the 200-level response code.
For more information about all of the possible
response codes you can receive, see
.Transaction Response
Codes
Troubleshooting Webhook Subscriptions
If you created a webhook subscription but are not receiving notifications:
- Verify that the digital signature key you created includes the correct organization ID. You can verify the organization ID by locating it in the response for creating the digital signature key. If the key is configured with the wrong organization ID, send a request for a new digital signature key using the correct organization ID.
- Verify that your server and the endpoint URL for the webhook are working and are configured correctly.
- Verify that the notification scope of the subscription is configured to send notifications to the correct organization. You can retrieve the webhook details to verify that the organization is listed in theorganizationIdresponse field. For more information, see Retrieve the Details of a Webhook Subscription. If the organization is not in the notification scope, you must update the webhook subscription. For more information, see Update a Webhook Subscription.
- Verify that the subscription status isACTIVE. You can do this by retrieving the webhook details. For more information, see Retrieve the Details of a Webhook Subscription. If the webhook is not set to theACTIVEstatus:
- Verify that your subscription is configured with a health check URL. If it is not, update the subscription with a correct URL. You must also verify that the URL is working and is configured to accept GET and POST requests. For more information, see Webhook Health Check URL and Automatic Revalidation.
- Verify that the webhook URL and health check URL contain hypertext transfer protocol secure (HTTPS). For example:"webhookUrl": "https://MyWebhookServer.com:443/simulateClient" "healthCheckUrl": "https://MyWebhookServer.com:443/simulateClientHealthCheck"
Meta Key Creation and Management
A meta key is a specialized API key that a portfolio or merchant account user can create for
the purposes of processing transactions on behalf of multiple of their transacting MID
accounts. Meta keys are useful for organizations whose transacting MID users do not
manage or store their own individual API keys. Instead of having to create and assign a
unique API key for each of your transacting MIDs, you can create and assign a single
meta key to dozens or hundreds of your transacting MIDs simultaneously.
IMPORTANT
Transacting MIDs cannot generate meta keys. For security reasons, do not
give a meta key to your transacting MID users.
Meta keys are available for these APIs:
- REST
- Simple Order API
- SOAP
- SCMP
When you are logged in to a portfolio account or merchant account in the
Business Center
, you can assign a meta key to a static subset of transacting MIDs or to all current
and future transacting MIDs. If you choose to assign a meta key to only a subset of
transacting MIDs, you can reassign the key later to all current and future transacting
MIDs. When using a meta key, the portfolio account or merchant account user submits a transaction on
behalf of the transacting MID. These processed transactions are recognized as belonging
to the transacting MID. Searching for or reporting on the transactions are performed at
the transacting MID level. All three account types can process follow-on transactions to
the initial transaction, such as a capture or refund.
Access to creating and managing meta keys is automatically enabled for all organizations. You
can disable the meta key feature to not allow portfolio or merchant account users to
generate meta keys or process transactions using meta keys.
WARNING
When a meta key expires, it expires for all transacting MIDs to which
it is assigned. All transactions using that meta key will fail. Careful monitoring is
necessary to track meta key expiration dates. You must create and assign a new key
before the previous key expires. The length of time after which a key expires depends on
the API for which the key was created. Read the instructions for the API key you will
use.
Hierarchy of Meta Keys
In this diagram, if the portfolio user assigns a meta key to all of the transacting MIDs,
every transacting MID in the diagram is assigned the key. If one of the merchant
accounts assigns a meta key to all of the transacting MIDs, only the transacting
MIDs belonging to that merchant account are assigned the key. The portfolio or
merchant account user can also choose specific transacting MIDs to assign the meta
key to.
Figure:
Portfolio Hierarchy Example
