On This Page
Getting Started with REST Developer Guide
This section describes how to use this developer guide and where to find further
information.
- Audience and Purpose
- This guide provides information about how to sign up for a sandbox account and set up theVisa Acceptance SolutionsREST API.
- Customer Support
- For support information about any service, visit the Support Center:
Recent Revisions to This Document
26.02.01
Added new section that explains how to migrate from HTTP signature messaging to JWT messaging
using a shared secret key pair. See Set Up a JSON Web Token Message Using Shared Secret Keys.
Added a warning note with the deprecation deadline for HTTP signature messaging. See
Set Up an HTTP Signature Message [DEPRECATING].
26.01.01
This revision contains only editorial changes and no technical updates.
25.12.01
Added information about how to test a REST–API Response MLE key. For more
information, see the Test Your REST—API Response MLE Key section in Test Your Setup.
25.11.01
Restructured these sections:
Added these sections for testing your security set up:
- JWT Messaging: Test Your Setup
- HTTP Signature Messaging: Test Your Setup
25.10.02
This revision contains only editorial changes and no technical updates.
25.10.01
This revision contains only editorial changes and no technical updates.
25.09.01
Added new set up information for enabling Message-Level Encryption (MLE) using JSON
Web Tokens (JWTs). See the Overview of MLE Set Up and Java: Enbaling MLE Using JWTs
sections in Enable Message-Level Encryption.
25.08.03
This revision contains only editorial changes and no technical updates.
25.08.02
This revision contains only editorial changes and no technical updates.
25.08.01
Added information about username and password requirements for creating a Sandbox
account. See these topics:
- JWT Messaging: Sign Up for a Sandbox Account
- HTTP Signature Messaging: Sign Up for a Sandbox Account
25.06.01
This revision contains only editorial changes and no technical updates.
25.04.01
Updated the Header field from
Date
to v-c-date
for
HTTP Signature Method. See Elements of an HTTP Message section and Update Header
Fields section in Construct Messages Using HTTP Signature Security.25.03.01
This revision contains only editorial changes and no technical updates.
25.02.01
Updated the link in Step 6 and added steps about using the JSON Web Token. SeeConstruct Messages Using JSON Web Tokens, and added the Create the Authorization
Header section.
Updated the description of the signature keyid. See the Update Header Fields section
in Construct Messages Using HTTP Signature Security.
Introduction to REST
To get started using
Visa Acceptance Solutions
APIs, you must first set up your
system to be REST compliant. Visa Acceptance Solutions
uses REST for developing web
services. REST enables communication between a client and server using HTTP protocols. This guide explains how to set up secure communications between your client and server
using one of these methods:
- JSON Web Token Messaging
- JSON Web Tokens (JWTs) are digitally signed JSON objects based on the open standard RFC 7519. These tokens provide a compact, self-contained method for securely transmitting information between parties. These tokens are signed with an RSA-encoded public and private key pair. The signature is calculated using the header and body, which enables the receiver to validate that the content has not been tampered with. Token-based messages are best for applications that use browser and mobile clients.
- HTTP Signature Messaging
- Each request is digitally signed, or the entire request is digitally hashed using a private key. Both the client and server have the same shared secret, which enables each request to be validated on either end. If the request transmission is compromised, the attacker cannot change the request or act as a user without the secret. HTTP signatures can be used only with API requests. They cannot be used in browser or mobile applications.WARNINGBySeptember 2026, all merchants using HTTP signature messaging must migrate to JSON Web Token (JWT) messaging in order to support message-level encryption (MLE). You risk transaction failures if you do not implement this update. If you are setting up your system to be REST-compliant for the first time,Visa Acceptance Solutionsrecommends using JWT messaging.
Secure Communication Requirements
REST-compliant machines communicate with each other using
stateless messaging
.
Stateless messaging is a loosely coupled connection between a client and server,
where each message is self-contained. This connection enables the client and server
to communicate without first establishing a communication channel and without
managing the state between systems.To ensure secure communications between the client and server, you must provide these
security measures:
- Sender Authentication:A receiver needs to know that a message comes from a trusted entity.
- Message Encryption:By encrypting the message before transmission and decrypting the message when received, you prevent man-in-the-middle attacks.
IMPORTANT
When building your connection to the
Visa Acceptance Solutions
payment
gateway, ensure that you have implemented controls to prevent card testing or
card enumeration attacks on your platform. When we detect
suspicious transaction activity associated with your merchant ID, including a
card testing or card enumeration attack, Visa Acceptance Solutions
reserves
the right to enable fraud management tools on your behalf in order to mitigate
the attack. The fraud team might also implement internal controls to mitigate
attack activity. These controls block traffic that is perceived as
fraudulent. Additionally, if you are using one of our fraud tools and experience
a significant attack, our internal team might modify or add rules to your
configuration to help prevent the attack and minimize the threat to our
infrastructure. However, any actions taken by Visa Acceptance Solutions
would
not replace the need for you to follow industry standard best practices to
protect your systems, servers, and platforms.Key Features of REST
These are the key features of REST:
- Client/Server model:Clients and servers are independent from each other, enabling portability and scalability.
- Stateless Communication:Each request is independent.
- Uniform Interface:Architecture is simplified through uniform standards.
Components of REST
A REST message consists of these four components:
- Endpoint:The endpoint is a Uniform Resource Identifier (URI) that shows where and how to find the resource on the internet. For example, to test an authorization request, you can send the request to this endpoint:.https://apitest.visaacceptance.com/pts/v2/payments
- HTTP Method:The method is the action performed by the resource. There are four basic HTTP methods:
- POST: Create a resource.
- GET: Retrieve a resource.
- PATCH: Modify a resource.
- DELETE: Delete a resource.
- Headers:The header is a collection of fields and their associated values. It provides information about the message to the receiver. Think of it as metadata about the message. The header also contains authentication information that indicates that the message is legitimate.
- Body:The request in JSON format.
Overview of How to Set Up Your Visa Acceptance Solutions
Account
Visa Acceptance Solutions
AccountThis overview lists the tasks you must complete in order to set up your
Visa Acceptance Solutions
account for sending and receiving REST API messages using either JSON Web Token
messaging or HTTP signature messaging.WARNING
By
September 2026
, all merchants using HTTP signature
messaging must migrate to JSON Web Token (JWT) messaging in order to support
message-level encryption (MLE). You risk transaction failures if you do not
implement this update. If you are setting up your system to be REST-compliant for
the first time, Visa Acceptance Solutions
recommends using JWT messaging.Figure:
Set Up Your
Visa Acceptance Solutions
Account
To set up JSON web token messaging using P12 certificates, see Set Up a JSON Web Token Message Using P12 Certificates.
To set up JSON web token messaging using shared secret key pairs, see Set Up a JSON Web Token Message Using Shared Secret Keys.
To set up an HTTP signature messaging, see Set Up an HTTP Signature Message [DEPRECATING].
Set Up a JSON Web Token Message Using P12
Certificates
To set up JSON Web Token messaging using a
P12 certificate
, you must complete the
tasks described in this section.Figure:
Setting Up JSON Web Token a Messaging

- Sign up for a test account. See Sign Up for a Sandbox Account.
- Create a P12 certificate. See Create or Submit a P12 Certificate.
- Construct a message using a JSON Web Token. See Construct Messages Using JSON Web Tokens.
- (Optional) Enable the optional message-level encryption (MLE) feature. See Enable Message-Level Encryption.
- Go live by transitioning your sandbox account into a production account. See Going Live.
Sign Up for a Sandbox Account
To begin setting up your account, you must first sign up for a sandbox account. A sandbox
account enables you to obtain your security keys and test your implementation.
IMPORTANT
A sandbox account cannot process live payments and is intended
only for testing.
Follow these steps to sign up
for a sandbox account:
- Go to theVisa Acceptance SolutionsDeveloper Center sandbox account sign-up page:
- Enter your information into the sandbox account form, and clickCreate Account.
- Go to your email and find a message titled:Merchant Registration Details. ClickSet up your username and password now.Your browser opens the New User Sign Up wizard.
- Enter the organization ID and contact email you supplied when you created your account. Follow the wizard pages to add your name, a username, and a password. Your username and password must meet these requirements:Username and Password RequirementsUsername RequirementsPassword Requirements
- Length must be 3-36 characters.
- Can only contain letters, numbers, periods, dashes, or underscores.
- Length must be 12–50 characters.
- Must contain one upper case letter.
- Must contain one lower case letter.
- Must contain one number.
- Cannot contain the username or organization ID.
- Log in to theBusiness Center.When you log in for the first time, you must verify your identity through a system-generated email sent to your email account.
- Check your email for a message titled:. A passcode is included in the message.Visa Acceptance SolutionsIdentification Code
- Enter the passcode on theVerify your Identitypage.You are directed to theBusiness Centerhome page.You have successfully signed up for a sandbox account.IMPORTANTA sandbox account cannot process live payments. After you verify that your system can send and receive REST messages, you can contact customer service to transition your sandbox account to a production account.
Create or Submit a P12 Certificate
This section describes how to create or submit a P12 certificate and how to extract its private
key. A private key is necessary for you to construct JSON Web Tokens.
Create
a
P12 certificate if you need a new certificate. Submit
a P12 certificate if you
want to use your own certificate.Creating a P12 Certificate
Follow these steps to create a P12 certificate file if you are using JSON Web Tokens
to secure communication:
- Log in to theBusiness Center:
- On the left navigation panel, choose
 Payment Configuration > Key Management.
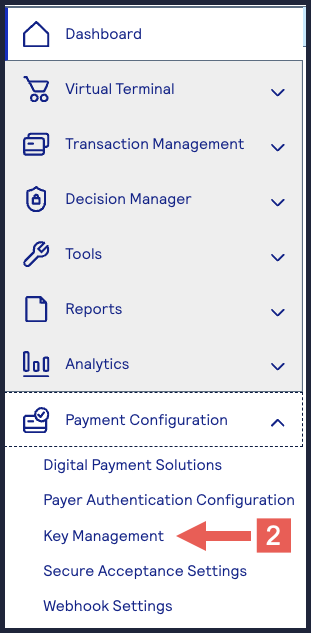
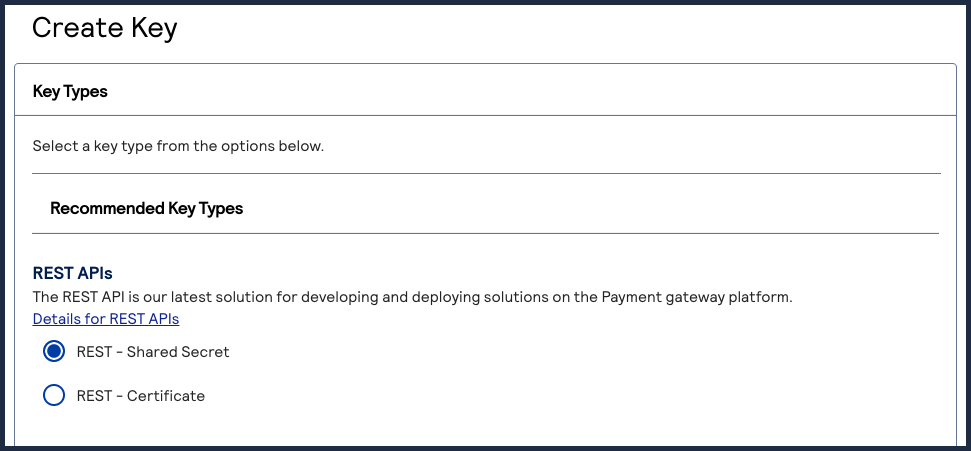
- Click+ Generate keyon the Key Management page.
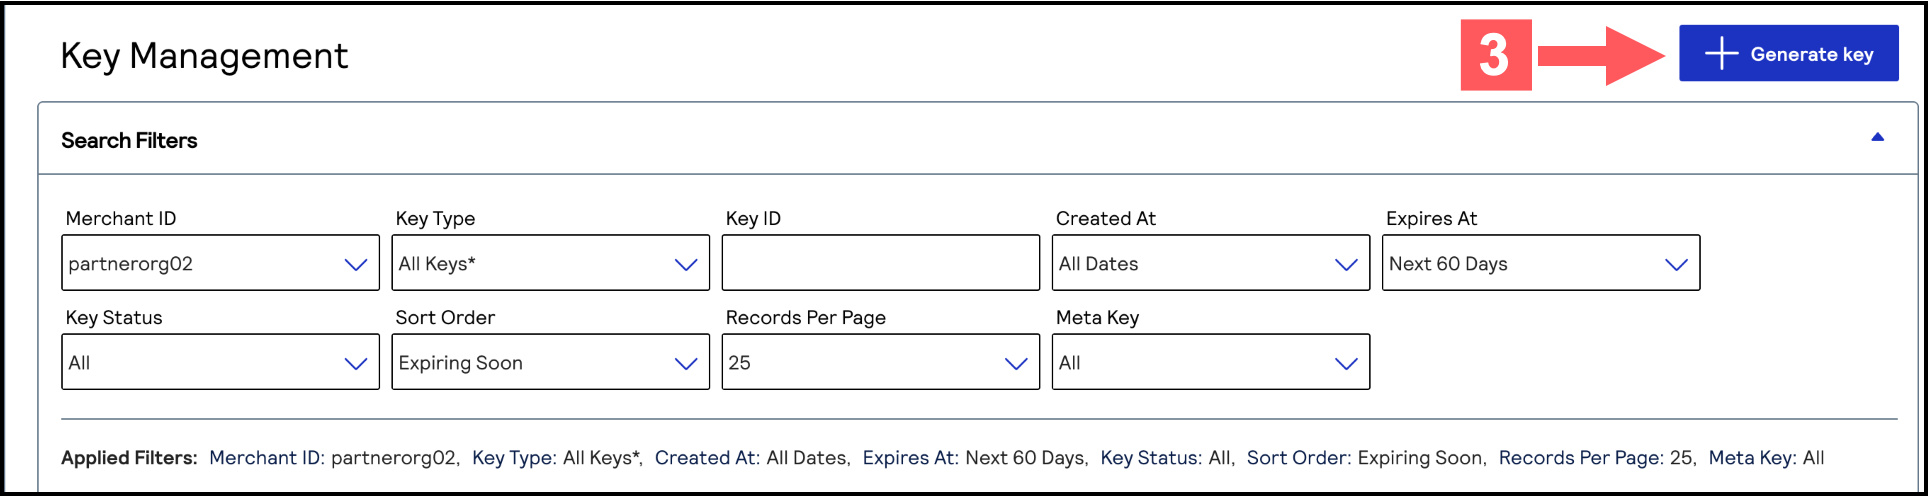
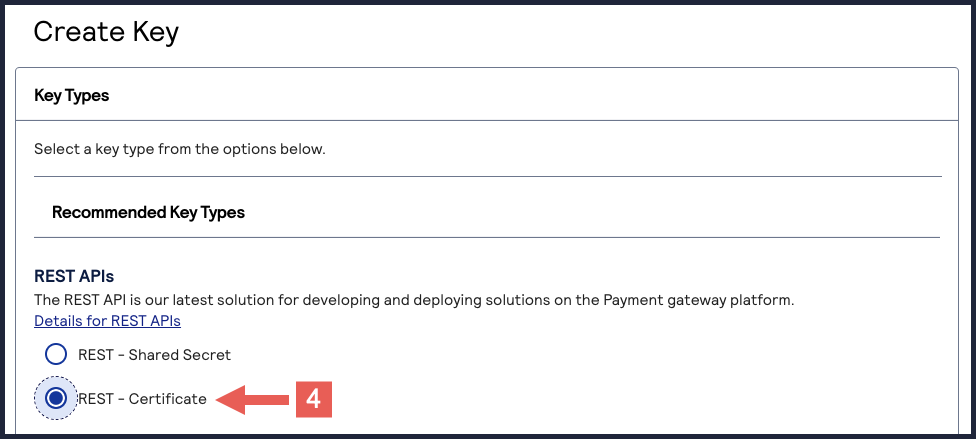
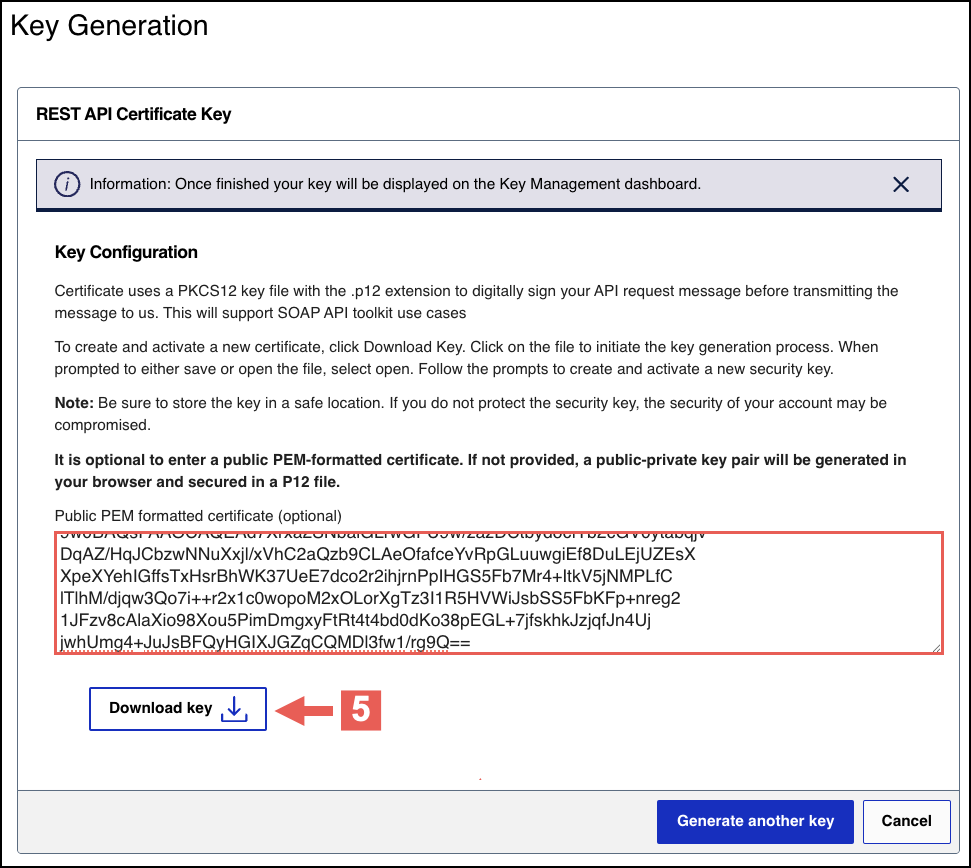
- Under REST APIs, chooseREST – Certificate, and then clickGenerate key.If you are using aportfolioaccount, the Key options window appears, giving you the choice to create a meta key.For more information about how to create a meta key, see .
- ClickDownload key
 .
.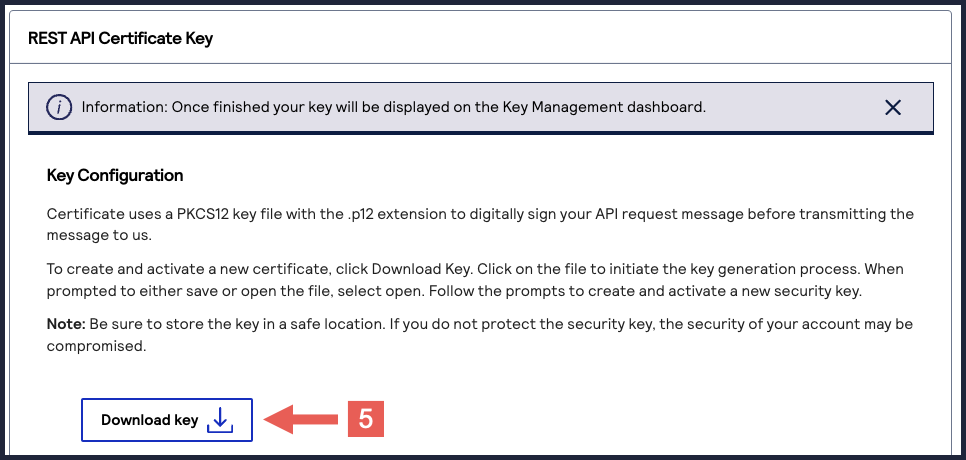
- Create a password for the certificate by entering one into theNew PasswordandConfirm Passwordfields. ClickGenerate key.
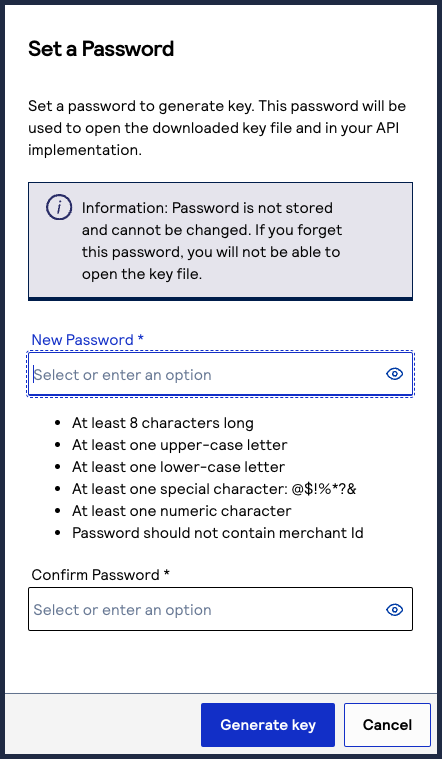 The.p12file downloads to your desktop.If prompted by your system, approve the location to which the key downloads.
To create or upload another key, click
Generate another key
. To view all of
your created keys, go to the Key Management page.IMPORTANT
Securely store the
.p12
file and password in your system. These
credentials are required in order to implement certain products, and you must be
able to access them.Submitting a P12 Certificate
Follow these steps to submit your own public PEM-formatted certificate signing
request (CSR) if you are using JSON Web Tokens to secure communication. You also have
the option to create a P12 certificate from your CSR to use for testing purposes.
- Log in to theBusiness Center:
- On the left navigation panel, choose
Payment Configuration > Key Management.
- Click+ Generate keyon the Key Management page.
- Under REST APIs, chooseREST – Certificate, and then clickGenerate key.If you are using aportfolioaccount, the Key options window appears, giving you the choice to create a meta key.For more information about how to create a meta key, see .
- Enter your public PEM-formatted certificate in the text box, then clickDownload key
.If you need to generate your own CSR and private key, run this command. In this example,merchantis your organization or merchant ID (MID). You can extract the certificate value by opening theexample.csrfile using a text editor application.openssl req -new -newkey rsa:2048 -keyout private_key.pem -out example.csr -sha256 -nodes -subj "/CN=merchant"
- (Optional) To convert your submitted CSR into a.p12file, run this command. In this example,merchantis your organization or merchant ID (MID).You can use the P12 certificate for testing using theREST API Referenceon the Developer Center.openssl pkcs12 -export -name "$(printf 'serialnumber=%s,cn=%s' "$(openssl x509 -inmerchant_certChain.pem -noout -serial | cut -d= -f2 | xxd -r -p)" "$(openssl x509 -inmerchant_certChain.pem -noout -subject | sed -n 's/.*CN=\([^/]*\).*/\1/p')" )" -outmerchant.p12 -inkey private_key.pem -inmerchant_certChain.pem
- When prompted, set a password for the.p12file.
To create or upload another key, click
Generate another key
. To view all of
your created keys, go to the Key Management page.IMPORTANT
Securely store your key's password in your system. These credentials
are required to implement certain products and you must be able to access them.
Extracting the Private Key from Your P12 Certificate
When you have your P12 certificate, extract the private key from the certificate. Use this key
to sign your header when sending an API request.
IMPORTANT
If you are using the SDK to establish communication, you do not
need to extract the private key from the P12 certificate.
- Prerequisite
- You must have a tool such as OpenSSL installed on your system.
- Extract the Private Key
- Follow these steps to extract the private key using OpenSSL:
- Open the command-line tool and navigate to the directory that contains the P12 certificate.
- Enter this command:openssl pkcs12 -in [certificate name] -nodes -nocerts -out [private key name]
- Enter the password for the certificate.You set this password when you created the P12 certificate in theBusiness Center.
The new certificate is added to the directory with the private key name you supplied in Step 2.
Testing Your Private Key
After creating your key certificate, you must verify that it can successfully process
API requests. This task explains how to test and validate your private key in the
Developer Center and the
Business Center
.Follow these steps:
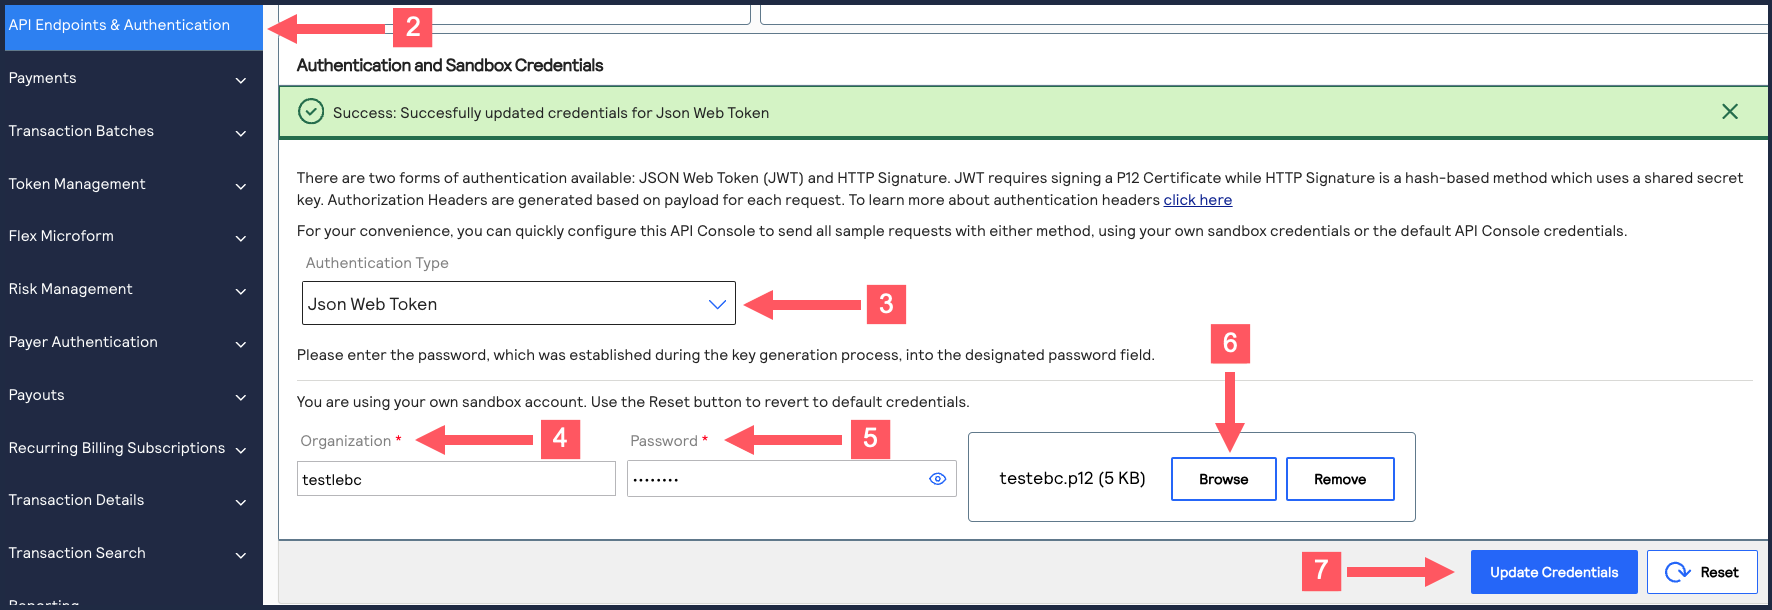
- Go to the Developer Center's API Reference page:
- On the left navigation panel, click .
- Under Authentication and Sandbox Credentials, go to the Authentication Type drop-down menu and chooseJSON Web Token.
- Enter your organization ID in theOrganizationfield.
- Enter your Password in thePasswordfield.
- ClickBrowseand upload your p12 certificate from your desktop.
- ClickUpdate Credentials.A confirmation message states that your credentials are successfully updated.
- Go to the Developer Center's API Reference and navigate toPayments >.POSTProcess a Payment
- ClickSend.
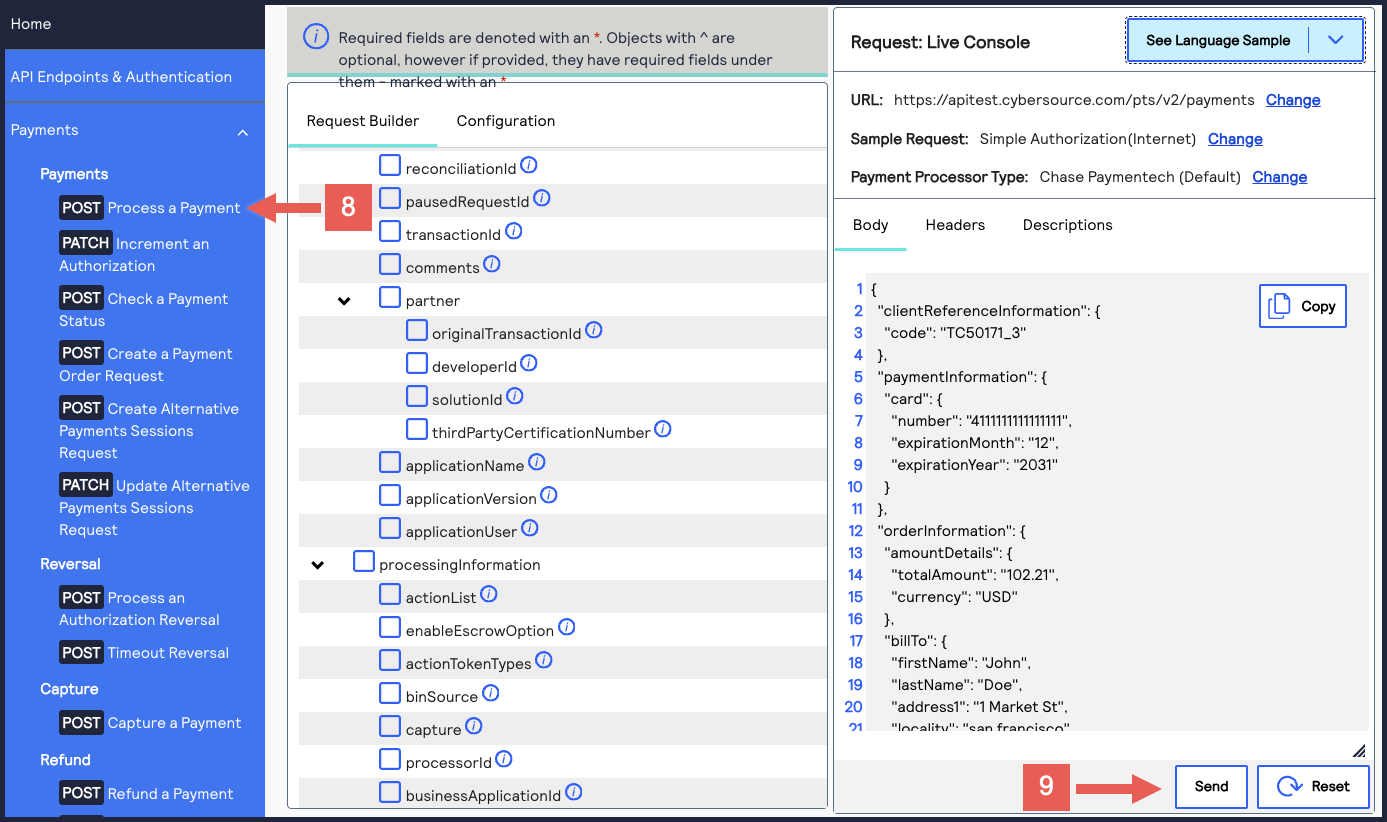 A message confirms that your request was successful with the status code 201.
- Log in to theBusiness Center:
- On the left navigation panel, choose
 Transaction Management > Transactions.
 - Under Search Results, verify that the request ID from the test authorization response is listed in the Request ID column.If the test authorization was successful, a success message is present in the corresponding Applications column.

Construct Messages Using JSON Web Tokens
IMPORTANT
As of
February 2026
, there are new requirements for
constructing a JWT. This section explains how to update your system to remain in
compliance. By September 2026
, all merchants using HTTP signature messaging must
migrate to JSON Web Token (JWT) messaging in order to support message-level encryption
(MLE).This figure shows the steps required for using JSON Web Tokens (JWTs) to construct messages.
Each step is described in the following subsections.

JSON Web Token Message Elements
A JWT message consists of HTTP headers and an HTTP message body.
- HTTP Message Elements
- Your HTTP message header must include these elements:
- HTTP Message Header ElementsHTTP Header ElementDescriptioncontent-typeAlso known as the Multipurpose Internet Mail Extension (MIME) type, this element identifies the media or file type of the resource (application/json).hostThe transaction endpoint. (api.visaacceptance.com)authorizationJSON Web Signature (JWS) bearer token.
- HTTP Message Body
- Your API request.
Step 1: Set Known HTTP Headers
Set the values for these HTTP header elements. They do not require calculation.
- content-type
- Set to the media or file type resource.
- host
- Set to the endpoint.
Step 2: Set the JWS Header Claims
You must construct a
JSON Web Signature
(JWS) token. To construct a JWS token, you
must first set its header claim values.These header claim values do not require calculation.
Header Field | Description |
|---|---|
alg | The asymmetric algorithm you use to sign the token header. These
algorithms are supported:
|
kid | The ID of the key you use to digitally sign the JWT. The key ID
must be registered with the authorizing server. It is the key ID
from your P12 certificate. For more information, see Create or Submit a P12 Certificate. |
typ | The token type. Set to JWT . |
Step 3: Set the JWS Body Claims
After you set the JWS header values, set these JWS body claim values:
JWS Body Claim Field | Description | Data Type |
|---|---|---|
digest | A Base64-encoded hash of the message payload. Do not include the digest field if the request message
is empty, such as during a GET or DELETE request. | String |
digestAlgorithm | The algorithm used to hash the message payload. The message payload should be hashed using the SHA-256
algorithm. Do not include the digestAlgorithm field if the
digest field is not included. | String |
exp | The time at which the JWS token expires. Field values cannot
exceed two minutes after the message issue date, which is the
iat field value. This field is an HTTP-date value as
defined in RFC7231.For example, 01/01/2020 at 00:02:00 is
1577836920 . | String |
iat | The date and time at which the message is issued. This field
uses a NumericDate value as defined in RFC 7519, which is
the number of seconds since
1970‑01‑01T00:00:00Z (Unix epoch).For
example, 01/01/2020 at 00:00:00 is
1577836800 . | String |
iss | The issuer identifier for the JWS token. Set to the
organization ID that created the private key (P12 certificate).
This value is used to validate the issuer. | String |
jti | The unique token ID. This value is used for replay
prevention. Format the value using UUID version 4. For
example:
6643fb9a-8093-47c6-95d3-8d69785b5e62 | String |
request-method | The HTTP request method. For example, post ,
get , put ,
patch , or delete .It is
standard practice to use lowercase values. | String |
request-resource-path | The complete URL path for the HTTP request. It is standard
practice to use lowercase values. | String |
v-c-jwt-version | The Visa JWT scheme version number. Set to
2 . | String |
v-c-merchant-id | Your Visa Acceptance Solutions transacting merchant ID
(MID).If you are a portfolio or merchant account user,
set this to the transacting merchant ID you send requests on
behalf of. | String |
v-c-response-mle-kid | The message-level encryption response key ID, also known as
the REST–API Response MLE key. | String |
The value of the
digest
JWS claim is a hashed version of the HTTP
message body that you must calculate. Visa Acceptance Solutions
uses this hash
value to validate the integrity of your message body.Follow these steps to calculate the digest hash:
- Generate the SHA-256 hash of the JSON payload (message body).
- Encode the hashed string to Base64.
- Add the message body hash to thedigestJWS body claims.
- Add the algorithm used to hash the digest in thedigestAlgorithmJWS body claims.
Example: Creating a Message Hash Using the Command Line
shasum
Toolecho -n "{"clientReferenceInformation":{"code":"TC50171_3"},"paymentInformation":{"card":{"number": "4111111111111111","expirationMonth":"12","expirationYear":"2031"}},"orderInformation":{"amountDetails": {"totalAmount":"102.21","currency":"USD"},"billTo”:{“firstName":"John","lastName":"Doe","address1": "1MarketSt","locality":"sanfrancisco","administrativeArea":"CA","postalCode":"94105","country":"US", "email":"","phoneNumber":"4158880000"}}}" | shasum -a 256
echo -n "6ae5459bc8a7d6a4b203e8a734d6a616725134088e13261f5bbcefc1424fc956" | base64
Example: Creating a Message Hash Using the Command Line
base64
Toolecho -n "6ae5459bc8a7d6a4b203e8a734d6a616725134088e13261f5bbcefc1424fc956" | base64
Example: Creating a Message Hash Using C#
public static string GenerateDigest() {
				var digest = "";
				var bodyText = "{ your JSON payload }";
				using (var sha256hash = SHA256.Create()) {
				byte[] payloadBytes = sha256hash
				.ComputeHash(Encoding.UTF8.GetBytes(bodyText));
				digest = Convert.ToBase64String(payloadBytes);
				digest = "SHA-256=" + digest;
				}
				return digest;
				}
Example: Creating a Message Using Java
public static String GenerateDigest() throws NoSuchAlgorithmException {
				String bodyText = "{ your JSON payload }";
				MessageDigest md = MessageDigest.getInstance("SHA-256");
				md.update(bodyText.getBytes(StandardCharsets.UTF_8));
				byte[] digest = md.digest();
				return "SHA-256=" + Base64.getEncoder().encodeToString(digest);
				}
Step 4: Calculate the JWS Signature
You can now calculate the JSON Web Signature (JWS). The JWS consists of the JWS header and
claim set hashes in the following format. They are encrypted with the private key.
[JWS Header].[Claim Set]
Follow these steps to calculate the signature:
- Concatenate the JWS header and claim set hash strings with a period character (.) between the hashes:[JWS Header].[Claim Set]
- Generate an encoded version of the text file using your private key from the.p12certificate. For more information, see Create or Submit a P12 Certificate.
- Base64-encode the signature output.
- After calculating the signature, you can construct a complete JWS token by combining the JWS header claims, body claims, and signature.
Example: Token Signature Hash
YjgwNGIxOTMxMzQ2NzhlYjdiMDdhMWZmYjZiYzUzNzliMTk5NzFmNjAzNWRmMThlNzk0N2NhY2U0YTEwNzYyYQ
Code Example: Encoding the Signature File Using OpenSSL
Encode the signature file using the
openssl
tool.openssl rsautl -encrypt -inkey publickey.key -pubin -in [signature-text-file] > [signature-encoded-file]
Code Example: Base64 Encoding the Signature File Using the Command
Line
Encode the signature file using the
openssl
tool and remove any
padding.base64 -i [signature-encoded-file]
Step 5: Complete the Message with JWTs
Combine all of the HTTP headers with your HTTP message body to construct your HTTP signature
message.
If you have not already, you must construct the entire JWS token by combining the JWS header
claims, body claims, and signature from Steps 2 – 4.
Enable Message-Level Encryption
IMPORTANT
There are additional tasks you must complete before you can
enable message-level encryption. See the Prerequisites for MLE section below.
Message-Level Encryption (MLE) enables you to store information or communicate
with other parties while helping to prevent uninvolved parties from understanding the
stored information. Enabling MLE requires you to create a
REST-Certificate
for
encrypting your requests and a REST – API Response MLE
key for decrypting
received responses. If your organization is using a meta key, the portfolio account or
merchant account that created the meta key must also create the REST – API Response MLE
key.MLE provides enhanced security for message payload by using an asymmetric encryption
technique (public-key cryptography). The message encryption is implemented with
symmetric encryption using Advanced Encryption Standard (AES), Galois Counter Mode (GCM)
with 256-bit key size. The encryption of keys is supported using RSA Optimal Asymmetric
Encryption Padding (OAEP) with 2048-bit key size. The encryption service is based on
JSON Web Encryption (JWE), works on top of SSL and requires separate key-pairs for
request and response legs of the transaction.
MLE is required for APIs that primarily deal with sensitive transaction data,
both financial and non-financial. These are the types of sensitive transaction data:
- Personal identification information (PII)
- Personal account number (PAN)
- Personal account information (PAI)
MLE is supported when using JSON web tokens.
Each of these authentication schemes uses an encrypted payload, called the
JWE
. A
JWE token has these five components, with each component separated by a period (.): - JOSE header containing four elements:"alg": "RSA-OAEP-256", // The algorithm used to encrypt the CEK. "enc": "A256GCM", // The algorithm used to encrypt the message. "iat": "1702493653", // The current timestamp in milliseconds. "kid": "keyId" // The serial number of shared public cert for encryption of CEK.
- JWE encrypted key
- JWE initialization vector
- JWE additional authentication data (AAD)
- JWE ciphertext and authentication tag
Prerequisites for MLE
Before you can enable message-level encryption (MLE), you must complete these requirements:
- Verify that theVisa Acceptance Solutionsproducts you are integrating support MLE.
- Ensure that your system is configured to read the public key and encrypt the API payload.
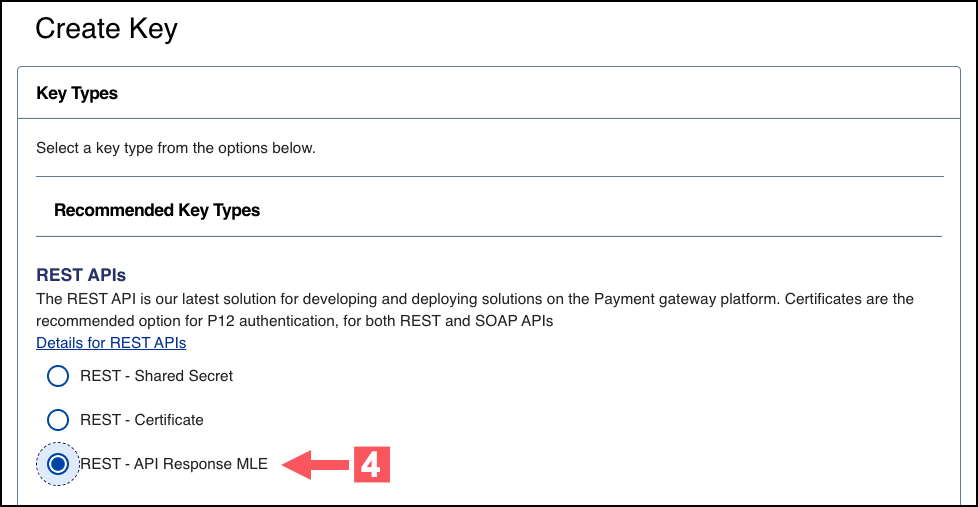
Create or Submit a REST—API Response MLE Key
Before you can enable your system to support MLE, you must create or upload
a
REST—API response MLE
certificate. After creating or uploading the certificate,
you can extract the certificate's key to begin enabling MLE.Follow these steps to create or submit an API Response MLE certificate in
the
Business Center
:- Log in to theBusiness Center:
- On the left navigation panel, choose
Payment Configuration > Key Management.
- Click+ Generate keyon the Key Management page.
- Under REST APIs, chooseREST – API Response MLE, and then clickGenerate key.
- Choose one of these options to download your key:
- To create a new API response MLE certificate, clickDownload key
.
- To upload your own certificate, enter your public PEM-formatted certificate in the text box, and then clickDownload key
. The
.pemfile downloads to your desktop. If prompted by your system, approve the location to which the file downloads.
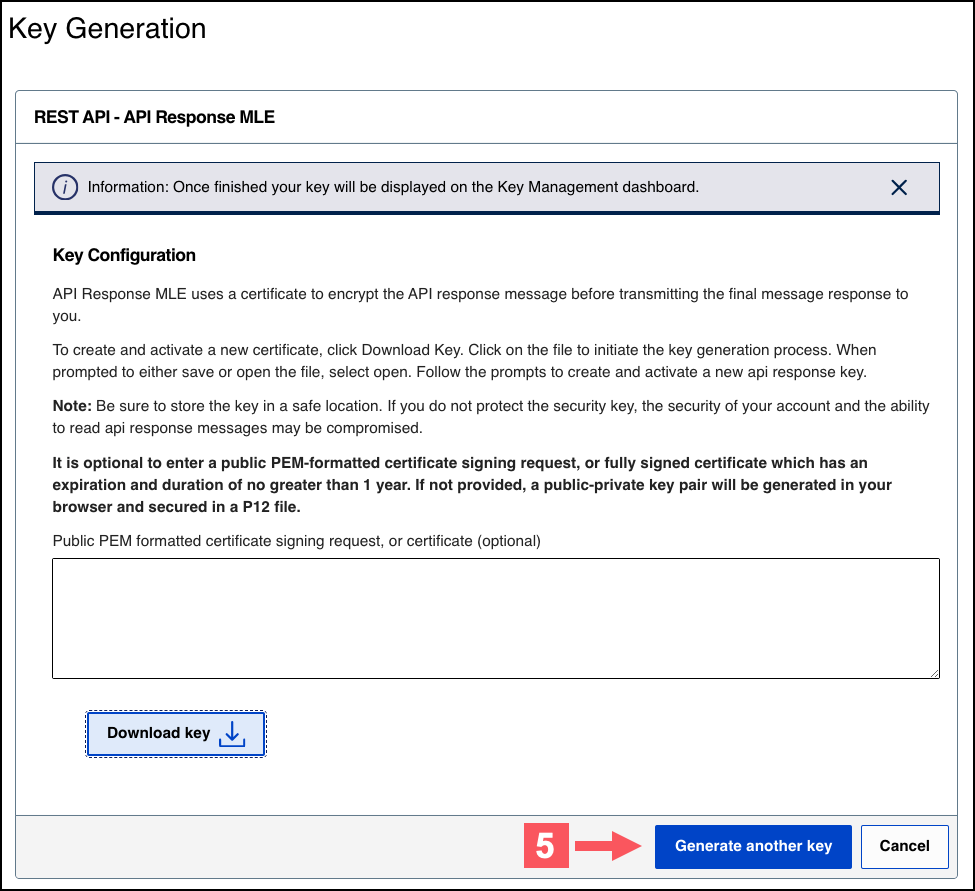
- If you are creating a certificate, the Set a Password window appears. Create a password for the certificate by entering the password into theNew PasswordandConfirm Passwordfields, and then clickGenerate key.The.p12file downloads to your desktop. If prompted by your system, approve the location to which the key downloads.
To create or upload another key, clickGenerate another key. To view all of your created keys, go to the Key Management page.IMPORTANTSecurely store the.p12file and password in your system. These credentials are required in order to implement certain products, and you must be able to access them.
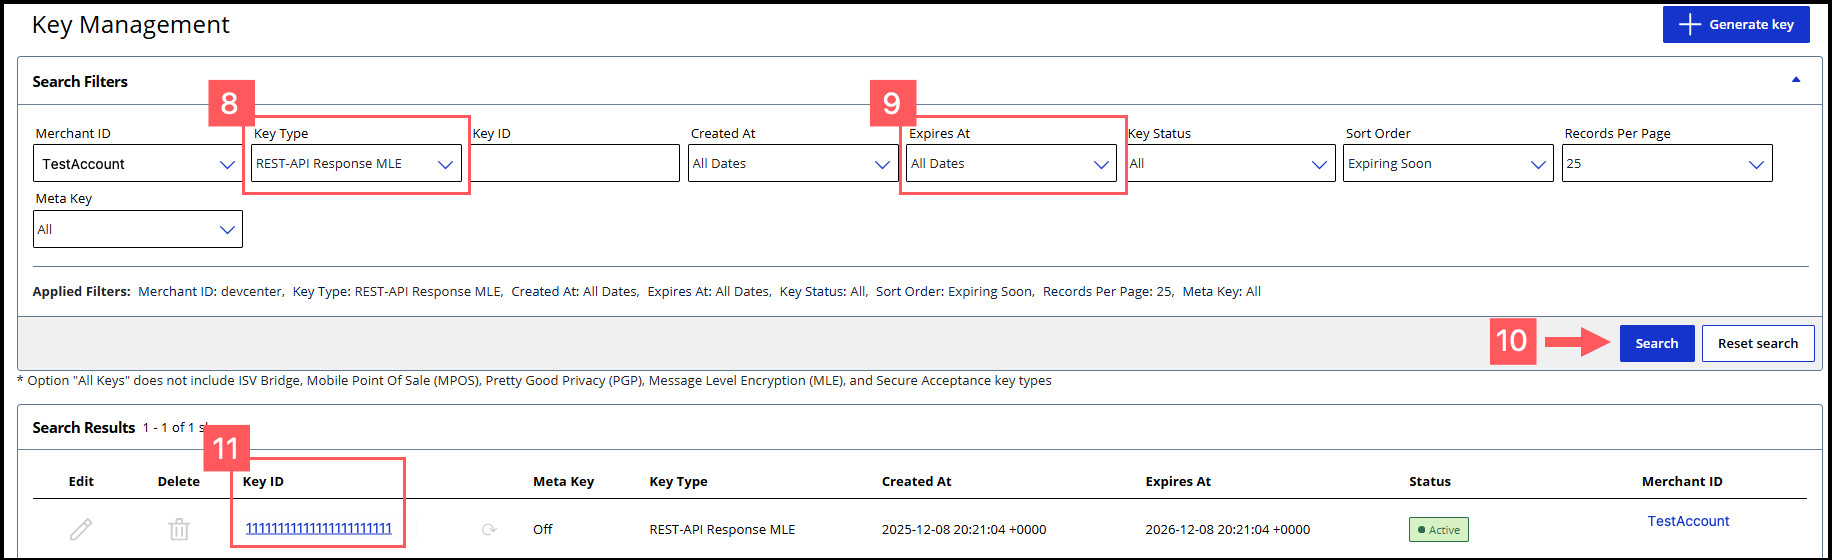
- ClickCancel.The Key Management page appears.
- Click theKey Typefilter and chooseREST-API Response MLE.
- Click theExpires Atfilter and chooseAll Dates.
- ClickSearch.
- Find the REST–API Response key that you created in the Search Results table and save its key ID.The key ID is needed to test and configure your system to use MLE.
- Test Your REST–API Response MLE Key
- To test your REST–API Response key, see Test Your REST—API Response MLE Key.
Overview of MLE Setup Tasks
Use the information in this section to configure your system with a custom MLE using
JWTs.
If you do not want to set up a custom MLE, you can use the REST Client SDK instead. For
more information, see the REST Client SDKs in GitHub.
Figure:
Overview of MLE Set-Up Tasks

- Import the required programming libraries for your system.
- Import these three certificates:
- Signing certificate (REST – Certificate).
- MLE request certificate (SJC public certificate)
- MLE response certificate (REST – API Response MLE)
- Encrypt the JSON request message using a JSON Web Encryption (JWE) that uses the SJC public certificate.
- Create the HTTP body in this format:{"encryptedRequest": ".JWE-with-SJC"}
- Create the JSON Web Signature (JWS) payload with these JWT payload fields and your signing certificate's private key. For descriptions of these fields, see the Headers table and Message Body Fields table in Construct Messages Using JSON Web Tokens.
- Header Fields
- alg
- kid
- type
- Message Body Fields
- digestAlgorithm
- digestof the HTTP body
- exp
- iat
- iss
- jti
- request-host
- request-method
- request-resource-path
- v-c-jwt-version
- v-c-merchant-id
- v-c-response-mle-kidfrom the MLE response certificate.
- Sign the JWS with your signing certificate and send it asAuthorization: Bearer, such as a P12 certificate.
- Receive an encrypted response and decrypt it with the MLE private key. You will receive the response in this format:{"encryptedResponse": "JWE-with-ResponseMLECertificate"}The JWE contains a JOSE header containing these four default elements:"alg": "RSA-OAEP-256", // The algorithm used to encrypt the CEK. "enc": "A256GCM", // The algorithm used to encrypt the message. "iat": "1702493653", // The current timestamp in milliseconds. "kid": "keyId" // The serial number of thev-c-api-response-mle-kidfrom the authentication JWS in step 5.
Java Example: Enabling MLE Using JWTs
This example describes a possible way in which to configure your system to create a
custom MLE with JWTs. These steps use the Java programming language.
- Import your preferred libraries to support MLE. In this step, the configuration uses Java leveraging the open source Nimbus JOSE and Bouncy Castle libraries.// Nimbus JOSE + JWT import com.nimbusds.jose.JWEAlgorithm; import com.nimbusds.jose.JWEHeader; import com.nimbusds.jose.JWEObject; import com.nimbusds.jose.JWSAlgorithm; import com.nimbusds.jose.JWSHeader; import com.nimbusds.jose.JWSObject; import com.nimbusds.jose.JOSEObjectType; import com.nimbusds.jose.EncryptionMethod; import com.nimbusds.jose.Payload; import com.nimbusds.jose.crypto.RSADecrypter; import com.nimbusds.jose.crypto.RSAEncrypter; import com.nimbusds.jose.crypto.RSASSASigner; // BouncyCastle (PEM parsing + cert conversion) import org.bouncycastle.cert.X509CertificateHolder; import org.bouncycastle.cert.jcajce.JcaX509CertificateConverter; import org.bouncycastle.openssl.PEMKeyPair; import org.bouncycastle.openssl.PEMParser; import org.bouncycastle.openssl.jcajce.JcaPEMKeyConverter;
- Import the signing, MLE, and SJC certificates. The P12 certificate as the signing certificate.public final class KeyPairMaterial { public final PrivateKey privateKey; public final X509Certificate cert; public KeyPairMaterial(PrivateKey k, X509Certificate c) { this.privateKey = k; this.cert = c; } } public final class CryptoMaterialDual { // Merchant: JWS (REST – Certificate) public final KeyPairMaterial signingCert; // Merchant: Response decryption (API Response MLE) public final KeyPairMaterial responseCert; // Platform encryption cert (SJC) public final X509Certificate sjcCert; public CryptoMaterialDual(KeyPairMaterial signingCert, KeyPairMaterial responseCert, X509Certificate sjcCert) { this.signingCert = signingCert; this.responseCert = responseCert; this.sjcCert = sjcCert; } }
- Unpack your imported certificates into a usable format for your system.Create this method for your system to read your.p12file, if you are using the P12 certificate.static KeyPairMaterial loadKeyPairFromP12(Path p12Path, char[] password, String keyAlias) throws Exception { KeyStore ks = KeyStore.getInstance("PKCS12"); try (InputStream in = Files.newInputStream(p12Path)) { ks.load( in , password); } KeyStore.PrivateKeyEntry entry = (KeyStore.PrivateKeyEntry) ks.getEntry( keyAlias, new KeyStore.PasswordProtection(password)); return new KeyPairMaterial(entry.getPrivateKey(), (X509Certificate) entry.getCertificate()); }Create this method for your system to read the PEM chain and private key.static KeyPairMaterial loadKeyPairFromPem(Path certificateChainPem, String privateKeyPem) throws Exception { X509Certificate leaf = readPemCerts(certificateChainPem).get(0); PrivateKey key = readPkcs8PrivateKey(privateKeyPem); return new KeyPairMaterial(key, leaf); }Create this method for your system to read the SJC from the.p12file or PEM chain.static X509Certificate loadSjcFromP12(Path p12Path, char[] password, String sjcAlias) throws Exception { KeyStore ks = KeyStore.getInstance("PKCS12"); try (InputStream in = Files.newInputStream(p12Path)) { ks.load( in , password); } return (X509Certificate) ks.getCertificate(sjcAlias); } static X509Certificate loadSjcFromPem(Path sjcCertPem) throws Exception { return readPemCerts(sjcCertPem).get(0); }Create this method to include PEM helper functions.static List < X509Certificate > readPemCerts(Path pemPath) throws Exception { try (Reader r = Files.newBufferedReader(pemPath); org.bouncycastle.openssl.PEMParser p = new org.bouncycastle.openssl.PEMParser(r)) { var xconv = new org.bouncycastle.cert.jcajce.JcaX509CertificateConverter().setProvider("BC"); List < X509Certificate > certs = new ArrayList < > (); Object o; while ((o = p.readObject()) != null) { if (o instanceof org.bouncycastle.cert.X509CertificateHolder h) certs.add(xconv.getCertificate(h)); } return certs; } } static PrivateKey readPkcs8PrivateKey(String pem) throws Exception { try (var parser = new org.bouncycastle.openssl.PEMParser(new StringReader(pem))) { Object o = parser.readObject(); var conv = new org.bouncycastle.openssl.jcajce.JcaPEMKeyConverter().setProvider("BC"); if (o instanceof org.bouncycastle.asn1.pkcs.PrivateKeyInfo pki) return conv.getPrivateKey(pki); if (o instanceof org.bouncycastle.openssl.PEMKeyPair kp) return conv.getPrivateKey(kp.getPrivateKeyInfo()); throw new IllegalArgumentException("Expect PKCS#8 private key PEM"); } }
- Create these methods as helpers for encrypting and signing.static String kidFromCert(X509Certificate cert) { String dn = cert.getSubjectDN().getName().toUpperCase(); int i = dn.indexOf("SERIALNUMBER="); if (i >= 0) { int j = dn.indexOf(",", i); if (j < 0) j = dn.length(); return dn.substring(i + "SERIALNUMBER=".length(), j).trim(); } return cert.getSerialNumber().toString(); } static String encryptToJwe(String json, X509Certificate sjcCert) throws Exception { var header = new com.nimbusds.jose.JWEHeader.Builder( com.nimbusds.jose.JWEAlgorithm.RSA_OAEP, com.nimbusds.jose.EncryptionMethod.A256GCM) .contentType("JWT") .keyID(kidFromCert(sjcCert)) .build(); var jwe = new com.nimbusds.jose.JWEObject(header, new com.nimbusds.jose.Payload(json)); jwe.encrypt(new com.nimbusds.jose.crypto.RSAEncrypter((RSAPublicKey) sjcCert.getPublicKey())); return jwe.serialize(); } static String sha256Base64(String body) throws Exception { MessageDigest md = MessageDigest.getInstance("SHA-256"); return Base64.getEncoder().encodeToString(md.digest(body.getBytes(StandardCharsets.UTF_8))); } static String signAsJws(String payload, KeyPairMaterial signingCert) throws Exception { var header = new com.nimbusds.jose.JWSHeader.Builder(com.nimbusds.jose.JWSAlgorithm.RS256) .keyID(kidFromCert(signingCert.cert)) .type(com.nimbusds.jose.JOSEObjectType.JWT) // typ=JWT .build(); var jws = new com.nimbusds.jose.JWSObject(header, new com.nimbusds.jose.Payload(payload)); jws.sign(new com.nimbusds.jose.crypto.RSASSASigner(signingCert.privateKey)); return jws.serialize(); } static String decryptJwe(String compactJwe, KeyPairMaterial responseCert) throws Exception { var jwe = com.nimbusds.jose.JWEObject.parse(compactJwe); jwe.decrypt(new com.nimbusds.jose.crypto.RSADecrypter((RSAPrivateKey) responseCert.privateKey)); return jwe.getPayload().toString(); }
- Create a class that uses the methods described in the above steps to encrypt and decrypt your payloads with MLE using JWTs.// Example mix: // - REST – Certificate from PKCS#12 // - API Response MLE from PEM // - SJC from PEM KeyPairMaterial signingCert = loadKeyPairFromP12( Paths.get("merchant.p12"), "password".toCharArray(), "merchant"); KeyPairMaterial responseCert = loadKeyPairFromPem( Paths.get("api_response_mle_chain.pem"), Files.readString(Paths.get("api_response_mle_private_key.pem"))); X509Certificate sjc = loadSjcFromPem(Paths.get("sjc_certificate.pem")); CryptoMaterialDual mat = new CryptoMaterialDual(signingCert, responseCert, sjc); // 1) Build your request JSON String requestJson = new org.json.JSONObject() .put("amount", "10.00") .put("currency", "USD") .put("reference", "ORDER-12345") .toString(); // 2) Encrypt request body to JWE using SJC public cert String encryptedJwe = encryptToJwe(requestJson, mat.sjcCert); // 3) Build the HTTP body (this is what you’ll hash for the digest) String httpBody = new org.json.JSONObject() .put("encryptedRequest", encryptedJwe) .toString(); // 4) Build JWS payload: include iat, response kid, digestAlgorithm, and digest of httpBody String digestB64 = sha256Base64(httpBody); String jwsPayload = new org.json.JSONObject() .put("iat", java.time.Instant.now().getEpochSecond()) .put("v-c-api-response-mle-kid", kidFromCert(mat.responseCert.cert)) // instruct server to encrypt to your API Response MLE key .put("digestAlgorithm", "SHA-256") .put("digest", digestB64) .toString(); // 5) Sign the JWS with the REST – Certificate private key String signedJws = signAsJws(jwsPayload, mat.signingCert); // 6) Send the HTTP request // POST /your/api // Content-Type: application/json // Authorization: Bearer <signedJws> /* Body: { "encryptedRequest": "<encryptedJwe>" } */ // 7) Handle the response (decrypt if needed with API Response MLE private key) String apiResponse = /* http call result as string */; org.json.JSONObject resp = new org.json.JSONObject(apiResponse); String finalPayload = resp.has("encryptedResponse") ? decryptJwe(resp.getString("encryptedResponse"), mat.responseCert) : apiResponse;
Test Your Setup
You can send a test API request to validate that your account, API key, JWT messages, and
MLE security are working as intended.
Visa Acceptance Solutions
Visa Acceptance Platform
recommends that you test and verify that your
payment system can securely send and receive REST API messages before transitioning to a
production account.Postman Testing
You can use Postman to verify your HTTP signature message. To download a Postman
collection of basic payment API requests, see the REST API collection on the Postman
website.
When testing an API outside of the Developer Center's API Reference sandbox, send
your test API requests to the test server:
https://apitest.visaacceptance.com
For example, to test an authorization request, you can send the request to this
endpoint:
https://apitest.visaacceptance.com
/pts/v2/paymentsTest Your REST—API Response MLE Key
Follow these steps to verify that your API response MLE key is working. If you
have not already created or submitted an API response MLE certificate, see the Create or
Submit a REST—API Response MLE Key section in Enable Message-Level Encryption.
- Go to the REST API Reference page in theVisa Acceptance SolutionsDeveloper Center:
- On the left navigation panel, choose an API that supports MLE. For testing purposes, you can chooseIntelligent Commerce > Intelligent Commerce Product > Enroll a Card.MLE support is indicated byRequest MLEandResponse MLEat the top of the screen.

- Choose theMLE Configurationtab.
- In the Message Level Encryption Credentials section, enter your API response MLE key credentials:
- Response encryption:Enter the key ID of your API response MLE key.You saved this key ID in Step 10 in the Create or Submit an API Response MLE Key section in Enable Message-Level Encryption.
- Response decryption:ClickBrowseto submit your own private decryption key from your local system. Only.p12files are supported.
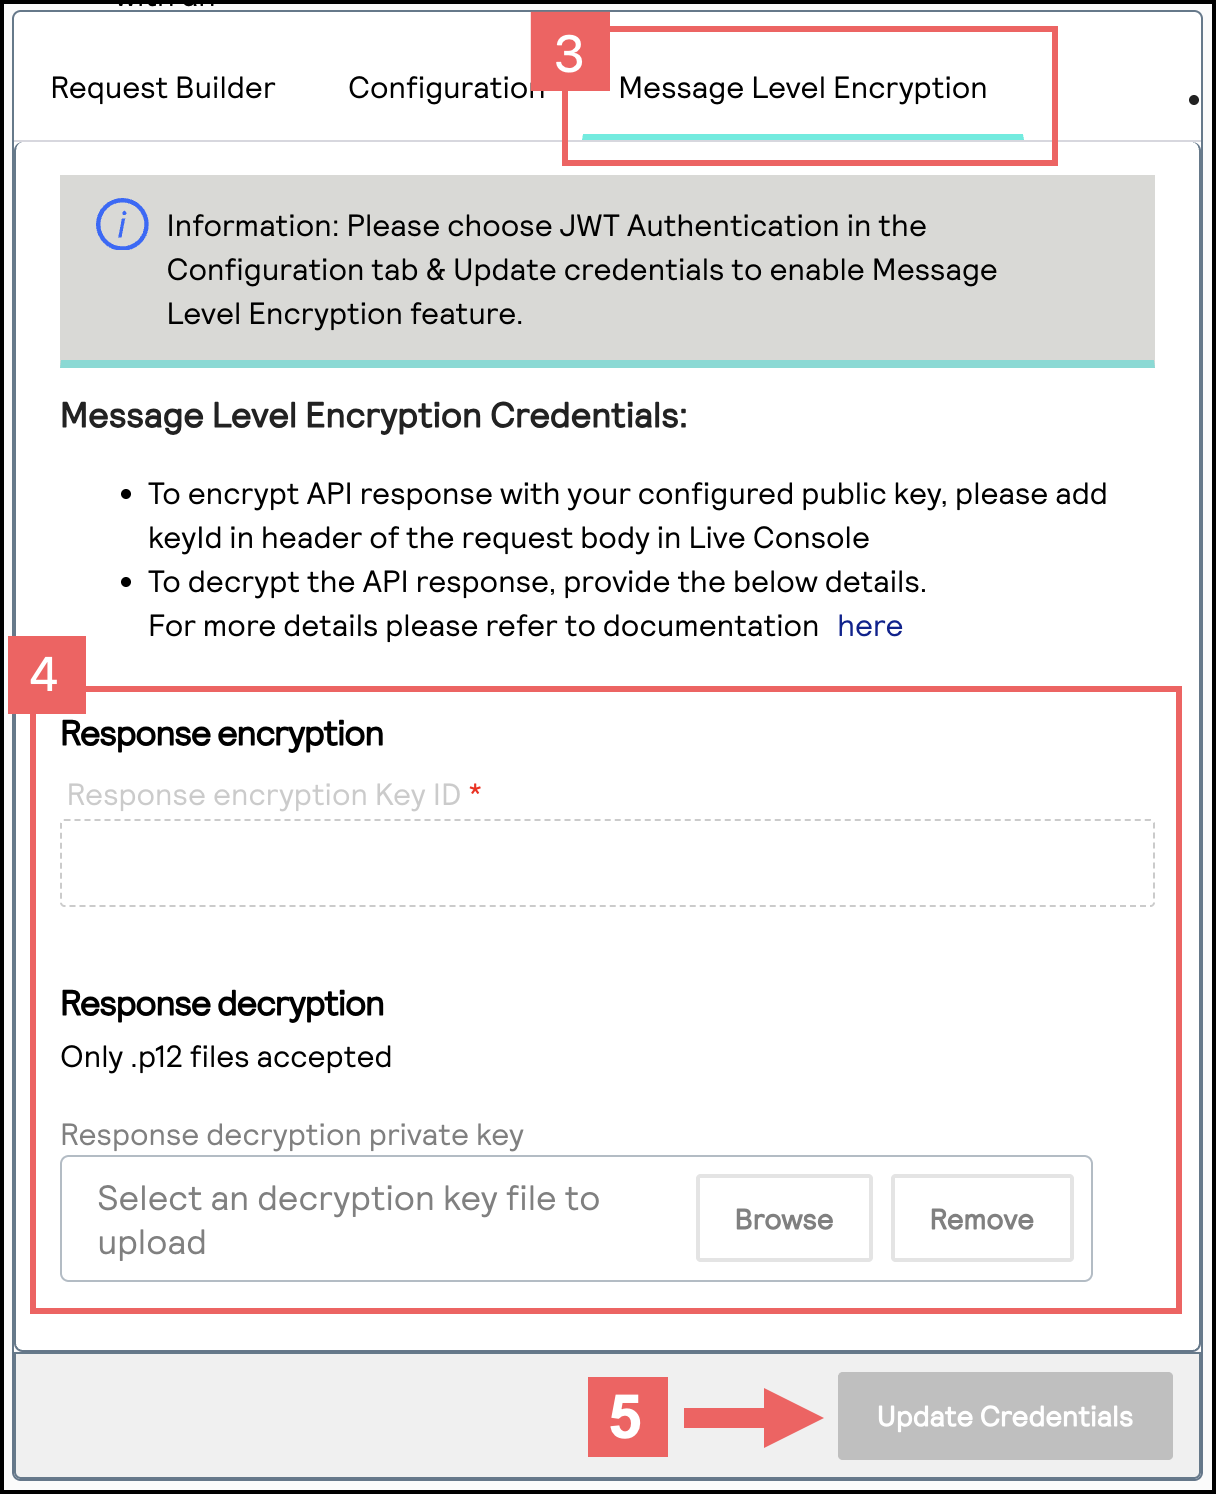
- ClickUpdate Credentials.
- From theSenddrop-down menu, chooseSend Request with Message Level Encryption.
- ClickSend.
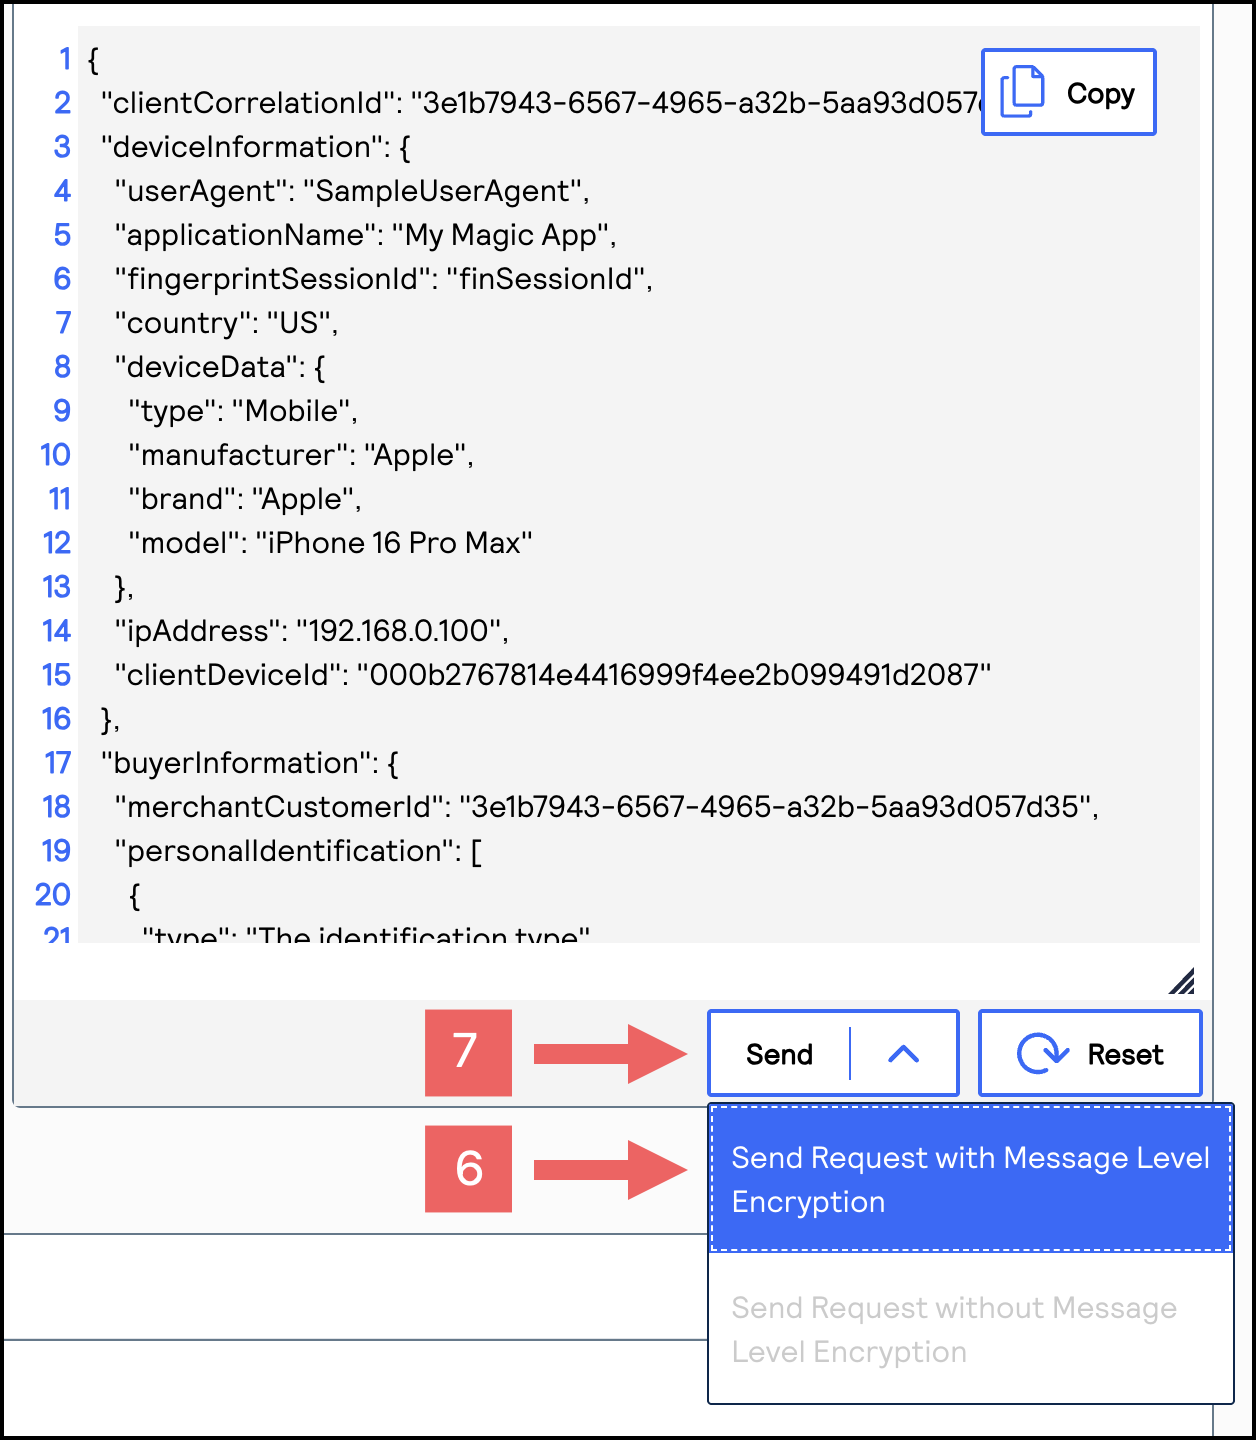
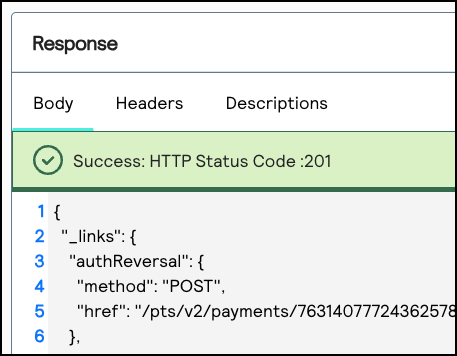
- When aSuccess: HTTP Status Code: 201message displays in the Response section, your API response key is properly configured.
Going Live
When you are ready to process payments in a live environment, you must
transition your account to the live status with a valid configuration for your chosen
payment processor. When your account is live, your transaction data flows through the
production
Visa Acceptance Solutions
gateway, to your processor, and on to the
appropriate payment network.To transition your account:
- Sign up for a merchant account.
- Contact Sales to establish a contract withVisa Acceptance Solutionsthat enables you to process real transactions and receive support.
- Submit a merchant ID (MID) activation request.
It can take up to three business days for the MID to become active.
Create a Merchant ID
The merchant ID (MID) identifies you and your transactions, which requires
you to include it in each transaction request. When you signed up for a sandbox account,
you received a merchant ID for testing purposes. If you choose, you can use that
merchant ID as your production ID.
Follow these steps to sign up for a merchant account in order to create a production MID:
- Go to theBusiness CenterSandbox Account Sign Up page, enter the required information, and clickCreate Account.Choose your merchant ID name. It cannot be changed. This name is not visible to your customers.
- Review your information entered, especially your business email address. Your merchant ID registration information will be sent to the email entered on this form.
- Look for an email from customer support titled:.Visa Acceptance SolutionsMerchant Evaluation AccountThis email contains your organization ID and contact email associated with your MID.
- Look for an email titled:Merchant Registration Details. Click theSet up your username and password nowlink.Your browser opens the New User Sign Up wizard.
- Enter the organization ID and contact email you supplied previously. Follow the wizard pages to add your name, a username, and password.
- Log in to theBusiness Center.When you log in for the first time, you will be asked to identify yourself through a system-generated email that is sent to your email account.
- Look for an email titled:. Save the passcode in the email.Visa Acceptance SolutionsIdentification Code
- Enter the passcode on the Verify your Identity page. You are directed to theBusiness Centerhome page.
You have successfully created a merchant ID and merchant account.
Activate Your Merchant ID
The activation process, also known as
going live
, transitions your
MID and account from test status to live status, enabling you to process real
transactions in production. It can take up to three business days for the MID to become
active.To transition your account, complete these steps:
- Sign in to thesupport centeras an administrator.
- Enter your credentials and log in to your test environment. The organization ID is your MID.
- In theBusiness Center, go toSupport Cases > MID Configuration Request. The MID Configuration Request page should be open.
- ClickMID Activation.
- In theDescriptionfield, enter the merchant ID that you want to take live.
- Choose a processor configuration, and enter the name of your processor.If you are unsure of the processor name, contact your merchant service provider or your merchant acquiring bank.
- Choose the environments to which this change applies (test or production).
- ClickService Enablementand list the products and services that you intend to use.
- ClickSubmit.
Production Endpoints
Send API requests using your production account to the production server:
https://api.visaacceptance.com
For example, send a live authorization request to this endpoint:
https://api.visaacceptance.com
/pts/v2/paymentsSet Up a JSON Web Token Message Using Shared Secret
Keys
IMPORTANT
If you are using HTTP signature security for messaging, use this
section to migrate your system to support JSON Web Token messaging. By
September
2026
, all merchants using HTTP signature messaging must migrate to JSON Web
Token (JWT) messaging in order to support message-level encryption (MLE).To set up JSON Web Token messaging using a
shared secret key pair
, you must
complete the tasks described in this section.Figure:
Set Up JSON Web Token a Messaging

- Sign up for a test account. See Sign Up for a Sandbox Account.
- Create a shared secret key pair. See Create a Shared Secret Key Pair.
- Construct a message using a JSON web token. See Construct Messages Using JSON Web Tokens.
- Enable the optional message-level encryption (MLE) feature. See Enable Message-Level Encryption.
- Test your REST transaction messages. See Test Your Setup.
- Go live by transitioning your sandbox account into a production account. See Going Live.
Create a Shared Secret Key Pair
You must create a shared secret key pair to use JWT message security. How you create your
shared secret key pair is determined by your
Visa Acceptance Solutions
account
type.Transacting merchant account users can create their own unique shared secret key.
Portfolio and merchant account users must create a
meta key
of a shared secret
key. Meta keys enable an organization administrator to create a single shared secret
key. That key is assigned to some or all transacting merchants in their organization.
The purpose of a meta key is to reduce the time needed to manage an organization's keys.
For example, by assigning the same meta key to all of your transacting merchants, you
need to update only one key when it expires instead of having to update each transacting
merchant's key when it expires.For more information about meta keys, see the Meta Key Creation and
Management section in the
Creating and Using Security Keys User
Guide
.Figure:
Account Type Overview

- Portfolio
- A portfolio account represents the partner user. This account type can create and manage merchant accounts in the test and production environments. To create a shared secret meta-key as a portfolio user, see Portfolio User: Create a Shared Secret Meta Key.
- Merchant
- A merchant account represents the merchant administrator user. This account type can create and manage multiple transacting merchant accounts in their organization. To create a shared secret meta-key as a merchant user, see Merchant Account User: Create a Shared Secret Meta Key.
- Transacting Merchant
- A transacting merchant represents the merchant user who is processing transactions. This account type is typically the account that sends API requests. To create a shared secret key pair as a transacting merchant, see Creating a Shared Secret Key Pair.
Creating a Shared Secret Key Pair
- On the left navigation panel, choose
Payment Configuration > Key Management.
- Click+ Generate keyon the Key Management page.
- Under REST APIs, chooseREST – Shared Secretand then clickGenerate key.
 The REST API Shared Secret Key page appears.
 - ClickDownload key
.The.pemfile downloads to your desktop.
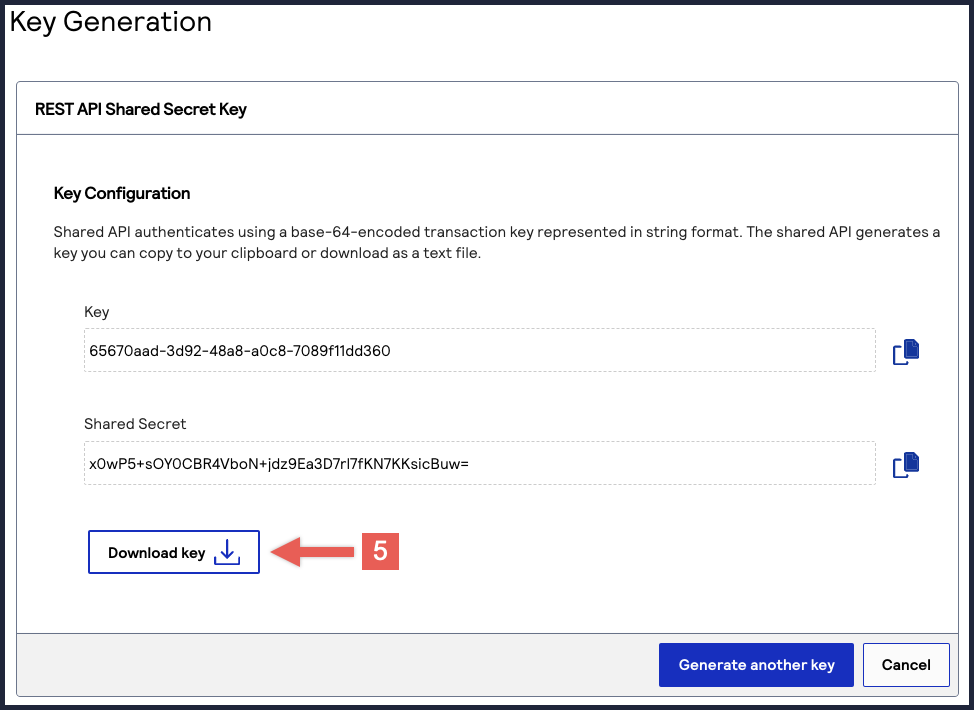
IMPORTANT
Securely store the key credentials and
.pem
file in your
system. These credentials are required in order to implement certain products, and
you must be able to access them.- What to do next
- To test your shared secret key pair, see Test Your Shared Secret Key Pair.
Merchant Account User: Create a Shared Secret Meta Key
This section describes how to create a meta key as a merchant account user in the
Business Center
. IMPORTANT
Only merchant account users can complete this task.
IMPORTANT
If you would like to create meta keys using the API,
contact your support team for more
information.
Follow these steps to create a meta key for a shared secret key pair:
- Log in to theBusiness Center:
- On the left navigation panel, choose
Payment Configuration > Key Management.If you are using a portfolio account to create a meta key for one of your merchant accounts, you can switch to a merchant account by clickingSwitch merchant.
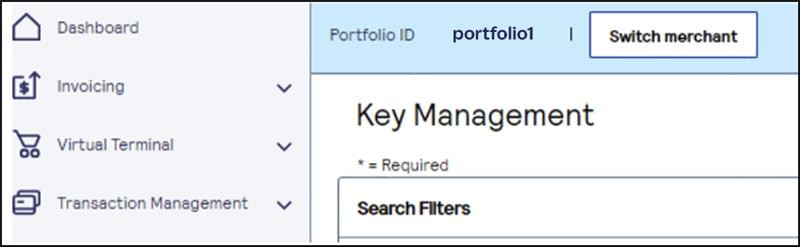 The Quick Merchant Switch page appears.Choose the merchant account ID that you want to switch to, and clickSwitch.
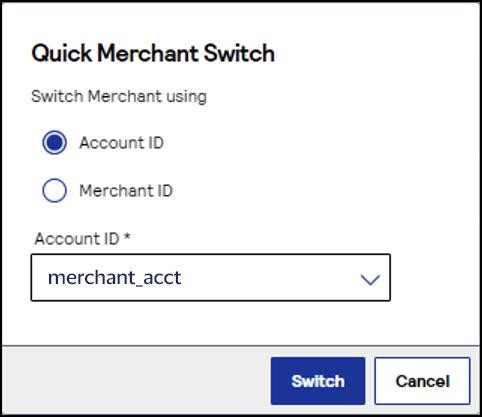
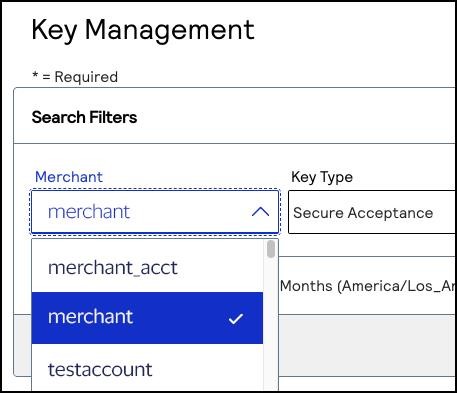
- In theMerchant IDsearch filter, choose your merchant account ID.If you logged in from a portfolio user account or the account (_acct) level, verify that the merchant ID you choose does not contain_acctin the ID name.
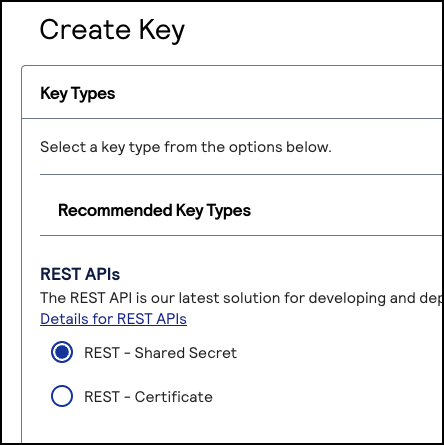
- Click+ Generate key.The Create Key page appears.
- ChooseREST – Shared Secretand clickGenerate key.
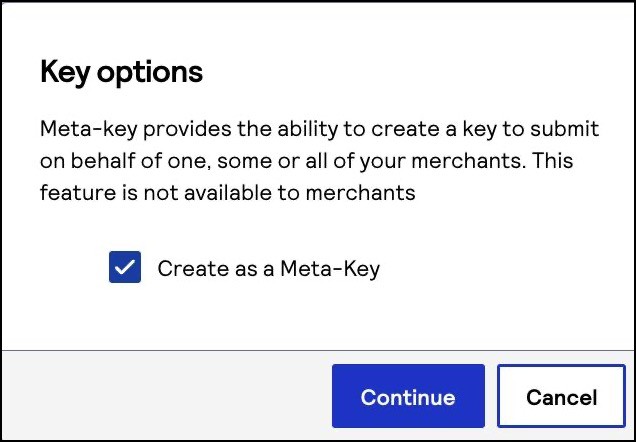
 The Key options window appears.
 - Check theCreate as a Meta-Keybox and clickContinue.
- Choose one of these options to assign the key:
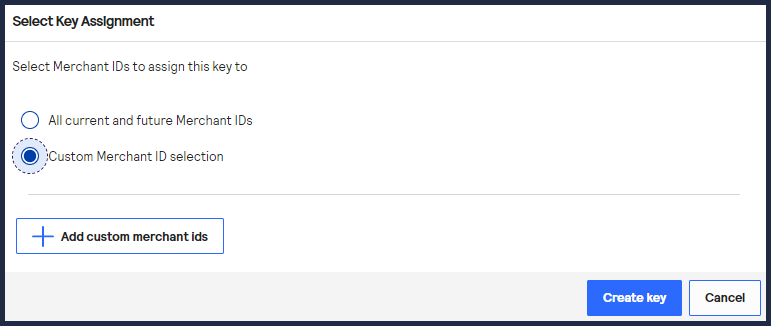
- Click+ Add custom merchant ids. The Add Custom Merchant IDs page appears.By default, all merchant IDs are shown in the Merchant IDs table. To limit the list to a subset of merchant IDs, click+ Add filter, choose a search filter from the drop-down menu, and clickSearch.
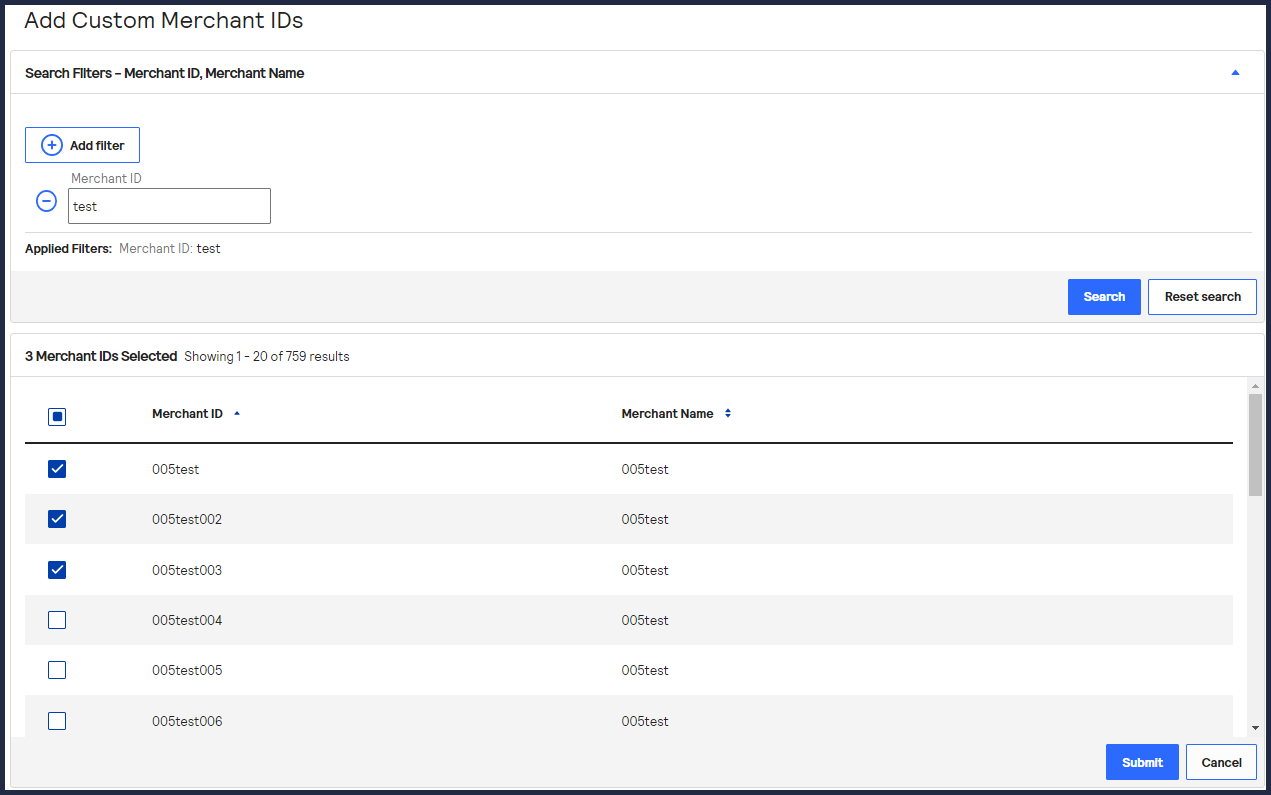
- Check one or more transacting MID account boxes, and clickSubmit.The Key Generation page opens.
- ClickCreate key.Continue to the Create Key page to view your new key.You can also generate a new key by clicking+ Generate Keyagain.
AFTER COMPLETING THE TASK
To test your shared secret key pair, see Test Your Shared Secret Key Pair.
Portfolio User: Create a Shared Secret Meta Key
This section describes how to create a meta key as a portfolio user in the
Business Center
. IMPORTANT
Only portfolio account users can complete
this task.
IMPORTANT
If you would like to create meta keys using the API,
contact your support team for more
information.
Follow these steps to create a meta key for a shared secret key
pair:
- Log in to theBusiness Center:
- On the left navigation panel, choose
Payment Configuration > Key Management.
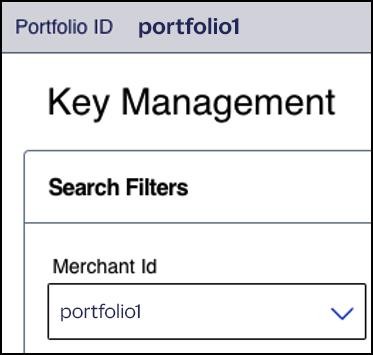
- In theMerchant Idfield, choose your portfolio ID if it is not already chosen by default.
- Click+ Generate key.The Create Key page appears.
- ChooseREST – Shared Secretand clickGenerate key.
The Key options page appears.
- Check theCreate as a Meta-Keybox and clickContinue.
- Choose one of these options to assign the key:
- Click+ Add custom merchant ids. The Add Custom Merchant IDs page appears.By default, all merchant IDs are shown in the Merchant IDs table. To limit the list to a subset of merchant IDs, click+ Add filter, choose a search filter from the drop-down menu, and clickSearch.
- Check one or more transacting MID account boxes, and clickSubmit.The Key Generation page opens.
- ClickCreate key.Continue to the Create Key page to view your new key.You can also generate a new key by clicking+ Generate Keyagain.
AFTER COMPLETING THE TASK
To test your shared secret key pair, see Test Your Shared Secret Key Pair.
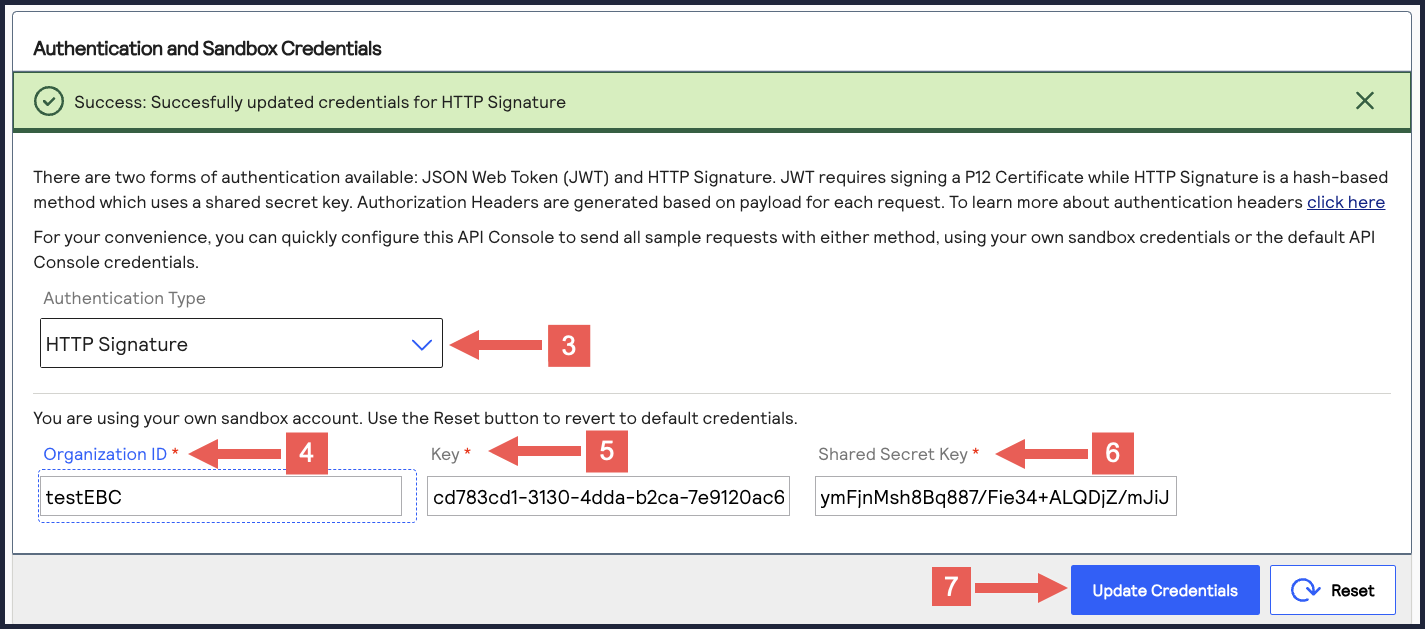
Test Your Shared Secret Key Pair
After creating your key certificate, you must verify that your key can successfully
process API requests. Follow these steps to validate your key certificate in the
Developer Center and the
Business Center
.- Go to the Developer Center's API Reference page:
- On the left navigation panel, click .
- Under Authentication and Sandbox Credentials, go to the Authentication Type drop-down menu and chooseHTTP Signature.
- Enter your organization ID in theOrganization IDfield.
- Enter your key, also known as your private key, in theKeyfield.
- Enter your secret key, also known as your public key, in theShared Secret Keyfield.
- ClickUpdate Credentials.
- ClickSend.
A message confirms that your request was successful with the status code 201.
- Log in to theBusiness Center:
- On the left navigation panel, choose
Transaction Management > Transactions.
- Under Search Results, verify that the request ID from the test authorization response is listed in the Request ID column.If the test authorization was successful, a success message is present in the corresponding Applications column.
Construct Messages Using JSON Web Tokens
IMPORTANT
As of
February 2026
, there are new requirements for
constructing a JWT. This section explains how to update your system to remain in
compliance. By September 2026
, all merchants using HTTP signature messaging must
migrate to JSON Web Token (JWT) messaging in order to support message-level encryption
(MLE).This figure shows the steps required for using JSON Web Tokens (JWTs) to construct messages.
Each step is described in the following subsections.
Create or Submit a REST—API Response MLE Key
- Log in to theBusiness Center:
- On the left navigation panel, choose
Payment Configuration > Key Management.
- Click+ Generate keyon the Key Management page.
- Under REST APIs, chooseREST – API Response MLE, and then clickGenerate key.
- Choose one of these options to download your key:
- To create a new API response MLE certificate, clickDownload key
.
- To upload your own certificate, enter your public PEM-formatted certificate in the text box, and then clickDownload key
. The
.pemfile downloads to your desktop. If prompted by your system, approve the location to which the file downloads.
- If you are creating a certificate, the Set a Password window appears. Create a password for the certificate by entering the password into theNew PasswordandConfirm Passwordfields, and then clickGenerate key.The.p12file downloads to your desktop. If prompted by your system, approve the location to which the key downloads.
To create or upload another key, clickGenerate another key. To view all of your created keys, go to the Key Management page.IMPORTANTSecurely store the.p12file and password in your system. These credentials are required in order to implement certain products, and you must be able to access them.
- Find the REST–API Response key that you created in the Search Results table and save its key ID.The key ID is needed to test and configure your system to use MLE.
- Test Your REST–API Response MLE Key
- To test your REST–API Response key, see Test Your REST—API Response MLE Key.
Overview of MLE Setup Tasks
Use the information in this section to configure your system with a custom MLE using
JWTs.
If you do not want to set up a custom MLE, you can use the REST Client SDK instead. For
more information, see the REST Client SDKs in GitHub.
Figure:
Overview of MLE Set-Up Tasks

- Import the required programming libraries for your system.
- Import these three credentials:
- Shared secret key pair (REST API key)
- MLE request certificate (SJC public certificate)
- MLE response certificate (REST – API Response MLE)
- Encrypt the JSON request message using a JSON Web Encryption (JWE) that uses the SJC public certificate.
- Create the HTTP body in this format:{"encryptedRequest": ".JWE-with-SJC"}
- Create the JSON Web Signature (JWS) payload with these JWT payload fields and your signing certificate's private key. For descriptions of these fields, see the Headers table and Message Body Fields table in Construct Messages Using JSON Web Tokens.
- Header Fields
- alg
- kid
- type
- Message Body Fields
- digestAlgorithm
- digestof the HTTP body
- exp
- iat
- iss
- jti
- request-host
- request-method
- request-resource-path
- v-c-jwt-version
- v-c-merchant-id
- v-c-response-mle-kidfrom the MLE response certificate.
- Sign the JWS with your private key from the shared secret key pair and send it asAuthorization: Bearer.
- Receive an encrypted response and decrypt it with the MLE private key. You will receive the response in this format:{"encryptedResponse": "JWE-with-ResponseMLECertificate"}The JWE contains a JOSE header containing these four default elements:"alg": "RSA-OAEP-256", // The algorithm used to encrypt the CEK. "enc": "A256GCM", // The algorithm used to encrypt the message. "iat": "1702493653", // The current timestamp in milliseconds. "kid": "keyId" // The serial number of thev-c-api-response-mle-kidfrom the authentication JWS in step 5.
Test Your REST–API Response Key
- On the left navigation panel, choose an API that supports MLE. For testing purposes, you can chooseIntelligent Commerce > Intelligent Commerce Product > Enroll a Card.MLE support is indicated byRequest MLEandResponse MLEat the top of the screen.
- In the Message Level Encryption Credentials section, enter your API response MLE key credentials:
- Response encryption:Enter the key ID of your API response MLE key.You saved this key ID in Step 10 in the Create or Submit an API Response MLE Key section in Enable Message-Level Encryption.
- Response decryption:ClickBrowseto submit your own private decryption key from your local system. Only.p12files are supported.
- ClickSend.
- When aSuccess: HTTP Status Code: 201message displays in the Response section, your API response key is properly configured.
Set Up an HTTP Signature Message [DEPRECATING]
To set up HTTP signature messaging, you must complete the tasks described in this
section.
WARNING
By
September 2026
, all merchants using HTTP signature
messaging must migrate to JSON Web Token (JWT) messaging in order to support
message-level encryption (MLE). You risk transaction failures if you do not
implement this update. If you are setting up your system to be REST-compliant for
the first time, Visa Acceptance Solutions
recommends using JWT messaging.To
update your system to support JWT messaging, use one of these methods:
Figure:
Set Up HTTP Signature Messaging

- Sign up for a test account. See Sign Up for a Sandbox Account.
- Create a shared secret key. See Create a Shared Secret Key Pair.
- Construct a message using HTTP signature security. See Construct Messages Using HTTP Signature Security.
- Go live by transitioning your sandbox account into a production account. Going Live.
Sign Up for a Sandbox Account
To begin setting up your account, you must first sign up for a sandbox account. A sandbox
account enables you to obtain your security keys and test your implementation.
IMPORTANT
A sandbox account cannot process live payments and is intended
only for testing.
Follow these steps to sign up
for a sandbox account:
- Go to theVisa Acceptance SolutionsDeveloper Center sandbox account sign-up page:
- Enter your information into the sandbox account form, and clickCreate Account.
- Go to your email and find a message titled:Merchant Registration Details. ClickSet up your username and password now.Your browser opens the New User Sign Up wizard.
- Enter the organization ID and contact email you supplied when you created your account. Follow the wizard pages to add your name, a username, and a password. Your username and password must meet these requirements:Username and Password RequirementsUsername RequirementsPassword Requirements
- Length must be 3-36 characters.
- Can only contain letters, numbers, periods, dashes, or underscores.
- Length must be 12–50 characters.
- Must contain one upper case letter.
- Must contain one lower case letter.
- Must contain one number.
- Cannot contain the username or organization ID.
- Log in to theBusiness Center.When you log in for the first time, you must verify your identity through a system-generated email sent to your email account.
- Check your email for a message titled:. A passcode is included in the message.Visa Acceptance SolutionsIdentification Code
- Enter the passcode on theVerify your Identitypage.You are directed to theBusiness Centerhome page.You have successfully signed up for a sandbox account.IMPORTANTA sandbox account cannot process live payments. After you verify that your system can send and receive REST messages, you can contact customer service to transition your sandbox account to a production account.
Create a Shared Secret Key Pair
You must create a shared secret key pair to use HTTP signature message security. How you create
your shared secret key pair is determined by your
Visa Acceptance Solutions
account
type.Transacting merchant account users can create their own unique shared secret key.
Portfolio and merchant account users must create a
meta key
of a shared secret
key. Meta keys enable an organization administrator to create a single shared secret
key. That key is assigned to some or all transacting merchants in their organization.
The purpose of a meta key is to reduce the time needed to manage an organization's keys.
For example, by assigning the same meta key to all of your transacting merchants, you
need to update only one key when it expires instead of having to update each transacting
merchant's key when it expires.For more information about meta keys, see the Meta Key Creation and
Management section in the
Creating and Using Security Keys User
Guide
.Figure:
Account Type Overview
- Portfolio
- A portfolio account represents the partner user. This account type can create and manage merchant accounts in the test and production environments. To create a shared secret meta-key as a portfolio user, see Portfolio User: Create a Meta Key.
- Merchant
- A merchant account represents the merchant user. This account type can create and manage multiple transacting merchant accounts within their organization. To create a shared secret meta-key as a merchant user, see Merchant Account User: Create a Meta Key.
- Transacting Merchant
- A transacting merchant represents the merchant user who is processing transactions. This account type is typically the account that sends API requests. To create a shared secret key pair as a transacting merchant, see Creating a Shared Secret Key Pair.
Creating a Shared Secret Key Pair
Follow these steps to create a shared secret key pair:
IMPORTANT
Only
transacting merchant account users can complete this task.
- Log in to theBusiness Center:
- On the left navigation panel, choose
Payment Configuration > Key Management.
- Click+ Generate keyon the Key Management page.
- Under REST APIs, chooseREST – Shared Secretand then clickGenerate key.
The REST API Shared Secret Key page appears.
- ClickDownload key
.The.pemfile downloads to your desktop.
To create or upload another key, click
Generate another key
. To view all of
your created keys, go to the Key Management page.IMPORTANT
Securely store the key credentials and
.pem
file in your
system. These credentials are required in order to implement certain products, and
you must be able to access them.- What to do next
- To test your shared secret key pair, see Test Your Shared Secret Key Pair.
Merchant Account User: Create a Meta Key
This section describes how to create a meta key as a merchant account user in the
Business Center
. IMPORTANT
Only merchant account users can complete this task.
IMPORTANT
If you would like to create meta keys using the API,
contact your support team for more
information.
Follow these steps to create a meta key for a shared secret key pair:
- Log in to theBusiness Center:
- On the left navigation panel, choose
Payment Configuration > Key Management.If you are using a portfolio account to create a meta key for one of your merchant accounts, you can switch to a merchant account by clickingSwitch merchant.
The Quick Merchant Switch page appears.Choose the merchant account ID that you want to switch to, and clickSwitch.
- In theMerchant IDsearch filter, choose your merchant account ID.If you logged in from a portfolio user account or the account (_acct) level, verify that the merchant ID you choose does not contain_acctin the ID name.
- Click+ Generate key.The Create Key page appears.
- ChooseREST – Shared Secretand clickGenerate key.
The Key options window appears.
- Check theCreate as a Meta-Keybox and clickContinue.
- Choose one of these options to assign the key:
- To assign this key to all accounts in the current portfolio, chooseAll current and future Merchant IDs, clickCreate key, and continue to the Create Key page. All future merchant IDs will be automatically assigned this key. You are done and do not need to proceed with the following steps.
- To assign this key to a specific merchant or group of merchants, chooseCustom Merchant ID selectionand then clickCreate key. This key is not automatically assigned to any future merchants. Proceed to the following steps.
- Click+ Add custom merchant ids. The Add Custom Merchant IDs page appears.By default, all merchant IDs are shown in the Merchant IDs table. To limit the list to a subset of merchant IDs, click+ Add filter, choose a search filter from the drop-down menu, and clickSearch.
- Check one or more transacting MID account boxes, and clickSubmit.The Key Generation page opens.
- ClickCreate key.Continue to the Create Key page to view your new key.You can also generate a new key by clicking+ Generate Keyagain.
AFTER COMPLETING THE TASK
To test your shared secret key pair, see Test Your Shared Secret Key Pair.
Portfolio User: Create a Meta Key
This section describes how to create a meta key as a portfolio user in the
Business Center
. IMPORTANT
Only portfolio account users can complete
this task.
IMPORTANT
If you would like to create meta keys using the API,
contact your support team for more
information.
Follow these steps to create a meta key for a shared secret key
pair:
- Log in to theBusiness Center:
- On the left navigation panel, choose
Payment Configuration > Key Management.
- In theMerchant Idfield, choose your portfolio ID if it is not already chosen by default.
- Click+ Generate key.The Create Key page appears.
- ChooseREST – Shared Secretand clickGenerate key.
The Key options page appears.
- Check theCreate as a Meta-Keybox and clickContinue.
- Choose one of these options to assign the key:
- To assign this key to all accounts in the current portfolio, chooseAll current and future Merchant IDs, clickCreate key, and continue to the Create Key page. All future merchant IDs will be automatically assigned this key. You are done and do not need to proceed with the following steps.
- To assign this key to a specific merchant or group of merchants, chooseCustom Merchant ID selectionand then clickCreate key. This key is not automatically assigned to any future merchants. Proceed to the following steps.
- Click+ Add custom merchant ids. The Add Custom Merchant IDs page appears.By default, all merchant IDs are shown in the Merchant IDs table. To limit the list to a subset of merchant IDs, click+ Add filter, choose a search filter from the drop-down menu, and clickSearch.
- Check one or more transacting MID account boxes, and clickSubmit.The Key Generation page opens.
- ClickCreate key.Continue to the Create Key page to view your new key.You can also generate a new key by clicking+ Generate Keyagain.
AFTER COMPLETING THE TASK
To test your shared secret key pair, see Test Your Shared Secret Key Pair.
Test Your Shared Secret Key Pair
After creating your key certificate, you must verify that your key can successfully
process API requests. Follow these steps to validate your key certificate in the
Developer Center and the
Business Center
.- Go to the Developer Center's API Reference page:
- On the left navigation panel, click .
- Under Authentication and Sandbox Credentials, go to the Authentication Type drop-down menu and chooseHTTP Signature.
- Enter your organization ID in theOrganization IDfield.
- Enter your key, also known as your private key, in theKeyfield.
- Enter your secret key, also known as your public key, in theShared Secret Keyfield.
- ClickUpdate Credentials.
- Go to the Developer Center's API Reference and navigate toPayments >.POSTProcess a Payment
- ClickSend.
A message confirms that your request was successful with the status code 201.
- Log in to theBusiness Center:
- On the left navigation panel, choose
Transaction Management > Transactions.
- Under Search Results, verify that the request ID from the test authorization response is listed in the Request ID column.If the test authorization was successful, a success message is present in the corresponding Applications column.
Construct Messages Using HTTP Signature Security
HTTP signatures use a digital signature to enable the receiver to validate the sender's
authenticity and ensure that the message was not tampered with during transit. For more
information about HTTP signatures, see the IETF Draft that is maintained by the IETF HTTP
Working Group.
Follow these steps to create messages using HTTP signatures:

HTTP Message Elements
An HTTP message is constructed using HTTP headers and an HTTP message body.
- HTTP Message Headers
- Your message header must include these HTTP header fields:HTTP Header FieldsHTTP Header FieldDescriptioncontent-typeAlso known as the Multipurpose Internet Mail Extension (MIME) type, it is the identifier of the media or file type resource. You can set the value to:application/jsonhostThe transaction endpoint (api.visaacceptance.com).v-c-dateThe date of the transaction in the RFC1123 format. Example:Thu, 18 Jul 2019 00:18:03 GMTv-c-merchant-idYourVisa Acceptance Solutionstransacting merchant ID (MID).If you are a portfolio or merchant account user, set this to the transacting merchant ID you send requests on behalf of.digestA hash of the HTTP message body that contains your API request.The digest field does not apply toGETAPI requests.signatureThe digital signature, which is constructed using the values of the other headers and secured by your private key.
- HTTP Message Body
- Your API request.
Step 1: Set Known HTTP Header Values
Set these HTTP header values, which do not require calculation:
- content-type
- Set to the media or file type resource.
- host
- Set to the transaction endpoint.
- v-c-date
- Set to the transaction date in RFC1123 format.
- v-c-merchant-id
- Set to a transacting merchant ID.
Step 2: Digest Hash Calculation
The value of the
digest
HTTP header is a hashed version of the HTTP message
body that you must calculate. This hash value validates the integrity of your
message by the receiver.Follow these steps to calculate the digest hash:
- Generate the SHA-256 hash of the JSON payload (message body).
- Encode the hashed string to Base64.
- PrependSHA-256=to the front of the hash.
- Add the message body hash to thedigestHTTP header field.
Creating a Message Hash Using the Command Line
shasum
Toolecho -n "{"clientReferenceInformation":{"code":"TC50171_3"},"paymentInformation":{"card":{"number": "4111111111111111","expirationMonth":"12","expirationYear":"2031"}},"orderInformation":{"amountDetails": {"totalAmount":"102.21","currency":"USD"},"billTo”:{“firstName":"John","lastName":"Doe","address1": "1MarketSt","locality":"sanfrancisco","administrativeArea":"CA","postalCode":"94105","country":"US", "email":"","phoneNumber":"4158880000"}}}" | shasum -a 256
echo -n "6ae5459bc8a7d6a4b203e8a734d6a616725134088e13261f5bbcefc1424fc956" | base64
Creating a Message Hash Using the Command Line
base64
Toolecho -n "6ae5459bc8a7d6a4b203e8a734d6a616725134088e13261f5bbcefc1424fc956" | base64
Creating a Message Hash Using C#
public static string GenerateDigest() {
				var digest = "";
				var bodyText = "{ your JSON payload }";
				using (var sha256hash = SHA256.Create()) {
				byte[] payloadBytes = sha256hash
				.ComputeHash(Encoding.UTF8.GetBytes(bodyText));
				digest = Convert.ToBase64String(payloadBytes);
				digest = "SHA-256=" + digest;
				}
				return digest;
				}
Creating a Message Using Java
public static String GenerateDigest() throws NoSuchAlgorithmException {
				String bodyText = "{ your JSON payload }";
				MessageDigest md = MessageDigest.getInstance("SHA-256");
				md.update(bodyText.getBytes(StandardCharsets.UTF_8));
				byte[] digest = md.digest();
				return "SHA-256=" + Base64.getEncoder().encodeToString(digest);
				}
Step 3: Signature Hash Calculation
Before you can construct the
signature
HTTP header value, you must first
generate the signature hash
. To generate the signature hash value, you must use a
Base64-encoded HMAC SHA-256 hash of the signature fields and their values. This table describes the signature field values that you must use to calculate the signature
hash.
Signature Field | Description |
|---|---|
v-c-date | From the header, the date and time in the RFC1123 format. For example: Date: Thu, 18 Jul 2023,
22:18:03. |
Digest | The Base64-encoded SHA-256 hash of the message body. For more
information, see Step 2: Digest Hash Calculation. Example: Digest:
SHA-256=gXWufV4Zc7VkN9Wkv9jh/JuAVclqDusx3vkyo3uJFWU= Do not include the digest with GET requests. |
Host | From the header, the endpoint host. For example: apitest.visaacceptance.com |
v-c-merchant-id | From the header, the merchant ID associated with the request. For example: v-c-merchant-id: mymerchantid . |
request-target | The HTTP method and endpoint resource path. For example: request-target: post /pts/v2/payments .IMPORTANT
Verify that your request-target values match exactly the resource
path. For example, /pts/v2/payments is not
the same as
/pts/v2/payments ./ |
Follow these steps to generate the signature hash value:
- Generate a byte array of the secret key generated previously. For more information, see Create a Shared Secret Key Pair.
- Generate the HMAC SHA-256 key object using the byte array of the secret key.
- Concatenate a string of the required information listed above.For more information, see Creating the Validation String below.
- Generate a byte array of the validation string.
- Use the HMAC SHA-256 key object to create the HMAC SHA-256 hash of the validation string byte array.
- Base64-encode the HMAC SHA-256 hash.
Signature Hash
signature=”OuKeDxj+Mg2Bh9cBnZ/25IXJs5n+qj93FvPKYpnqtTE=”
Creating the Validation String
To create the validation string, concatenate the required information in the same order as listed in the signature header field parameter. Each
item must be on a separate line, and each line should be terminated with a new line character
\n
.Validation String Example
host:apitest.visaacceptance.com\n date: Thu, 18 Jul 2019 00:18:03 GMT\n request-target: post /pts/v2/payments/\n digest: SHA-256=gXWufV4Zc7VkN9Wkv9jh/JuAVclqDusx3vkyo3uJFWU=\n v-c-merchant-id: mymerchantid
Generating a Signature Hash in C#
private static string GenerateSignatureFromParams(string signatureParams, string secretKey) {
var sigBytes = Encoding.UTF8.GetBytes(signatureParams);
var decodedSecret = Convert.FromBase64String(secretKey);
var hmacSha256 = new HMACSHA256(decodedSecret);
var messageHash = hmacSha256.ComputeHash(sigBytes);
return Convert.ToBase64String(messageHash);
}
Generating a Signature Hash in Java
public static String GenerateSignatureFromParams(String keyString,
String signatureParams) throws InvalidKeyException, NoSuchAlgorithmException {
byte[] decodedKey = Base64.getDecoder().decode(keyString);
SecretKey originalKey = new SecretKeySpec(decodedKey, 0, decodedKey.length, "HmacSHA256");
Mac hmacSha256 = Mac.getInstance("HmacSHA256");
hmacSha256.init(originalKey);
hmacSha256.update(signatureParams.getBytes());
byte[] HmachSha256DigestBytes = hmacSha256.doFinal();
return Base64.getEncoder().encodeToString(HmachSha256DigestBytes);}
Step 4: Constructing the Signature Header
After you generate a signature hash, you can construct the
signature
HTTP header value.The
signature
HTTP header value is constructed using these
parameters:Signature Parameter | Description |
|---|---|
keyid | The serial number of the signing certificate/key pair. Obtain
this in the Business Center Key Management area. For more
information, see Creating a Shared Secret Key Pair. |
algorithm | The HMAC SHA256 algorithm used to encrypt the signature. It
should be formatted: HmacSHA256 . |
headers | The signed-header values calculated in the signature:
IMPORTANT
If you are using a meta-key, set the
v-c-merchant-id signature-parameter
value to the meta-key creator's ID. Then set the
v-c-merchant-id HTTP header value to
the transacting merchant ID (MID) that you are sending a
request on-behalf of. |
signature | The signature hash. |

- Signature Field Format
- Signature:"keyid:"[keyid]",algorithm="[encryption algoritm]",headers="field1" "field2" "field3" "etc.", signature="[signature hash]"
- Signature Example
- Signature:"keyid="123abcki-key1-key2-key3-keyid1234567", algorithm="HmacSHA256", headers="host date request-target digest v-c-merchant-id", signature="hrptKYTtn/VfwAdUqkrQ0HT7jqAbagAbFC6nRGXrNzE="
Step 5: Complete Message with HTTP Signature
Combine all of the HTTP header values with your HTTP message body to construct your HTTP
signature message.
To test your message, you can send a test request to
Visa Acceptance Solutions
. For
more information, see Test Your Setup.Test Your Setup
You can send a test API request to validate that your account, API key, HTTP headers, and
HTTP message body are working as intended.
Visa Acceptance Solutions
Visa Acceptance Platform
recommends that you test and verify that your
payment system can securely send and receive REST API messages before transitioning to a
production account.Postman Testing
You can use Postman to verify your HTTP signature message. To download a Postman
collection of basic payment API requests, see the REST API collection on the Postman
website.
When testing an API outside of the Developer Center's API Reference sandbox, send
your test API requests to the test server:
https://apitest.visaacceptance.com
For example, to test an authorization request, you can send the request to this
endpoint:
https://apitest.visaacceptance.com
/pts/v2/paymentsGoing Live
When you are ready to process payments in a live environment, you must
transition your account to the live status with a valid configuration for your chosen
payment processor. When your account is live, your transaction data flows through the
production
Visa Acceptance Solutions
gateway, to your processor, and on to the
appropriate payment network.To transition your account:
- Sign up for a merchant account.
- Contact Sales to establish a contract withVisa Acceptance Solutionsthat enables you to process real transactions and receive support.
- Submit a merchant ID (MID) activation request.
It can take up to three business days for the MID to become active.
Create a Merchant ID
The merchant ID (MID) identifies you and your transactions, which requires
you to include it in each transaction request. When you signed up for a sandbox account,
you received a merchant ID for testing purposes. If you choose, you can use that
merchant ID as your production ID.
Follow these steps to sign up for a merchant account in order to create a production MID:
- Go to theBusiness CenterSandbox Account Sign Up page, enter the required information, and clickCreate Account.Choose your merchant ID name. It cannot be changed. This name is not visible to your customers.
- Review your information entered, especially your business email address. Your merchant ID registration information will be sent to the email entered on this form.
- Look for an email from customer support titled:.Visa Acceptance SolutionsMerchant Evaluation AccountThis email contains your organization ID and contact email associated with your MID.
- Look for an email titled:Merchant Registration Details. Click theSet up your username and password nowlink.Your browser opens the New User Sign Up wizard.
- Enter the organization ID and contact email you supplied previously. Follow the wizard pages to add your name, a username, and password.
- Log in to theBusiness Center.When you log in for the first time, you will be asked to identify yourself through a system-generated email that is sent to your email account.
- Look for an email titled:. Save the passcode in the email.Visa Acceptance SolutionsIdentification Code
- Enter the passcode on the Verify your Identity page. You are directed to theBusiness Centerhome page.
You have successfully created a merchant ID and merchant account.
Activate Your Merchant ID
The activation process, also known as
going live
, transitions your
MID and account from test status to live status, enabling you to process real
transactions in production. It can take up to three business days for the MID to become
active.To transition your account, complete these steps:
- Sign in to thesupport centeras an administrator.
- Enter your credentials and log in to your test environment. The organization ID is your MID.
- In theBusiness Center, go toSupport Cases > MID Configuration Request. The MID Configuration Request page should be open.
- ClickMID Activation.
- In theDescriptionfield, enter the merchant ID that you want to take live.
- Choose a processor configuration, and enter the name of your processor.If you are unsure of the processor name, contact your merchant service provider or your merchant acquiring bank.
- Choose the environments to which this change applies (test or production).
- ClickService Enablementand list the products and services that you intend to use.
- ClickSubmit.
Production Endpoints
Send API requests using your production account to the production server:
https://api.visaacceptance.com
For example, send a live authorization request to this endpoint:
https://api.visaacceptance.com
/pts/v2/paymentsVISA Platform Connect: Specifications and Conditions for
Resellers/Partners
The following are specifications and conditions that apply to a Reseller/Partner enabling
its merchants through
Visa Acceptance platform
. Failure to meet any of the specifications and conditions below is
subject to the liability provisions and indemnification obligations under
Reseller/Partner’s contract with Visa/Cybersource.- Before boarding merchants for payment processing on a VPC acquirer’s connection, Reseller/Partner and the VPC acquirer must have a contract or other legal agreement that permits Reseller/Partner to enable its merchants to process payments with the acquirer through the dedicated VPC connection and/or traditional connection with such VPC acquirer.
- Reseller/Partner is responsible for boarding and enabling its merchants in accordance with the terms of the contract or other legal agreement with the relevant VPC acquirer.
- Reseller/Partner acknowledges and agrees that all considerations and fees associated with chargebacks, interchange downgrades, settlement issues, funding delays, and other processing related activities are strictly between Reseller and the relevant VPC acquirer.
- Reseller/Partner acknowledges and agrees that the relevant VPC acquirer is responsible for payment processing issues, including but not limited to, transaction declines by network/issuer, decline rates, and interchange qualification, as may be agreed to or outlined in the contract or other legal agreement between Reseller/Partner and such VPC acquirer.
DISCLAIMER: NEITHER VISA NOR CYBERSOURCE WILL BE RESPONSIBLE OR LIABLE FOR ANY ERRORS OR
OMISSIONS BY THE
Visa Platform Connect
ACQUIRER IN PROCESSING TRANSACTIONS. NEITHER VISA
NOR CYBERSOURCE WILL BE RESPONSIBLE OR LIABLE FOR RESELLER/PARTNER BOARDING MERCHANTS OR
ENABLING MERCHANT PROCESSING IN VIOLATION OF THE TERMS AND CONDITIONS IMPOSED BY THE
RELEVANT Visa Platform Connect
ACQUIRER.